D-Link DFL-200 Product Manual - Page 63
Restoring system settings to factory defaults, Step 1, Tools, Reset, Reset to Factory, Defaults - firmware upgrade
 |
UPC - 790069268823
View all D-Link DFL-200 manuals
Add to My Manuals
Save this manual to your list of manuals |
Page 63 highlights
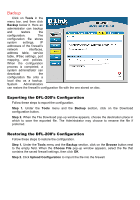
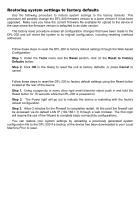
Restoring system settings to factory defaults Use the following procedure to restore system settings to the factory defaults. This procedure will possibly change the DFL-200 firmware version to a lower version if it has been upgraded. Make sure you have the current firmware file available for upload to the device in the case where the firmware version is defaulted to an older version. The factory reset procedure erases all configuration changes that have been made to the DFL-200 and will revert the system to its original configuration, including resetting interface addresses. Follow these steps to reset the DFL-200 to factory default settings through the Web-based Configuration: Step 1. Under the Tools menu and the Reset section, click on the Reset to Factory Defaults button. Step 2. Click OK in the dialog to reset the unit to factory defaults, or press Cancel to cancel. Follow these steps to reset the DFL-200 to factory default settings using the Reset button located at the rear of the device: Step 1. Using a paperclip or some other rigid small diameter object push in and hold the Reset button for 15 seconds while the DFL-200 is powered on. Step 2. The Power light will go out to indicate the device is restarting with the factory default configuration. Step 3. Allow 2 minutes for the Firewall to completely restart. At this point the firewall can be accessed via its default LAN IP (192.168.1.1) through a web browser. The first login will require the use of the Wizard to complete basic connectivity configurations. You can restore your system settings by uploading a previously generated system configuration file to the DFL-200 if a backup of the device has been downloaded to your Local Machine Prior to reset.
-
 1
1 -
2
-
3
-
4
-
5
-
6
-
7
-
8
-
9
-
10
-
11
-
12
-
13
-
14
-
15
-
16
-
17
-
18
-
19
-
20
-
21
-
22
-
23
-
24
-
25
-
26
-
27
-
28
-
29
-
30
-
31
-
32
-
33
-
34
-
35
-
36
-
37
-
38
-
39
-
40
-
41
-
42
-
43
-
44
-
45
-
46
-
47
-
48
-
49
-
50
-
51
-
52
-
53
-
54
-
55
-
56
-
57
-
 58
58 -
 59
59 -
 60
60 -
 61
61 -
 62
62 -
 63
63 -
 64
64 -
 65
65 -
 66
66 -
 67
67 -
 68
68 -
69
-
70
-
71
-
72
-
73
-
74
-
75
-
76
-
77
-
78
-
79
-
80
-
81
-
82
-
83
-
84
-
85
-
86
-
87
-
88
-
89
-
90
-
91
-
92
-
93
-
94
-
95
-
96
-
97
-
98
-
99
-
100
-
101
-
102
-
103
-
104
-
105
-
106
-
107
-
108
-
109
-
110
-
111
-
112
-
113
-
114
-
115
-
116
-
117
-
118
-
119
-
120
-
121
-
122
-
123
-
124
-
125
-
126
-
127
-
128
-
129
-
130
-
131
-
132
 |
 |
