D-Link G604T Product Manual - Page 38
PPPoE and PPPoA Connection for WAN - dsl password
 |
UPC - 790069265662
View all D-Link G604T manuals
Add to My Manuals
Save this manual to your list of manuals |
Page 38 highlights
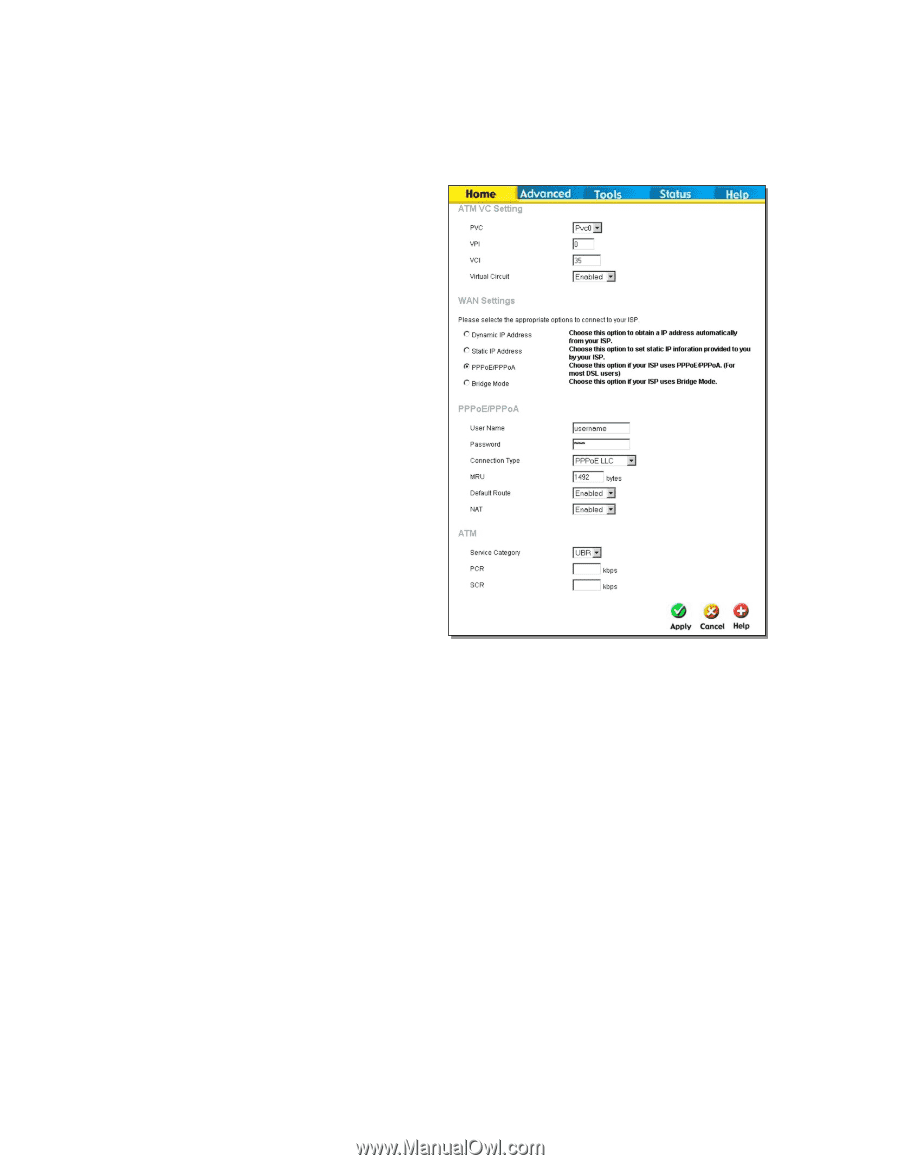
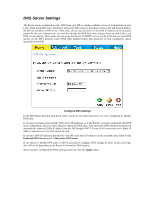
PPPoE and PPPoA Connection for WAN Follow the instructions below to configure the Router to use a PPPoE or PPPoA for the Internet connection. Make sure you have all the necessary information before you configure the WAN connection. 6. Click to select the PPPoE/PPPoA radio button in the WAN Settings options list. This is selected by default if you are configuring the Router for the first time. If it is not selected, click the PPPoE/PPPoA radio button located under the WAN Settings heading. 7. The ATM VC Settings at the top of the menu should not be changed unless you have been instructed to change them. However, if you are instructed to change the VPI or VCI values, type in the values assigned for your account. Leave the PVC and Virtual Circuit settings at their default (Pcv0 and Enabled) values for now. These can be used later if you are configuring multiple virtual circuits for your ADSL service. 8. Under the PPPoE/PPPoA heading, type the User Name and Password used for your ADSL account. A typical User Name will be in the form [email protected], the Password may be assigned to you by your ISP or you may have selected it when you set up the account with your ISP. 9. Choose the Connection Type from the pulldown menu located under the User Name and Password entry fields. This defines both the connection protocol and encapsulation method used for your ADSL service. The available options are PPPoA VC-MUX, PPPoA LLC and PPPoE LLC. If have not been provided specific information for the Connection Type setting, leave the default setting. 10. Leave the MRU value at the default setting (default = 1492) unless you have been instructed to change this. 11. If you are instructed to use enable Default Route, this setting specifies that the Router be used to define the default route to the Internet for your LAN. Whenever a computer on the LAN attempts to access the Internet, the Router becomes the Internet gateway to the computer. 12. Set NAT to Enabled unless you have been told to NAT must be Disabled for your account. 13. If you have not been instructed to change the ATM settings at the bottom of the menu, leave these at the default settings. If you have been given new settings to configure, select the Service Category and type in the values for PCR and SCR in Kbps. 14. When you are satisfied that all the WAN settings are configured correctly, click on the Apply button. The new settings must be saved and the Router must be restarted for the settings to go into effect. To Save & Reboot the Router, click on the Tools directory tab and then click the Admin menu button. In the Administrator Settings menu, click the Reboot button under Force the DSL-G604T to system restart. The Router will save the new settings and restart. Upon restarting the Router will automatically establish a connection to the Internet.
-
 1
1 -
2
-
3
-
4
-
5
-
6
-
7
-
8
-
9
-
10
-
11
-
12
-
13
-
14
-
15
-
16
-
17
-
18
-
19
-
20
-
21
-
22
-
23
-
24
-
25
-
26
-
27
-
28
-
29
-
30
-
31
-
32
-
 33
33 -
 34
34 -
 35
35 -
 36
36 -
 37
37 -
 38
38 -
 39
39 -
 40
40 -
 41
41 -
 42
42 -
 43
43 -
44
-
45
-
46
-
47
-
48
-
49
-
50
-
51
-
52
-
53
-
54
-
55
-
56
-
57
-
58
-
59
-
60
-
61
-
62
-
63
-
64
-
65
-
66
-
67
-
68
-
69
-
70
-
71
-
72
-
73
-
74
-
75
-
76
-
77
-
78
-
79
 |
 |