D-Link G604T Product Manual - Page 73
BIP Address Setup - dsl user manual
 |
UPC - 790069265662
View all D-Link G604T manuals
Add to My Manuals
Save this manual to your list of manuals |
Page 73 highlights
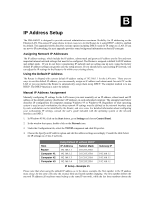
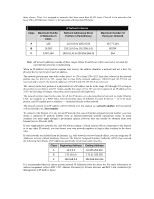
B IP Address Setup The DSL-G604T is designed to provide network administrators maximum flexibility for IP addressing on the Ethernet LAN. The easiest IP setup choice in most cases is to let the Router do it using DHCP, which is enabled by default. This appendix briefly describes various options including DHCP, used for IP setup on a LAN. If you are new to IP networking, the next appendix provides some background information on basic IP concepts. Assigning Network IP Addresses The IP address settings, which include the IP address, subnet mask and gateway IP address are the first and most important internal network settings that need to be configured. The Router is assigned a default LAN IP address and subnet mask. If you do not have a preexisting IP network and are setting one up now, using the factory default IP address settings can greatly ease the setup process. If you already have a preexisting IP network, you can adjust the IP settings for the Router to fit within your existing scheme. Using the Default IP Address The Router is shipped with a preset default IP address setting of 192.168.1.1 for the LAN port. There are two ways to use this default IP address, you can manually assign an IP address and subnet mask for each PC on the LAN or you can instruct the Router to automatically assign them using DHCP. The simplest method is to use DHCP. The DHCP function is active by default. Manual IP Address Assignment Manually configuring IP settings for the LAN means you must manually set an IP address, subnet mask and IP address of the default gateway (the Router's IP address) on each networked computer. The example listed below describes IP configuration for computers running Windows 95 or Windows 98. Regardless of what operating system is used on each workstation, the three network IP settings must be defined so the network interface used by each workstation can be identified by the Router, and vice versa. For detailed information about configuring your workstations IP settings, consult the user's guide included with the operating system or the network interface card (NIC). 1. In Windows 95/98, click on the Start button, go to Settings and choose Control Panel. 2. In the window that opens, double-click on the Network icon. 3. Under the Configuration tab, select the TCP/IP component and click Properties. 4. Choose the Specify an IP address option and edit the address settings accordingly. Consult the table below for IP settings on a Class C network. Host Router Computer #1 Computer #2 Computer #3 Using Default IP without DHCP IP Address Subnet Mask 192.168.1.1 255.255.255.0 192.168.1.2 255.255.255.0 192.168.1.3 255.255.255.0 192.168.1.4 255.255.255.0 Gateway IP 192.168.1.1 192.168.1.1 192.168.1.1 IP Setup - Example #1 Please note that when using the default IP address as in the above example, the first number in the IP address must always be the same with only the second, third and fourth number changing. The first number defines the network IP address (all machines must belong to the same IP network), while the last three numbers denote the
-
 1
1 -
2
-
3
-
4
-
5
-
6
-
7
-
8
-
9
-
10
-
11
-
12
-
13
-
14
-
15
-
16
-
17
-
18
-
19
-
20
-
21
-
22
-
23
-
24
-
25
-
26
-
27
-
28
-
29
-
30
-
31
-
32
-
33
-
34
-
35
-
36
-
37
-
38
-
39
-
40
-
41
-
42
-
43
-
44
-
45
-
46
-
47
-
48
-
49
-
50
-
51
-
52
-
53
-
54
-
55
-
56
-
57
-
58
-
59
-
60
-
61
-
62
-
63
-
64
-
65
-
66
-
67
-
 68
68 -
 69
69 -
 70
70 -
 71
71 -
 72
72 -
 73
73 -
 74
74 -
 75
75 -
 76
76 -
 77
77 -
 78
78 -
79
 |
 |