D-Link G604T Product Manual - Page 49
IP Address, Enabled, Apply
 |
UPC - 790069265662
View all D-Link G604T manuals
Add to My Manuals
Save this manual to your list of manuals |
Page 49 highlights
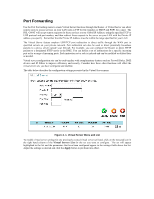
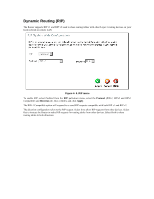
DMZ Since some applications are not compatible with NAT, the Router supports use of a DMZ IP address for a single host on the LAN. This IP address is not protected by NAT and will therefore be visible to agents on the Internet with the right type of software. Keep in mind that any client PC in the DMZ will be exposed to various types of security risks. If you use the DMZ, take measures (such as client-based virus protection) to protect the remaining client PCs on your LAN from possible contamination through the DMZ. Figure 4- 3. DMZ IP address configuration To designate a DMZ IP address, type in the IP Address of the server or device on your LAN, select the Enabled radio button and click the Apply button. To remove DMZ status from the designated IP address, select the Disabled radio button and click Apply. It will be necessary to save the settings and reboot the Router before the DMZ is activated.
-
 1
1 -
2
-
3
-
4
-
5
-
6
-
7
-
8
-
9
-
10
-
11
-
12
-
13
-
14
-
15
-
16
-
17
-
18
-
19
-
20
-
21
-
22
-
23
-
24
-
25
-
26
-
27
-
28
-
29
-
30
-
31
-
32
-
33
-
34
-
35
-
36
-
37
-
38
-
39
-
40
-
41
-
42
-
43
-
 44
44 -
 45
45 -
 46
46 -
 47
47 -
 48
48 -
 49
49 -
 50
50 -
 51
51 -
 52
52 -
 53
53 -
 54
54 -
55
-
56
-
57
-
58
-
59
-
60
-
61
-
62
-
63
-
64
-
65
-
66
-
67
-
68
-
69
-
70
-
71
-
72
-
73
-
74
-
75
-
76
-
77
-
78
-
79
 |
 |
