D-Link G604T Product Manual - Page 41
DHCP Server Settings for the LAN - default gateway
 |
UPC - 790069265662
View all D-Link G604T manuals
Add to My Manuals
Save this manual to your list of manuals |
Page 41 highlights
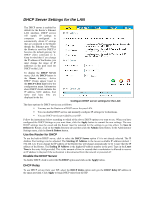
DHCP Server Settings for the LAN The DHCP server is enabled by default for the Router's Ethernet LAN interface. DHCP service will supply IP settings to computers configured to automatically obtain IP settings that are connected to the Router though the Ethernet port. When the Router is used for DHCP it becomes the default gateway for DHCP client connected to it. Keep in mind that if you change the IP address of the Router, you must change the range of IP addresses in the pool used for DHCP on the LAN. To display the DHCP Server menu, click the DHCP button in the Home directory. Active DHCP Clients appear listed in the DHCP Client List below the configuration menu. Information about DHCP clients includes the IP address, MAC address, host name and lease time are displayed in the list. Configure DHCP server settings for the LAN The three options for DHCP service are as follows: You may use the Router as a DHCP server for your LAN. You can disable DHCP service and manually configure IP settings for workstations. You use DHCP service provided by your ISP. Follow the instructions below according to which of the above DHCP options you want to use. When you have configured the DHCP Settings as you want them, click the Apply button to commit the new settings. The new DHCP settings must be saved and the Router must be restarted for the settings to go into effect. To Save & Reboot the Router, click on the Tools directory tab and then click the Admin menu button. In the Administrator Settings menu, click he Save & Reboot button. Use the Router for DHCP To use the built-in DHCP server, click to select the DHCP Server option if it is not already selected. The IP Address Pool settings can be adjusted. The Starting IP Address is the lowest available IP address (default = 192.168.1.2). If you change the IP address of the Router this will change automatically to be 1 more that the IP address of the Router. The Ending IP Address is the highest IP address number in the pool. Type in the Lease Time in the entry field provided. This is the amount of time in seconds that a workstation is allowed to reserve an IP address in the pool if the workstation is disconnected from the network or powered off. Disable the DHCP Server To disable DHCP, click to select the No DHCP option and click on the Apply button. DHCP Relay To use DHCP service from your ISP, select the DHCP Relay option and type the DHCP Relay IP address in the space provided. Click Apply to begin DHCP relay from the ISP.
-
 1
1 -
2
-
3
-
4
-
5
-
6
-
7
-
8
-
9
-
10
-
11
-
12
-
13
-
14
-
15
-
16
-
17
-
18
-
19
-
20
-
21
-
22
-
23
-
24
-
25
-
26
-
27
-
28
-
29
-
30
-
31
-
32
-
33
-
34
-
35
-
 36
36 -
 37
37 -
 38
38 -
 39
39 -
 40
40 -
 41
41 -
 42
42 -
 43
43 -
 44
44 -
 45
45 -
 46
46 -
47
-
48
-
49
-
50
-
51
-
52
-
53
-
54
-
55
-
56
-
57
-
58
-
59
-
60
-
61
-
62
-
63
-
64
-
65
-
66
-
67
-
68
-
69
-
70
-
71
-
72
-
73
-
74
-
75
-
76
-
77
-
78
-
79
 |
 |
