Dell Dimension 2300C Dell Dimension 2300C Owner's Manual - Page 82
Adding Memory
 |
View all Dell Dimension 2300C manuals
Add to My Manuals
Save this manual to your list of manuals |
Page 82 highlights
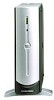
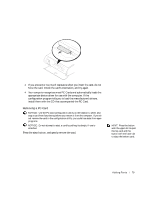
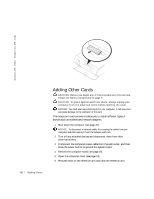
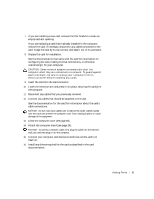
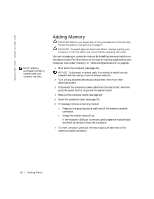
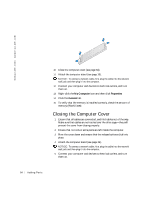
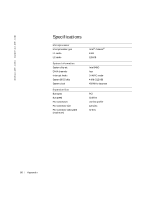
www.jp.dell.com | support.jp.dell.com HINT: Memory purchased from Dell is covered under your computer warranty. Adding Memory CAUTION: Before you begin any of the procedures in this section, follow the safety instructions on page 7. CAUTION: To guard against electrical shock, always unplug your computer from the electrical outlet before opening the cover. You can increase your computer memory by installing memory modules on the system board. For information on the type of memory supported by your computer, look under "Memory" in "Technical Specifications" on page 86. 1 Shut down the computer (see page 31). NOTICE: To disconnect a network cable, first unplug the cable from your computer and then unplug it from the network wall jack. 2 Turn off any attached devices and disconnect them from their electrical outlets. 3 Disconnect the computer power cable from the wall outlet, and then press the power button to ground the system board. 4 Remove the computer stand (see page 19). 5 Open the computer cover (see page 74). 6 If necessary, remove a memory module: a Press out the securing clip at each end of the memory module connector. b Grasp the module and pull up. If the module is difficult to remove, gently ease the module back and forth to remove it from the connector. 7 To insert a module, press out the securing clip at each end of the memory module connector. 82 A d d i n g Pa r ts
-
 1
1 -
2
-
3
-
4
-
5
-
6
-
7
-
8
-
9
-
10
-
11
-
12
-
13
-
14
-
15
-
16
-
17
-
18
-
19
-
20
-
21
-
22
-
23
-
24
-
25
-
26
-
27
-
28
-
29
-
30
-
31
-
32
-
33
-
34
-
35
-
36
-
37
-
38
-
39
-
40
-
41
-
42
-
43
-
44
-
45
-
46
-
47
-
48
-
49
-
50
-
51
-
52
-
53
-
54
-
55
-
56
-
57
-
58
-
59
-
60
-
61
-
62
-
63
-
64
-
65
-
66
-
67
-
68
-
69
-
70
-
71
-
72
-
73
-
74
-
75
-
76
-
 77
77 -
 78
78 -
 79
79 -
 80
80 -
 81
81 -
 82
82 -
 83
83 -
 84
84 -
 85
85 -
 86
86 -
 87
87 -
88
-
89
-
90
-
91
-
92
-
93
-
94
-
95
-
96
-
97
-
98
-
99
-
100
 |
 |