Dell Inspiron Zino HD 400 Inspiron Zino HD Service Manual - Page 21
Before You Begin, Replacing the Drive Bay, Replacing the Optical Drive, Replacing the Top Bracket,
 |
View all Dell Inspiron Zino HD 400 manuals
Add to My Manuals
Save this manual to your list of manuals |
Page 21 highlights
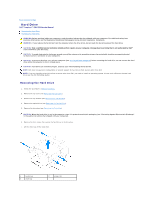
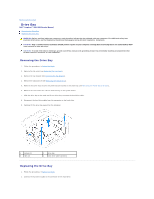
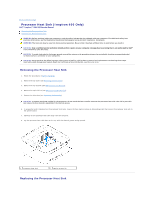
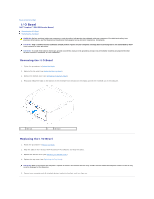
CAUTION: Incorrect alignment of the processor heat sink can cause damage to the system board and processor. NOTE: The original thermal grease can be reused if the original processor and processor heat sink are reinstalled together. If either the processor or the processor heat sink is replaced, use the thermal grease provided in the kit to ensure that thermal conductivity is achieved. 1. Follow the procedures in Before You Begin. 2. Clean the thermal grease from the bottom of the processor heat sink. CAUTION: Ensure that you apply new thermal grease. New thermal grease is critical for ensuring adequate thermal bonding, which is a requirement for optimal processor operation. 3. Apply the new thermal grease to the top of the processor. 4. Align the four captive screws on the processor heat sink with the screw holes on the system board and tighten the screws in ascending order. 5. Replace the drive bay (see Replacing the Drive Bay). 6. Replace the optical drive (see Replacing the Optical Drive). 7. Replace the top bracket (see Replacing the Top Bracket). 8. Replace the top cover (see Replacing the Top Cover). CAUTION: Before turning on the computer, replace all screws and ensure that no stray screws remain inside the computer. Failure to do so may result in damage to the computer. 9. Connect your computer and devices to electrical outlets, and then turn them on. Back to Contents Page
-
 1
1 -
2
-
3
-
4
-
5
-
6
-
7
-
8
-
9
-
10
-
11
-
12
-
13
-
14
-
15
-
 16
16 -
 17
17 -
 18
18 -
 19
19 -
 20
20 -
 21
21 -
 22
22 -
 23
23 -
 24
24 -
 25
25 -
 26
26 -
27
-
28
-
29
-
30
-
31
-
32
-
33
-
34
-
35
-
36
-
37
-
38
-
39
-
40
-
41
-
42
-
43
-
44
-
45
-
46
-
47
-
48
-
49
-
50
-
51
-
52
-
53
 |
 |