Dell Inspiron Zino HD 400 Inspiron Zino HD Service Manual - Page 44
Clearing Forgotten Passwords and CMOS Settings
 |
View all Dell Inspiron Zino HD 400 manuals
Add to My Manuals
Save this manual to your list of manuals |
Page 44 highlights
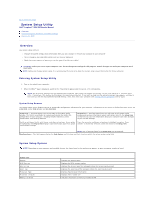
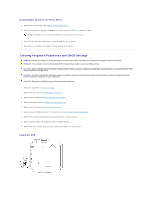
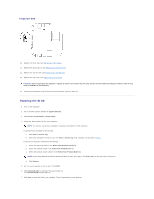
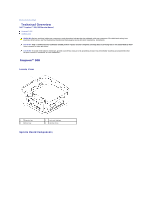
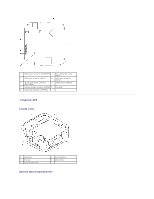
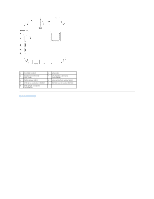
Changing Boot Sequence for Future Boots 1. Enter system setup utility (see Entering System Setup Utility). 2. Use the arrow keys to highlight the Boot menu option and press to access the menu. NOTE: Write down your current boot sequence in case you want to restore it. 3. Press the up- and down-arrow keys to move through the list of devices. 4. Press plus (+) or minus (-) to change the boot priority of the device. Clearing Forgotten Passwords and CMOS Settings WARNING: Before you begin any of the procedures in this section, follow the safety instructions that shipped with your computer. WARNING: The computer must be disconnected from the electrical outlet to clear the CMOS setting. CAUTION: Only a certified service technician should perform repairs on your computer. Damage due to servicing that is not authorized by Dell™ is not covered by your warranty. CAUTION: To avoid electrostatic discharge, ground yourself by using a wrist grounding strap or by periodically touching an unpainted metal surface (such as a connector on your computer). CAUTION: Clearing the CMOS settings will also clear the password. 1. Follow the procedures in Before You Begin. 2. Remove the top cover (see Removing the Top Cover). 3. Remove the top bracket (see Removing the Top Bracket). 4. Remove the optical drive (see Removing the Optical Drive). 5. Remove the drive bay (see Removing the Drive Bay). 6. Locate the 3-pin CMOS connector on the system board (see System Board Components). 7. Remove the 2-pin jumper plug from pins 2 and 3 and fix it on pins 1 and 2. 8. Wait for approximately five seconds to clear the CMOS setting. 9. Remove the 2-pin jumper plug from pins 1 and 2 and replace it on pins 2 and 3. Inspiron 300
-
 1
1 -
2
-
3
-
4
-
5
-
6
-
7
-
8
-
9
-
10
-
11
-
12
-
13
-
14
-
15
-
16
-
17
-
18
-
19
-
20
-
21
-
22
-
23
-
24
-
25
-
26
-
27
-
28
-
29
-
30
-
31
-
32
-
33
-
34
-
35
-
36
-
37
-
38
-
 39
39 -
 40
40 -
 41
41 -
 42
42 -
 43
43 -
 44
44 -
 45
45 -
 46
46 -
 47
47 -
 48
48 -
 49
49 -
50
-
51
-
52
-
53
 |
 |