Dell Latitude LS Service Manual - Page 18
is stamped on the top of the clip see
 |
View all Dell Latitude LS manuals
Add to My Manuals
Save this manual to your list of manuals |
Page 18 highlights
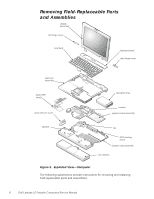
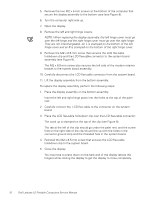
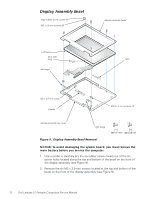
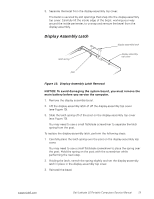
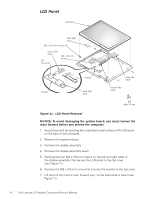
5. Remove the two M2 x 4-mm screws at the bottom of the computer that secure the display assembly to the bottom case (see Figure 8). 6. Turn the computer right-side up. 7. Open the display. 8. Remove the left and right hinge covers. NOTE: When replacing the display assembly, the left hinge cover must go over the left hinge and the right hinge cover must go over the right hinge. They are not interchangeable. An L is stamped on the bottom of the left hinge cover and an R is stamped on the bottom of the right hinge cover. 9. Remove the M2 x 8.5-mm screw that secures the LCD flex-cable hold-down clip and the LCD flex-cable connector to the system board assembly (see Figure 8). The M2 x 8.5-mm screw also secures the left side of the modem retainer bracket to the system board assembly. 10. Carefully disconnect the LCD flex-cable connector from the system board. 11. Lift the display assembly from the bottom assembly. To replace the display assembly, perform the following steps: 1. Place the display assembly on the bottom assembly. Insert the left and right hinge posts into the holes at the top of the palm rest. 2. Carefully connect the LCD flex cable to the connector on the system board. 3. Place the LCD flex-cable hold-down clip over the LCD flex-cable connector. The word up is stamped on the top of the clip (see Figure 8). The tab at the left of the clip should go under the palm rest, and the screw hole on the right side of the clip should line up with the holes in the connector ground strip and the threaded hole in the system board. 4. Reinstall the M2 x 8.5-mm screw that secures the LCD flex-cable hold-down clip to the system board. 5. Close the display. You may have to press down on the back end of the display (above the hinges) while closing the display to get the display to close completely. 10 Dell Latitude LS Portable Computers Service Manual
-
 1
1 -
2
-
3
-
4
-
5
-
6
-
7
-
8
-
9
-
10
-
11
-
12
-
 13
13 -
 14
14 -
 15
15 -
 16
16 -
 17
17 -
 18
18 -
 19
19 -
 20
20 -
 21
21 -
 22
22 -
 23
23 -
24
-
25
-
26
-
27
-
28
-
29
-
30
-
31
-
32
-
33
-
34
-
35
-
36
-
37
-
38
-
39
-
40
-
41
-
42
-
43
-
44
-
45
-
46
-
47
-
48
 |
 |
