Dell Latitude LS Service Manual - Page 21
Display Assembly Latch
 |
View all Dell Latitude LS manuals
Add to My Manuals
Save this manual to your list of manuals |
Page 21 highlights
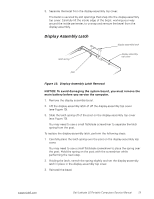
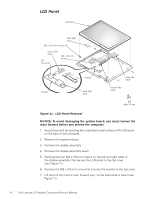
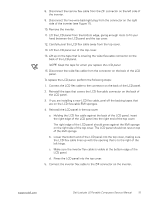
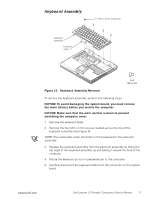
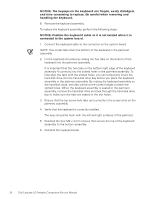
3. Separate the bezel from the display-assembly top cover. The bezel is secured by slot openings that snap into the display-assembly top cover. Carefully lift the inside edge of the bezel, working your way around the inside perimeter, to unsnap and remove the bezel from the display assembly. Display Assembly Latch display assembly latch latch spring display assembly top cover post Figure 10. Display Assembly Latch Removal NOTICE: To avoid damaging the system board, you must remove the main battery before you service the computer. 1. Remove the display assembly bezel. 2. Lift the display assembly latch of off the display-assembly top cover (see Figure 10). 3. Slide the latch spring off of the post on the display-assembly top cover (see Figure 10). You may need to use a small flat-blade screwdriver to separate the latch spring from the post. To replace the display-assembly latch, perform the following steps: 1. Carefully place the latch spring over the post on the display-assembly top cover. You may need to use a small flat-blade screwdriver to place the spring over the post. Hold the spring on the post with the screwdriver while performing the next step. 2. Holding the latch, stretch the spring slightly and set the display-assembly latch in place in the display assembly top cover. 3. Reinstall the bezel. support.dell.com Dell Latitude LS Portable Computers Service Manual 13
-
 1
1 -
2
-
3
-
4
-
5
-
6
-
7
-
8
-
9
-
10
-
11
-
12
-
13
-
14
-
15
-
 16
16 -
 17
17 -
 18
18 -
 19
19 -
 20
20 -
 21
21 -
 22
22 -
 23
23 -
 24
24 -
 25
25 -
 26
26 -
27
-
28
-
29
-
30
-
31
-
32
-
33
-
34
-
35
-
36
-
37
-
38
-
39
-
40
-
41
-
42
-
43
-
44
-
45
-
46
-
47
-
48
 |
 |
