Dell Latitude LS Service Manual - Page 43
is printed on the back door. As you hold the doors for installation
 |
View all Dell Latitude LS manuals
Add to My Manuals
Save this manual to your list of manuals |
Page 43 highlights
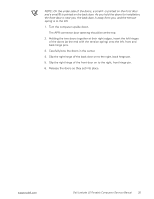
NOTE: On the under side of the doors, a small F is printed on the front door and a small B is printed on the back door. As you hold the doors for installation, the front door is near you, the back door is away from you, and the tension spring is to the left. 1. Turn the computer upside down. The APR connector door opening should be at the top. 2. Holding the two doors together at their right edges, insert the left hinges of the doors (at the end with the tension spring) onto the left, front and back hinge pins. 3. Carefully bow the doors in the center. 4. Slip the right hinge of the back door on to the right, back hinge pin. 5. Slip the right hinge of the front door on to the right, front hinge pin. 6. Release the doors so they set into place. support.dell.com Dell Latitude LS Portable Computers Service Manual 35
-
 1
1 -
2
-
3
-
4
-
5
-
6
-
7
-
8
-
9
-
10
-
11
-
12
-
13
-
14
-
15
-
16
-
17
-
18
-
19
-
20
-
21
-
22
-
23
-
24
-
25
-
26
-
27
-
28
-
29
-
30
-
31
-
32
-
33
-
34
-
35
-
36
-
37
-
 38
38 -
 39
39 -
 40
40 -
 41
41 -
 42
42 -
 43
43 -
 44
44 -
 45
45 -
 46
46 -
 47
47 -
 48
48
 |
 |