Dell Latitude LS Service Manual - Page 35
Fan Removal
 |
View all Dell Latitude LS manuals
Add to My Manuals
Save this manual to your list of manuals |
Page 35 highlights
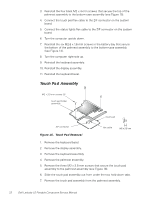
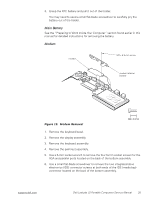
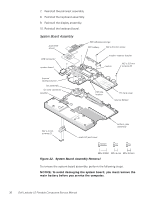
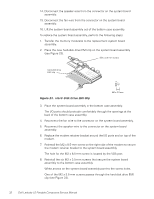
Fan M2 x 3.5-mm screws (2) fan connector Figure 20. Fan Removal 1. Remove the keyboard bezel. 2. Remove the display assembly. 3. Remove the keyboard assembly. 4. Remove the palmrest assembly. 5. Carefully disconnect the fan wire connector from the system board (see Figure 20). The male connector on the fan wire is keyed to fit into the female connector one way only. 6. Remove the two M2 x 3.5-mm screws that secure the fan to the bottom assembly (see Figure 20). 7. Remove the fan from the bottom assembly. To replace the fan, perform the following steps: 1. Place the fan in the bottom case. Make sure that the arrow that is stamped on top of the fan is pointing towards the thermal cooling solution. 2. Reinstall the M2 x 3.5-mm screws to secure the fan the bottom assembly. 3. Reconnect the fan wire to the connector on the system board assembly. support.dell.com Dell Latitude LS Portable Computers Service Manual 27
-
 1
1 -
2
-
3
-
4
-
5
-
6
-
7
-
8
-
9
-
10
-
11
-
12
-
13
-
14
-
15
-
16
-
17
-
18
-
19
-
20
-
21
-
22
-
23
-
24
-
25
-
26
-
27
-
28
-
29
-
 30
30 -
 31
31 -
 32
32 -
 33
33 -
 34
34 -
 35
35 -
 36
36 -
 37
37 -
 38
38 -
 39
39 -
 40
40 -
41
-
42
-
43
-
44
-
45
-
46
-
47
-
48
 |
 |
