Dell Latitude LS Service Manual - Page 37
USB connector housing.
 |
View all Dell Latitude LS manuals
Add to My Manuals
Save this manual to your list of manuals |
Page 37 highlights
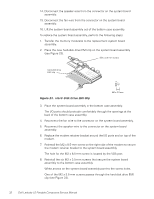
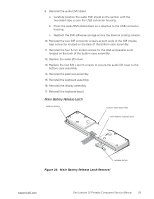
NOTICE: The audio EMI shield is attached to the USB connector housing with two-sided tape. To avoid bending the audio EMI shield, care must be taken when separating the audio EMI shield from the USB connector housing. 6. Using a small flat-blade screwdriver, carefully separate the audio EMI shield away from the USB connector housing. Place the edge of the screwdriver between the audio EMI shield and the USB connector housing, and slowly pry the two apart. 7. Carefully disconnect the speaker wire connector from the system board. The male connector on the speaker wire is keyed to fit into the female connector one way only. 8. Remove the two M2 x 3.5-mm screws that secure the speaker to the bottom assembly. 9. Remove the speaker from the bottom assembly. 10. Remove the rubber speaker gasket from the bottom assembly. To replace the speaker, perform the following steps: 1. Reinstall the rubber speaker gasket in the bottom case. The gasket is keyed, so it will fit in the bottom case one way only. 2. Place the speaker in the bottom case. 3. The wire end of the speaker should face towards the center of the bottom assembly. 4. Reinstall the two M2 x 3.5-mm screws to secure the speaker to the bottom assembly. 5. Carefully connect the speaker wire to the connector in the system board assembly. The male connector on the speaker wire is keyed to fit into the female connector one way only. 6. Reinstall the audio EMI shield. a. Carefully position the audio EMI shield so the section with the two-sided tape is over the USB connector housing. b. Press the audio EMI shield down so it attaches to the USB connector housing. c. Reattach the EMI adhesive sponge across the thermal cooling solution. support.dell.com Dell Latitude LS Portable Computers Service Manual 29
-
 1
1 -
2
-
3
-
4
-
5
-
6
-
7
-
8
-
9
-
10
-
11
-
12
-
13
-
14
-
15
-
16
-
17
-
18
-
19
-
20
-
21
-
22
-
23
-
24
-
25
-
26
-
27
-
28
-
29
-
30
-
31
-
 32
32 -
 33
33 -
 34
34 -
 35
35 -
 36
36 -
 37
37 -
 38
38 -
 39
39 -
 40
40 -
 41
41 -
 42
42 -
43
-
44
-
45
-
46
-
47
-
48
 |
 |
