Dell Latitude XPi Service Manual - Page 45
Hard-Disk Drive Assembly,
 |
View all Dell Latitude XPi manuals
Add to My Manuals
Save this manual to your list of manuals |
Page 45 highlights
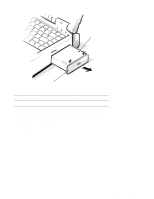
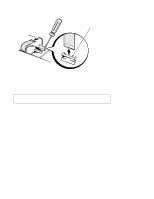
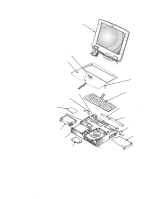
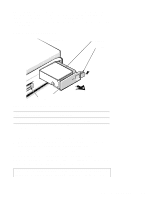
The following subsections provide instructions for removing and replacing these parts and assemblies. Some of the instructions are preceded by a table listing the Dell order name for the part or assembly being replaced. A more detailed breakdown of parts and assemblies can be found in Appendix A, "Factory Repair Parts." Hard-Disk Drive Assembly front of computer hard-disk drive drive latch drive door PC Card slot Figure 4-6. Hard-Disk Drive Assembly Removal Part or Assembly Name Order Name Hard-disk drive assembly CUS,HD,xxxxx,yyMM,zzz,LXP* * Substitute the drive capacity for xxxxx, the drive height for yy, and the manufacturer for zzz. To remove the hard-disk drive assembly, follow these steps: 1. Slide the drive latch toward the front of the computer to release the hard-disk drive assembly from the hard-disk drive bay. The latch is on the left-front corner of the computer. 2. Grasp the drive door and pull the drive out of the computer. When reinserting the drive into the drive bay, ensure that the drive latch is open. Then slide the drive completely into the hard-disk drive bay. CAUTION: The hard-disk drive is very sensitive to shock. Handle the assembly with care and avoid dropping it even from a height of 1 inch. Removing and Replacing Parts 4-7
-
 1
1 -
2
-
3
-
4
-
5
-
6
-
7
-
8
-
9
-
10
-
11
-
12
-
13
-
14
-
15
-
16
-
17
-
18
-
19
-
20
-
21
-
22
-
23
-
24
-
25
-
26
-
27
-
28
-
29
-
30
-
31
-
32
-
33
-
34
-
35
-
36
-
37
-
38
-
39
-
 40
40 -
 41
41 -
 42
42 -
 43
43 -
 44
44 -
 45
45 -
 46
46 -
 47
47 -
 48
48 -
 49
49 -
 50
50 -
51
-
52
-
53
-
54
-
55
-
56
-
57
-
58
-
59
-
60
-
61
-
62
-
63
-
64
-
65
-
66
-
67
-
68
-
69
-
70
-
71
-
72
-
73
-
74
-
75
-
76
-
77
-
78
-
79
-
80
-
81
-
82
-
83
-
84
-
85
-
86
-
87
-
88
-
89
-
90
-
91
-
92
-
93
-
94
-
95
-
96
-
97
-
98
-
99
-
100
-
101
-
102
-
103
-
104
-
105
-
106
-
107
-
108
-
109
-
110
-
111
-
112
-
113
-
114
-
115
-
116
-
117
-
118
-
119
-
120
-
121
-
122
 |
 |
