Dell Latitude XPi Service Manual - Page 82
Audio Board, Audio Board Removal
 |
View all Dell Latitude XPi manuals
Add to My Manuals
Save this manual to your list of manuals |
Page 82 highlights
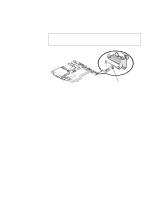
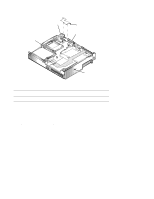
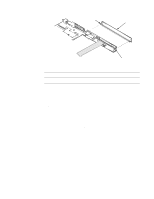
Audio Board hard-disk drive bracket audio board audio connectors connector board system board connector JAUDIO connector JTB HD1 (6 mm) 6 mm Figure 4-32. Audio Board Removal Part or Assembly Name Audio board Order Name PWA,AUDIO,LXPiCD,NBK To remove the audio board, follow these steps: 1. Remove the palmrest assembly. 2. Remove the display assembly. 3. Remove the superpart assembly. 4. Remove the system board. 5. Remove the hard-disk drive bracket. Turn the system board over and place it on a flat work surface. Remove screw HD1, which secures the bracket to the system board. Turn the system board over so that the bracket is on the top. Use a plastic scribe or a small flat-blade screwdriver to pry the bracket from connector JTB. Gently push the bracket outward from the system board until the bracket is disengaged from the audio connectors, and lift the bracket away from the system board. 6. Lift the audio board straight up from the system board. The audio board is held in place on the system board by connector JAUDIO. 4-44 Dell Latitude XPi CD Service Manual
-
 1
1 -
2
-
3
-
4
-
5
-
6
-
7
-
8
-
9
-
10
-
11
-
12
-
13
-
14
-
15
-
16
-
17
-
18
-
19
-
20
-
21
-
22
-
23
-
24
-
25
-
26
-
27
-
28
-
29
-
30
-
31
-
32
-
33
-
34
-
35
-
36
-
37
-
38
-
39
-
40
-
41
-
42
-
43
-
44
-
45
-
46
-
47
-
48
-
49
-
50
-
51
-
52
-
53
-
54
-
55
-
56
-
57
-
58
-
59
-
60
-
61
-
62
-
63
-
64
-
65
-
66
-
67
-
68
-
69
-
70
-
71
-
72
-
73
-
74
-
75
-
76
-
 77
77 -
 78
78 -
 79
79 -
 80
80 -
 81
81 -
 82
82 -
 83
83 -
 84
84 -
 85
85 -
 86
86 -
 87
87 -
88
-
89
-
90
-
91
-
92
-
93
-
94
-
95
-
96
-
97
-
98
-
99
-
100
-
101
-
102
-
103
-
104
-
105
-
106
-
107
-
108
-
109
-
110
-
111
-
112
-
113
-
114
-
115
-
116
-
117
-
118
-
119
-
120
-
121
-
122
 |
 |
