Dell Latitude XPi Service Manual - Page 63
Hinge Covers, Hinge Covers Removal
 |
View all Dell Latitude XPi manuals
Add to My Manuals
Save this manual to your list of manuals |
Page 63 highlights
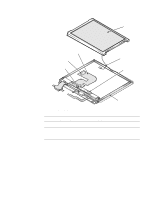
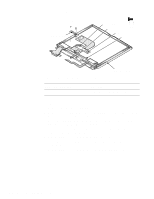
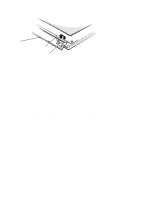
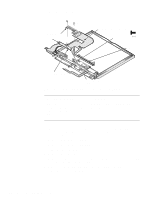
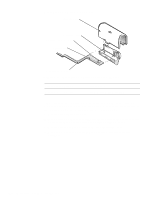
Hinge Covers display assembly base hinge cover hinge Figure 4-19. Hinge Covers Removal Each of the hinge covers is held in place by three tabs that fit into slots on the display assembly base. The microphone is inside the right hinge cover. To remove the hinge covers, follow these steps: 1. Remove the display assembly from the computer. 2. Place the display assembly faceup on the work surface. 3. Rotate the display assembly base until the display assembly hinges are pointing upward at approximately a 45-degree angle. 4. To remove a hinge cover, press in on the front of the cover to release the hinge cover's front tab. Then rotate the cover in the direction of the arrow, and lift the cover away from the display assembly base. To replace the hinge covers, set the display assembly base in the position shown, and reinsert the hinge cover into its original position, making sure that its two tab slots engage the tabs on the display assembly base. Then rotate the hinge cover opposite to the direction shown in Figure 4-18 until its front tab engages the tab slot in the display assembly base. Removing and Replacing Parts 4-25
-
 1
1 -
2
-
3
-
4
-
5
-
6
-
7
-
8
-
9
-
10
-
11
-
12
-
13
-
14
-
15
-
16
-
17
-
18
-
19
-
20
-
21
-
22
-
23
-
24
-
25
-
26
-
27
-
28
-
29
-
30
-
31
-
32
-
33
-
34
-
35
-
36
-
37
-
38
-
39
-
40
-
41
-
42
-
43
-
44
-
45
-
46
-
47
-
48
-
49
-
50
-
51
-
52
-
53
-
54
-
55
-
56
-
57
-
 58
58 -
 59
59 -
 60
60 -
 61
61 -
 62
62 -
 63
63 -
 64
64 -
 65
65 -
 66
66 -
 67
67 -
 68
68 -
69
-
70
-
71
-
72
-
73
-
74
-
75
-
76
-
77
-
78
-
79
-
80
-
81
-
82
-
83
-
84
-
85
-
86
-
87
-
88
-
89
-
90
-
91
-
92
-
93
-
94
-
95
-
96
-
97
-
98
-
99
-
100
-
101
-
102
-
103
-
104
-
105
-
106
-
107
-
108
-
109
-
110
-
111
-
112
-
113
-
114
-
115
-
116
-
117
-
118
-
119
-
120
-
121
-
122
 |
 |
