Dell PowerEdge 1855 Avocent Digital Access KVM Module Installation Informati - Page 15
The DRAC/MC CLI command prompt, VT100 for Emulation - power
 |
View all Dell PowerEdge 1855 manuals
Add to My Manuals
Save this manual to your list of manuals |
Page 15 highlights
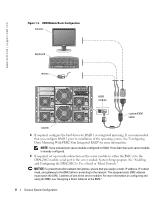
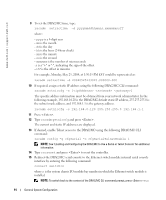
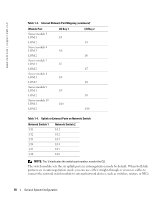
3 Enter a name for the new connection, select an icon, and then click OK. 4 From the Connect to drop-down menu, select an available COM port, and then click OK. After you select an available COM port, the COM port properties window appears. 5 Configure the port with the following settings: • Set Bits per second to 115200. • Set Data bits to 8. • Set Parity to None. • Set Stop bits to 1. • Set Flow control to None. • Under Properties, select VT100 for Emulation mode. • Select Terminal keys for Function, Arrow, and Ctrl keys. Ensure that the setting is for Terminal keys-not Windows keys. 6 Click OK. The DRAC/MC application displays a login screen on the console monitor. 7 Log into the DRAC/MC using the default username root and password calvin. The DRAC/MC CLI command prompt DRAC/MC: is displayed. NOTE: Dell recommends changing the default username and password names. See the Dell Remote Access Controller/Modular Chassis User's Guide for instructions. 8 If the system chassis is powered off, power on the chassis using the following DRAC/MC CLI command: racadm chassisaction -m chassis powerup NOTE: The Ethernet switch module inserted into the chassis I/O bay is powered on automatically when the system chassis is powered on. For more information on configuring the system chassis using the DRAC/MC CLI interface, see the Dell Remote Access Controller/Modular Chassis User's Guide. NOTE: Dell recommends that you power up the chassis prior to inserting server modules if Ethernet switch modules are installed. The Ethernet switch may take longer to boot than the server modules, which may cause functions like PXE to fail due to the Ethernet switch not being fully booted and ready to send packets. General System Configuration 13
-
 1
1 -
2
-
3
-
4
-
5
-
6
-
7
-
8
-
9
-
 10
10 -
 11
11 -
 12
12 -
 13
13 -
 14
14 -
 15
15 -
 16
16 -
 17
17 -
 18
18 -
 19
19 -
 20
20 -
21
-
22
-
23
-
24
-
25
-
26
-
27
-
28
-
29
-
30
-
31
-
32
-
33
-
34
-
35
-
36
-
37
-
38
-
39
-
40
-
41
-
42
-
43
-
44
-
45
-
46
-
47
-
48
-
49
-
50
-
51
-
52
-
53
-
54
-
55
-
56
-
57
-
58
-
59
-
60
-
61
-
62
-
63
-
64
-
65
-
66
-
67
-
68
-
69
-
70
-
71
-
72
-
73
-
74
-
75
-
76
-
77
-
78
-
79
-
80
-
81
-
82
-
83
-
84
-
85
-
86
-
87
-
88
-
89
-
90
-
91
-
92
-
93
-
94
-
95
-
96
-
97
-
98
-
99
-
100
-
101
-
102
-
103
-
104
-
105
-
106
-
107
-
108
-
109
-
110
-
111
-
112
-
113
-
114
-
115
-
116
-
117
-
118
-
119
-
120
-
121
-
122
-
123
-
124
-
125
-
126
-
127
-
128
-
129
-
130
-
131
-
132
-
133
-
134
-
135
-
136
-
137
-
138
-
139
-
140
-
141
-
142
-
143
-
144
-
145
-
146
-
147
-
148
-
149
-
150
-
151
-
152
-
153
-
154
-
155
-
156
-
157
-
158
-
159
-
160
-
161
-
162
-
163
-
164
-
165
-
166
-
167
-
168
-
169
-
170
-
171
-
172
-
173
-
174
-
175
-
176
-
177
-
178
-
179
-
180
-
181
-
182
-
183
-
184
-
185
-
186
-
187
-
188
-
189
-
190
-
191
-
192
-
193
-
194
-
195
-
196
-
197
-
198
-
199
-
200
-
201
-
202
-
203
-
204
-
205
-
206
-
207
-
208
-
209
-
210
-
211
-
212
-
213
-
214
-
215
-
216
-
217
-
218
-
219
-
220
-
221
-
222
-
223
-
224
-
225
-
226
-
227
-
228
-
229
-
230
-
231
-
232
-
233
-
234
-
235
-
236
-
237
-
238
-
239
-
240
-
241
-
242
-
243
-
244
-
245
-
246
-
247
-
248
-
249
-
250
-
251
-
252
-
253
-
254
-
255
-
256
-
257
-
258
-
259
-
260
-
261
-
262
-
263
-
264
-
265
-
266
-
267
-
268
-
269
-
270
-
271
-
272
-
273
-
274
-
275
-
276
-
277
-
278
-
279
-
280
-
281
-
282
-
283
-
284
-
285
-
286
-
287
-
288
-
289
-
290
-
291
-
292
-
293
-
294
-
295
-
296
 |
 |