Dell PowerEdge 1855 Avocent Digital Access KVM Module Installation Informati - Page 33
Setting Console Security - firmware
 |
View all Dell PowerEdge 1855 manuals
Add to My Manuals
Save this manual to your list of manuals |
Page 33 highlights
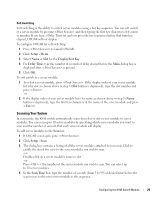
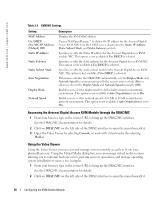
To set a screen delay time for OSCAR: 1 Type in the number of seconds (0-9) you want to delay display of OSCAR after you press . Entering will instantly launch OSCAR with no delay. 2 Click OK. Setting a time to delay display of OSCAR allows you to complete a soft switch without OSCAR displaying. To perform a soft switch, see "Soft Switching." Controlling the Status Flag The status flag displays on your desktop and shows the name of the selected server module or the status of a slot. Use the Flag dialog box to configure the flag to display by server module name, or to change the flag color, opacity, display time, and location on the desktop. To access the Flag dialog box: 1 Press . 2 Click Setup - Flag. Displaying Version Information Use the Version dialog box to display the KVM switch firmware, hardware and FPGA versions, and to identify the language and keyboard configuration. For optimum performance, keep your firmware current. To display version information: 1 Press . 2 Click Commands - Display Versions. 3 The top half of the Version box lists the subsystem versions in the KVM switch. 4 Click X or press to close the Version dialog box. Setting Console Security OSCAR enables you to set security on your KVM switch console. You can establish a screen saver mode that engages after your console remains unused for a specified delay time. Once engaged, your console will remain locked until you press any key or move the mouse. You will then need to type in your password to continue. Use the Security dialog box to lock your console with password protection, set or change your password, and enable the screen saver. To access the Security dialog box: 1 Press . 2 Click Setup - Security. NOTE: If a password has been previously set, the user will have to enter the password before being able to access the Security dialog box. Configuring the KVM Switch Module 31
-
 1
1 -
2
-
3
-
4
-
5
-
6
-
7
-
8
-
9
-
10
-
11
-
12
-
13
-
14
-
15
-
16
-
17
-
18
-
19
-
20
-
21
-
22
-
23
-
24
-
25
-
26
-
27
-
 28
28 -
 29
29 -
 30
30 -
 31
31 -
 32
32 -
 33
33 -
 34
34 -
 35
35 -
 36
36 -
 37
37 -
 38
38 -
39
-
40
-
41
-
42
-
43
-
44
-
45
-
46
-
47
-
48
-
49
-
50
-
51
-
52
-
53
-
54
-
55
-
56
-
57
-
58
-
59
-
60
-
61
-
62
-
63
-
64
-
65
-
66
-
67
-
68
-
69
-
70
-
71
-
72
-
73
-
74
-
75
-
76
-
77
-
78
-
79
-
80
-
81
-
82
-
83
-
84
-
85
-
86
-
87
-
88
-
89
-
90
-
91
-
92
-
93
-
94
-
95
-
96
-
97
-
98
-
99
-
100
-
101
-
102
-
103
-
104
-
105
-
106
-
107
-
108
-
109
-
110
-
111
-
112
-
113
-
114
-
115
-
116
-
117
-
118
-
119
-
120
-
121
-
122
-
123
-
124
-
125
-
126
-
127
-
128
-
129
-
130
-
131
-
132
-
133
-
134
-
135
-
136
-
137
-
138
-
139
-
140
-
141
-
142
-
143
-
144
-
145
-
146
-
147
-
148
-
149
-
150
-
151
-
152
-
153
-
154
-
155
-
156
-
157
-
158
-
159
-
160
-
161
-
162
-
163
-
164
-
165
-
166
-
167
-
168
-
169
-
170
-
171
-
172
-
173
-
174
-
175
-
176
-
177
-
178
-
179
-
180
-
181
-
182
-
183
-
184
-
185
-
186
-
187
-
188
-
189
-
190
-
191
-
192
-
193
-
194
-
195
-
196
-
197
-
198
-
199
-
200
-
201
-
202
-
203
-
204
-
205
-
206
-
207
-
208
-
209
-
210
-
211
-
212
-
213
-
214
-
215
-
216
-
217
-
218
-
219
-
220
-
221
-
222
-
223
-
224
-
225
-
226
-
227
-
228
-
229
-
230
-
231
-
232
-
233
-
234
-
235
-
236
-
237
-
238
-
239
-
240
-
241
-
242
-
243
-
244
-
245
-
246
-
247
-
248
-
249
-
250
-
251
-
252
-
253
-
254
-
255
-
256
-
257
-
258
-
259
-
260
-
261
-
262
-
263
-
264
-
265
-
266
-
267
-
268
-
269
-
270
-
271
-
272
-
273
-
274
-
275
-
276
-
277
-
278
-
279
-
280
-
281
-
282
-
283
-
284
-
285
-
286
-
287
-
288
-
289
-
290
-
291
-
292
-
293
-
294
-
295
-
296
 |
 |
