Dell PowerEdge 1855 Avocent Digital Access KVM Module Installation Informati - Page 41
Using Virtual Media, Virtual Media, DRAC/MC, Media, Detach, Attach, Launch Application, Floppy Drive
 |
View all Dell PowerEdge 1855 manuals
Add to My Manuals
Save this manual to your list of manuals |
Page 41 highlights
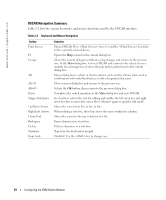
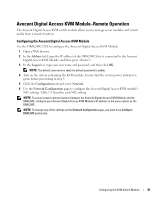
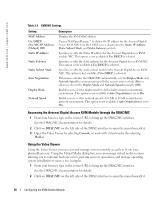
Using Virtual Media NOTE: You must install the Java plug-in 1.4.2 or later (1.4.x) to use the Virtual Media feature. To install the Sun java plug-in, go to http:\\java.sun.com, download JRE 1.4.2 or later (1.4.x), and follow the instructions on screen. Virtual Media Dialog Box The Virtual Media dialog box allows you to connect a diskette device, a USB device, or a CD/DVD device to a target server. When you have connected a device, you will be able to see it from the remote console through the video viewer. You may then operate the device normally through the video viewer session. (See "Using the Video Viewer"). The device will behave as if it is physically attached to that server. 1 From your browser, type in the correct URL to bring up the DRAC/MC interface. See the DRAC/MC documentation for details. 2 Click on DRAC/MC on the left side of the DRAC interface to open the menu beneath it. 3 Select Media. 4 To access a server from the list of servers, click the button that represents the server you would like to view. If you are already connected to another server, first disconnect from that server by clicking Detach at the bottom of the display. 5 Click the Attach button at the bottom of the display. When the system has successfully made the selection, the Launch Application button will become active. 6 Click the Launch Application button. The virtual media dialog box will appear. Connecting a Generic Mass Storage Device The Floppy Drive panel allows you to select a floppy or USB device from a list of all client floppy and removable USB drives. You can also select the Floppy Image option that allows you to browse to the location of your chosen floppy image file. If you do not want to select either of these options you can select the None option. NOTE: Only one generic mass storage device can be selected at any one time. The selected device is not connected until you click Connect. Configuring the KVM Switch Module 39
-
 1
1 -
2
-
3
-
4
-
5
-
6
-
7
-
8
-
9
-
10
-
11
-
12
-
13
-
14
-
15
-
16
-
17
-
18
-
19
-
20
-
21
-
22
-
23
-
24
-
25
-
26
-
27
-
28
-
29
-
30
-
31
-
32
-
33
-
34
-
35
-
 36
36 -
 37
37 -
 38
38 -
 39
39 -
 40
40 -
 41
41 -
 42
42 -
 43
43 -
 44
44 -
 45
45 -
 46
46 -
47
-
48
-
49
-
50
-
51
-
52
-
53
-
54
-
55
-
56
-
57
-
58
-
59
-
60
-
61
-
62
-
63
-
64
-
65
-
66
-
67
-
68
-
69
-
70
-
71
-
72
-
73
-
74
-
75
-
76
-
77
-
78
-
79
-
80
-
81
-
82
-
83
-
84
-
85
-
86
-
87
-
88
-
89
-
90
-
91
-
92
-
93
-
94
-
95
-
96
-
97
-
98
-
99
-
100
-
101
-
102
-
103
-
104
-
105
-
106
-
107
-
108
-
109
-
110
-
111
-
112
-
113
-
114
-
115
-
116
-
117
-
118
-
119
-
120
-
121
-
122
-
123
-
124
-
125
-
126
-
127
-
128
-
129
-
130
-
131
-
132
-
133
-
134
-
135
-
136
-
137
-
138
-
139
-
140
-
141
-
142
-
143
-
144
-
145
-
146
-
147
-
148
-
149
-
150
-
151
-
152
-
153
-
154
-
155
-
156
-
157
-
158
-
159
-
160
-
161
-
162
-
163
-
164
-
165
-
166
-
167
-
168
-
169
-
170
-
171
-
172
-
173
-
174
-
175
-
176
-
177
-
178
-
179
-
180
-
181
-
182
-
183
-
184
-
185
-
186
-
187
-
188
-
189
-
190
-
191
-
192
-
193
-
194
-
195
-
196
-
197
-
198
-
199
-
200
-
201
-
202
-
203
-
204
-
205
-
206
-
207
-
208
-
209
-
210
-
211
-
212
-
213
-
214
-
215
-
216
-
217
-
218
-
219
-
220
-
221
-
222
-
223
-
224
-
225
-
226
-
227
-
228
-
229
-
230
-
231
-
232
-
233
-
234
-
235
-
236
-
237
-
238
-
239
-
240
-
241
-
242
-
243
-
244
-
245
-
246
-
247
-
248
-
249
-
250
-
251
-
252
-
253
-
254
-
255
-
256
-
257
-
258
-
259
-
260
-
261
-
262
-
263
-
264
-
265
-
266
-
267
-
268
-
269
-
270
-
271
-
272
-
273
-
274
-
275
-
276
-
277
-
278
-
279
-
280
-
281
-
282
-
283
-
284
-
285
-
286
-
287
-
288
-
289
-
290
-
291
-
292
-
293
-
294
-
295
-
296
 |
 |