Dell PowerEdge T40 EMC Installation and Service Manual - Page 68
Syetm board screw location, Removing the system board
 |
View all Dell PowerEdge T40 manuals
Add to My Manuals
Save this manual to your list of manuals |
Page 68 highlights
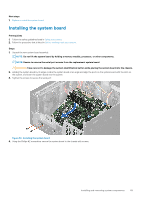
Figure 48. Syetm board screw location 2. Remove the screws securing the serial port. 3. Holding the edges of the system board, incline the system board at an angle and lift the system board out of the chassis. CAUTION: Take care not to damage the system identification button while removing the system board from the chassis. CAUTION: Do not lift the system board by holding a memory module, processor, or other components. Figure 49. Removing the system board 68 Installing and removing system components
-
 1
1 -
2
-
3
-
4
-
5
-
6
-
7
-
8
-
9
-
10
-
11
-
12
-
13
-
14
-
15
-
16
-
17
-
18
-
19
-
20
-
21
-
22
-
23
-
24
-
25
-
26
-
27
-
28
-
29
-
30
-
31
-
32
-
33
-
34
-
35
-
36
-
37
-
38
-
39
-
40
-
41
-
42
-
43
-
44
-
45
-
46
-
47
-
48
-
49
-
50
-
51
-
52
-
53
-
54
-
55
-
56
-
57
-
58
-
59
-
60
-
61
-
62
-
 63
63 -
 64
64 -
 65
65 -
 66
66 -
 67
67 -
 68
68 -
 69
69 -
 70
70 -
 71
71 -
 72
72 -
 73
73 -
74
-
75
-
76
-
77
-
78
-
79
-
80
-
81
-
82
-
83
-
84
-
85
-
86
-
87
-
88
-
89
-
90
-
91
-
92
-
93
-
94
-
95
 |
 |

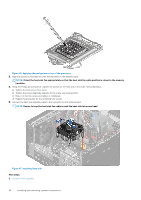
Figure 48. Syetm board screw location
2.
Remove the screws securing the serial port.
3.
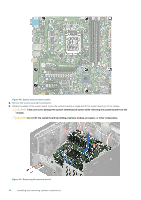
Holding the edges of the system board, incline the system board at an angle and lift the system board out of the chassis.
CAUTION:
Take care not to damage the system identification button while removing the system board from the
chassis.
CAUTION:
Do not lift the system board by holding a memory module, processor, or other components.
Figure 49. Removing the system board
68
Installing and removing system components