Dell PowerEdge T40 EMC Installation and Service Manual - Page 70
Entering the System Service Tag by using the Service
 |
View all Dell PowerEdge T40 manuals
Add to My Manuals
Save this manual to your list of manuals |
Page 70 highlights
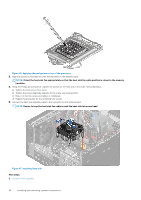
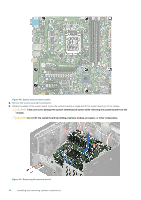
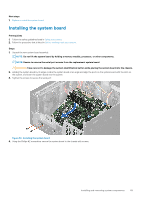
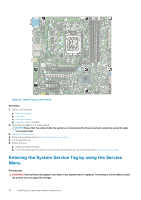
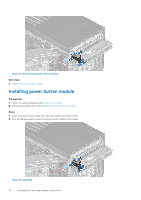
Figure 51. System board screw location Next steps 1. Replace the following: a. Memory modules. b. Processor. c. Heat sink module. d. Expansion card, if installed 2. Reconnect all cables to the system board. NOTE: Ensure that the cables inside the system are routed along the chassis wall and secured by using the cable securing bracket. 3. Close the PSU assembly. 4. Follow the procedure listed in After working inside your system. 5. Let the system boot. 6. Ensure that you: a. Update the BIOS firmware. b. Enter the system service tag after you install the system board. For more information see Entering the service Tag. Entering the System Service Tag by using the Service Menu Prerequisites WARNING: Service Menu only appears once after a new system board is replaced. The setting in Service Menu cannot be undone once you apply the changes. 70 Installing and removing system components
-
 1
1 -
2
-
3
-
4
-
5
-
6
-
7
-
8
-
9
-
10
-
11
-
12
-
13
-
14
-
15
-
16
-
17
-
18
-
19
-
20
-
21
-
22
-
23
-
24
-
25
-
26
-
27
-
28
-
29
-
30
-
31
-
32
-
33
-
34
-
35
-
36
-
37
-
38
-
39
-
40
-
41
-
42
-
43
-
44
-
45
-
46
-
47
-
48
-
49
-
50
-
51
-
52
-
53
-
54
-
55
-
56
-
57
-
58
-
59
-
60
-
61
-
62
-
63
-
64
-
 65
65 -
 66
66 -
 67
67 -
 68
68 -
 69
69 -
 70
70 -
 71
71 -
 72
72 -
 73
73 -
 74
74 -
 75
75 -
76
-
77
-
78
-
79
-
80
-
81
-
82
-
83
-
84
-
85
-
86
-
87
-
88
-
89
-
90
-
91
-
92
-
93
-
94
-
95
 |
 |
