Dell PowerEdge T40 EMC Installation and Service Manual - Page 72
Installing the control panel
 |
View all Dell PowerEdge T40 manuals
Add to My Manuals
Save this manual to your list of manuals |
Page 72 highlights
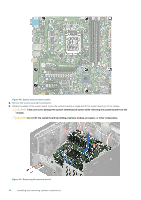
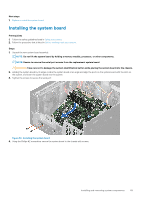
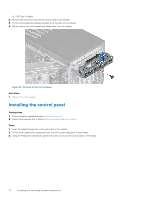
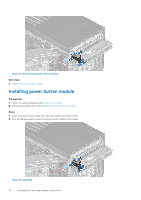
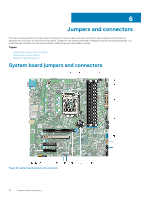
d) USB Type-A cables. 2. Remove the screw that secures the control panel to the chassis. 3. Tilt the control panel and release the tabs from the slots on the chassis. 4. Gently remove the control panel and cables away from the chassis. Figure 52. Removal of the control panel Next steps 1. Replace the control panel. Installing the control panel Prerequisites 1. Follow the safety guidelines listed in Safety instructions. 2. Follow the procedure that is listed in Before working inside your system. Steps 1. Insert the cables through the control panel slot on the chassis. 2. Tilt the control panel at an angle and insert it into the control panel slot in the chassis. 3. Using the Phillips #2 screwdriver, tighten the screw to secure the control panel to the chassis. 72 Installing and removing system components
-
 1
1 -
2
-
3
-
4
-
5
-
6
-
7
-
8
-
9
-
10
-
11
-
12
-
13
-
14
-
15
-
16
-
17
-
18
-
19
-
20
-
21
-
22
-
23
-
24
-
25
-
26
-
27
-
28
-
29
-
30
-
31
-
32
-
33
-
34
-
35
-
36
-
37
-
38
-
39
-
40
-
41
-
42
-
43
-
44
-
45
-
46
-
47
-
48
-
49
-
50
-
51
-
52
-
53
-
54
-
55
-
56
-
57
-
58
-
59
-
60
-
61
-
62
-
63
-
64
-
65
-
66
-
 67
67 -
 68
68 -
 69
69 -
 70
70 -
 71
71 -
 72
72 -
 73
73 -
 74
74 -
 75
75 -
 76
76 -
 77
77 -
78
-
79
-
80
-
81
-
82
-
83
-
84
-
85
-
86
-
87
-
88
-
89
-
90
-
91
-
92
-
93
-
94
-
95
 |
 |
