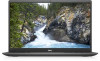
Dell Vostro 5402 Service Manual
Dell Vostro 5402 Manual
 |
View all Dell Vostro 5402 manuals
Add to My Manuals
Save this manual to your list of manuals |
Dell Vostro 5402 manual content summary:
- Dell Vostro 5402 | Service Manual - Page 1
Vostro 5402 Service Manual Regulatory Model: P130G Regulatory Type: P130G002 October 2020 Rev. A01 - Dell Vostro 5402 | Service Manual - Page 2
of data and tells you how to avoid the problem. WARNING: A WARNING indicates a potential for property damage, personal injury, or death. © 2020 Dell Inc. or its subsidiaries. All rights reserved. Dell, EMC, and other trademarks are trademarks of Dell Inc. or its subsidiaries. Other trademarks may be - Dell Vostro 5402 | Service Manual - Page 3
instructions...7 Before working inside your computer...7 Safety precautions...8 Electrostatic discharge-ESD protection...8 ESD field service the M.2 2230 solid-state drive - SSD-1 - discrete 37 Replacing the SSD-1 support bracket...38 Removing the M.2 2280 solid-state drive - SSD-2 - discrete 39 - Dell Vostro 5402 | Service Manual - Page 4
...51 Installing the heat sink - discrete...52 Coin-cell battery...53 Removing the coin-cell battery - UMA...53 Installing the coin-cell battery - UMA...54 Removing the coin-cell battery - discrete...55 Installing the coin-cell battery - discrete...55 I/O board...56 Removing the I/O board - UMA...56 - Dell Vostro 5402 | Service Manual - Page 5
Pre-boot behavior...108 Virtualization support...109 Performance...109 System logs on systems with BitLocker enabled 111 Updating the Dell BIOS in Linux and Ubuntu environments 111 Flashing an existing system setup password 117 Chapter 6: Troubleshooting...118 Built-in self-test (BIST)...118 - Dell Vostro 5402 | Service Manual - Page 6
Flashing the BIOS...123 Flashing BIOS (USB key)...123 Backup media and recovery options...124 WiFi power cycle...124 Releasing Ethernet (RJ-45) cable...124 Chapter 7: Getting help...125 Contacting Dell...125 6 Contents - Dell Vostro 5402 | Service Manual - Page 7
only perform troubleshooting and simple repairs as authorized in your product documentation, or as directed by the online or telephone service and support team. Damage due to servicing that is not authorized by Dell is not covered by your warranty. Read and follow the safety instructions that came - Dell Vostro 5402 | Service Manual - Page 8
performing any disassembly instructions. Observe the Use an ESD field service kit when working inside any notebook to avoid electrostatic system board. Remove the battery from notebooks. Bonding Bonding is a obvious, such as intermittent problems or a shortened product life span. As the industry - Dell Vostro 5402 | Service Manual - Page 9
more difficult type of damage to recognize and troubleshoot is the intermittent (also called latent or " and the hardware is known as bonding. Use only Field Service kits with a wrist strap, mat, and bonding wire. Never parts to be returned to Dell, it is critical to place these parts in anti- - Dell Vostro 5402 | Service Manual - Page 10
grounding wrist strap and protective anti-static mat at all times when servicing Dell products. In addition, it is critical that technicians keep sensitive parts separate from all insulator parts while performing service and that they use anti-static bags for transporting sensitive components. After - Dell Vostro 5402 | Service Manual - Page 11
-state drive shield 7. M.2 2230 SSD 8. Speaker 9. System board 10. Touchpad 11. Palm-rest and keyboard assembly 12. Display assembly 13. Power button with fingerprint reader 14. Coin-cell battery 15. I/O board 16. System fan 17. WLAN card Major components of your system 11 - Dell Vostro 5402 | Service Manual - Page 12
18. M.2 2280 SSD NOTE: Dell provides a list of components and their part numbers for the original system configuration purchased. These parts are available according to warranty coverages purchased by the customer. Contact your Dell sales representative for purchase options. 12 Major components of - Dell Vostro 5402 | Service Manual - Page 13
• WLAN card • Memory modules • Solid-state drive • Speakers • System fan • Heat sink • Coin-cell battery • I/O board • Power button with fingerprint reader (optional) • DC-in port • Touchpad • Display assembly • System board • Palm-rest and keyboard assembly Recommended tools The procedures in - Dell Vostro 5402 | Service Manual - Page 14
Table 1. Screw list (continued) Component Screw type Quantity Battery WLAN Solid-state drive -1 Solid-state drive - 2 Solid-state drive -2 support bracket System fan Heat sink - UMA M2x3 4 Display assembly M2.5x4 3 M2x3 1 System board M2x3 2 Screw image 14 Disassembly and reassembly - Dell Vostro 5402 | Service Manual - Page 15
Base cover Removing the base cover Prerequisites Follow the procedure in before working inside your computer. About this task The figure indicates the location of the base cover and provides a visual representation of the removal procedure. Disassembly and reassembly 15 - Dell Vostro 5402 | Service Manual - Page 16
Steps 1. Remove the five screws (M2x4) that secure the base cover to the palm-rest and keyboard assembly. 2. Loosen the two captive screws (M2x8.8) that secure the base cover to the palm-rest and keyboard assembly. 3. Pry open the base cover starting from the recess at the hinge area and work your - Dell Vostro 5402 | Service Manual - Page 17
Disassembly and reassembly 17 - Dell Vostro 5402 | Service Manual - Page 18
assembly. Next steps Follow the procedure in after working inside your computer. Battery Lithium-ion battery precautions CAUTION: ● Exercise caution when handling Lithium-ion batteries. ● Discharge the battery completely before removing it. Disconnect the AC power adapter from the system and - Dell Vostro 5402 | Service Manual - Page 19
, do not try to release it as puncturing, bending, or crushing a lithium-ion battery can be dangerous. In such an instance, contact Dell technical support for assistance. See www.dell.com/contactdell. ● Always purchase genuine batteries from www.dell.com or authorized Dell partners and resellers - Dell Vostro 5402 | Service Manual - Page 20
the screw holes on the palm-rest and keyboard assembly. 2. Install the four screws (M2x3) that secure the battery to the system board and palm-rest and keyboard assembly. 3. Connect the battery cable to the system board. Next steps 1. Install the base cover. 2. Follow the procedure in after working - Dell Vostro 5402 | Service Manual - Page 21
. 2. Remove the base cover. About this task The figure indicates the location of the battery in a discrete configuration and provides a visual representation of the removal procedure. Steps 1. Disconnect the battery cable from the system board. 2. Remove the four screws (M2x3) that secure the - Dell Vostro 5402 | Service Manual - Page 22
card Removing the WLAN card - UMA Prerequisites 1. Follow the procedure in before working inside your computer. 2. Remove the base cover. 3. Remove the battery (3-cell or 4-cell). About this task The figure indicates the location of the WLAN card and provides a visual representation of the removal - Dell Vostro 5402 | Service Manual - Page 23
Steps 1. Remove the single screw (M2x3) that secures the WLAN card bracket to the WLAN card. 2. Remove the WLAN card bracket from the WLAN card. 3. Disconnect the antenna cables from the WLAN card. 4. Slide and remove the WLAN card from the WLAN card slot. Installing the WLAN card - UMA - Dell Vostro 5402 | Service Manual - Page 24
card bracket on the WLAN card. 4. Replace the screw (M2x3) to secure the WLAN card bracket to the WLAN card. Next steps 1. Install the battery (3-cell or 4-cell) based on the configuration. 2. Install the base cover. 3. Follow the procedure in after working inside your computer. Removing the WLAN - Dell Vostro 5402 | Service Manual - Page 25
Steps 1. Remove the single screw (M2x3) that secures the WLAN card bracket to the WLAN card. 2. Remove the WLAN card bracket from the WLAN card. 3. Disconnect the antenna cables from the WLAN card. 4. Slide and remove the WLAN card from the WLAN card slot. Installing the WLAN card - discrete - Dell Vostro 5402 | Service Manual - Page 26
bracket on the WLAN card. 4. Replace the screw (M2x3) to secure the WLAN card bracket to the WLAN card. Next steps 1. Install the battery (3-cell or 4-cell) based on the configuration. 2. Install the base cover. 3. Follow the procedure in after working inside your computer. Memory modules Removing - Dell Vostro 5402 | Service Manual - Page 27
About this task The figure indicates the location of the memory module and provides a visual representation of the removal procedure. Steps 1. Lift the mylar covering the memory module. 2. Using your finger tips gently pry the retention clips away from the memory module until the memory module pops - Dell Vostro 5402 | Service Manual - Page 28
until it clicks into place. NOTE: If you do not hear the click, remove the memory module and reinstall it. Next steps 1. Connect the battery (3-cell or 4-cell) based on the configuration. 2. Install the base cover. 3. Follow the procedure in after working inside your computer. Removing the memory - Dell Vostro 5402 | Service Manual - Page 29
About this task The figure indicates the location of the memory module and provides a visual representation of the removal procedure. Steps 1. Lift the mylar covering the memory module. 2. Using your finger tips gently pry the retention clips away from the memory module until the memory module pops - Dell Vostro 5402 | Service Manual - Page 30
until it clicks into place. NOTE: If you do not hear the click, remove the memory module and reinstall it. Next steps 1. Install the battery (3-cell or 4-cell) based on the configuration. 2. Install the base cover. 3. Follow the procedure in after working inside your computer. 30 Disassembly and - Dell Vostro 5402 | Service Manual - Page 31
. M.2 slot two is only available if you have ordered an Intel Optane storage. NOTE: If you have ordered a 4-cell (53 Wh) battery configuration, your computer may support a 2230 solid-state drive or a 2280 solid-state drive or an Intel Optane storage in M.2 slot two. The figure indicates the location - Dell Vostro 5402 | Service Manual - Page 32
. M.2 slot two is only available if you have ordered an Intel Optane storage. NOTE: If you have ordered a 4-cell (53 Wh) battery configuration, your computer may support a 2230 solid-state drive or a 2280 solid-state drive or an Intel Optane storage in M.2 slot two. The figure indicates the location - Dell Vostro 5402 | Service Manual - Page 33
one. M.2 slot two is only available if you have ordered an Intel Optane storage. NOTE: If you have ordered a 4-cell (53 Wh) battery configuration, your computer may support a 2230 solid-state drive or a 2280 solid-state drive or an Intel Optane storage in M.2 slot two. NOTE: If there is only one - Dell Vostro 5402 | Service Manual - Page 34
the procedure in before working inside your computer. 2. Remove the base cover. 3. Disconnect the battery (3-cell or 4-cell). About this task NOTE: Depending on the configuration ordered, your computer may support a 2230 solid-state drive or a 2280 solid-state drive in M.2 slot one. NOTE: M.2 slot - Dell Vostro 5402 | Service Manual - Page 35
the installation procedure. About this task NOTE: Depending on the configuration ordered, your computer may support a 2230 solid-state drive or a 2280 solid-state drive in M.2 slot one. NOTE: M.2 slot two supports one PCIe Gen3 x4 NVMe or SATA solid-state drive (M.2 2230 or M.2 2280) or one - Dell Vostro 5402 | Service Manual - Page 36
the procedure in before working inside your computer. 2. Remove the base cover. 3. Disconnect the battery (3-cell or 4-cell). About this task NOTE: Depending on the configuration ordered, your computer may support a 2230 solid-state drive or a 2280 solid-state drive in M.2 slot one. NOTE: M.2 slot - Dell Vostro 5402 | Service Manual - Page 37
the installation procedure. About this task NOTE: Depending on the configuration ordered, your computer may support a 2230 solid-state drive or a 2280 solid-state drive in M.2 slot one. NOTE: M.2 slot two supports one PCIe Gen3 x4 NVMe or SATA solid-state drive (M.2 2230 or M.2 2280) or one - Dell Vostro 5402 | Service Manual - Page 38
. 3. Follow the procedure in after working inside your computer. Replacing the SSD-1 support bracket Prerequisites 1. Follow the procedure in before working inside your computer. 2. Remove the base cover. 3. Remove the battery (3-cell or 4-cell). 4. Remove the UMA (M.2 2230 SSD or M.2 2280 SSD) or - Dell Vostro 5402 | Service Manual - Page 39
. M.2 slot two is only available if you have ordered an Intel Optane storage. NOTE: If you have ordered a 4-cell (53 Wh) battery configuration, your computer may support a 2230 solid-state drive or a 2280 solid-state drive or an Intel Optane storage in M.2 slot two. NOTE: This procedure applies only - Dell Vostro 5402 | Service Manual - Page 40
one. M.2 slot two is only available if you have ordered an Intel Optane storage. NOTE: If you have ordered a 4-cell (53 Wh) battery configuration, your computer may support a 2230 solid-state drive or a 2280 solid-state drive or an Intel Optane storage in M.2 slot two. NOTE: If there is only one - Dell Vostro 5402 | Service Manual - Page 41
the single (M1.6x2) screw to secure the solid-state drive bracket to the palm-rest and keyboard assembly. Next steps 1. Install the battery (3-cell or 4-cell) based on the configuration. 2. Install the base cover. 3. Follow the procedure in after working inside your computer. Speakers Removing the - Dell Vostro 5402 | Service Manual - Page 42
the computer. 5. Lift the speakers, along with the cable, off the palm-rest and keyboard assembly. Installing the speakers (in 3-cell battery configuration) Prerequisites If you are replacing a component, remove the existing component before performing the installation procedure. About this task The - Dell Vostro 5402 | Service Manual - Page 43
the palm-rest and keyboard assembly. 2. Route the speaker cable through the routing guides on the palm-rest and keyboard assembly. 3. Connect the speaker cable to the system board. Next steps 1. Install the battery (3-cell or 4-cell) based on the configuration. 2. Install the base cover. 3. Follow - Dell Vostro 5402 | Service Manual - Page 44
. 5. Lift the speakers, along with the cable, off the palm-rest and keyboard assembly. Installing the speakers (in 4-cell battery configuration) Prerequisites If you are replacing a component, remove the existing component before performing the installation procedure. 44 Disassembly and reassembly - Dell Vostro 5402 | Service Manual - Page 45
the palm-rest and keyboard assembly. 2. Route the speaker cable through the routing guides on the palm-rest and keyboard assembly. 3. Connect the speaker cable to the system board. Next steps 1. Install the battery (3-cell or 4-cell) based on the configuration. 2. Install the base cover. 3. Follow - Dell Vostro 5402 | Service Manual - Page 46
fan Removing the system fan - UMA Prerequisites 1. Follow the procedure in before working inside your computer. 2. Remove the base cover. 3. Remove the battery (3-cell or 4-cell). About this task The figure indicates the location of the system fan and provides a visual representation of the removal - Dell Vostro 5402 | Service Manual - Page 47
5. Slide and lift the system fan off the palm-rest and keyboard assembly. Installing the system fan - UMA Prerequisites If you are replacing a component, remove the existing component before performing the installation procedure. About this task The figure indicates the location of the system fan - Dell Vostro 5402 | Service Manual - Page 48
Removing the system fan - discrete Prerequisites 1. Follow the procedure in before working inside your computer. 2. Remove the base cover. 3. Remove the battery (3-cell or 4-cell). About this task The figure indicates the location of the system fan and provides a visual representation of the removal - Dell Vostro 5402 | Service Manual - Page 49
3. Peel the adhesive tape, and unroute the I/O cable. 4. Remove the two (M2x2) screws that secure the system fan to the palm-rest and keyboard assembly. 5. Slide and lift the system fan off the palm-rest and keyboard assembly. Installing the system fan - discrete Prerequisites If you are replacing a - Dell Vostro 5402 | Service Manual - Page 50
depending on the configuration ordered. Prerequisites 1. Follow the procedure in before working inside your computer. 2. Remove the base cover. 3. Remove the battery (3-cell or 4-cell). 4. Remove the system fan. About this task The figure indicates the location of the heat sink and provides a visual - Dell Vostro 5402 | Service Manual - Page 51
sink), tighten the four captive screws that secure the heat sink to the system board. Next steps 1. Install the system fan. 2. Install the battery (3-cell or 4-cell) based on the configuration. 3. Install the base cover. 4. Follow the procedure in after working inside your computer. Removing the - Dell Vostro 5402 | Service Manual - Page 52
About this task The figure indicates the location of the heat sink and provides a visual representation of the removal procedure. Steps 1. In sequential order (as indicated on the heat sink), loosen the seven captive screws that secure the heat sink to the system board. 2. Lift and remove the heat - Dell Vostro 5402 | Service Manual - Page 53
heat sink), tighten the seven captive screws that secure the heat sink to the system board. Next steps 1. Install the system fan. 2. Install the battery (3-cell or 4-cell) based on the configuration. 3. Install the base cover. 4. Follow the procedure in after working inside your computer. Coin-cell - Dell Vostro 5402 | Service Manual - Page 54
you are replacing a component, remove the existing component before performing the installation procedure. About this task The figure indicates the location of the coin-cell battery and provides a visual representation of the installation procedure. 54 Disassembly and reassembly - Dell Vostro 5402 | Service Manual - Page 55
- discrete Prerequisites 1. Follow the procedure in before working inside your computer. 2. Remove the base cover. 3. Remove the battery (3-cell or 4-cell). NOTE: Removing the coin-cell battery resets the BIOS setup program settings to default. It is recommended that you note the BIOS setup program - Dell Vostro 5402 | Service Manual - Page 56
1. Follow the procedure in before working inside your computer. 2. Remove the base cover. 3. Remove the battery (3-cell or 4-cell). 4. Remove the system fan. 5. Remove the coin-cell battery. About this task The figure indicates the location of the I/O board and provides a visual representation of - Dell Vostro 5402 | Service Manual - Page 57
Steps 1. Locate the I/O board on your computer. 2. Lift the mylar cover. 3. Peel the adhesive tape to unroute the I/O cable. 4. Open the latch, and disconnect the I/O-board cable from the I/O board. 5. Remove the two screws (M2.5x4) and (M2x3) that secure the left display hinge to the computer. 6. - Dell Vostro 5402 | Service Manual - Page 58
board and close the latch to secure the cable. 8. Place the mylar cover back. Next steps 1. Install the coin-cell battery. 2. Install the system fan. 3. Install the battery (3-cell or 4-cell) based on the configuration. 4. Install the base cover. 5. Follow the procedure in after working inside your - Dell Vostro 5402 | Service Manual - Page 59
1. Follow the procedure in before working inside your computer. 2. Remove the base cover. 3. Remove the battery (3-cell or 4-cell). 4. Remove the system fan. 5. Remove the coin-cell battery. About this task The figure indicates the location of the I/O board and provides a visual representation of - Dell Vostro 5402 | Service Manual - Page 60
8. Remove the three screws (M2x3) that secure the I/O board to the palm-rest and keyboard assembly. 9. Lift the I/O board off the palm-rest and keyboard assembly. Installing the I/O board - discrete Prerequisites If you are replacing a component, remove the existing component before performing the - Dell Vostro 5402 | Service Manual - Page 61
cell or 4-cell). 4. Remove the system fan. 5. Remove the M.2 2280 SSD or M.2 2230 SSD. 6. Remove the I/O board. 7. Remove the coin-cell battery. About this task The figure indicates the location of the power button with optional fingerprint reader and provides a visual representation of the removal - Dell Vostro 5402 | Service Manual - Page 62
and keyboard assembly. Next steps 1. Install the I/O board. 2. Install the system fan. 3. Install the coin-cell battery. 4. Install the M.2 2280 SSD card or M.2 2230 SSD card. 5. Install the battery (3-cell or 4-cell) based on the configuration. 6. Install the base cover. 7. Follow the procedure in - Dell Vostro 5402 | Service Manual - Page 63
cell or 4-cell). 4. Remove the system fan. 5. Remove the M.2 2280 SSD or M.2 2230 SSD. 6. Remove the I/O board. 7. Remove the coin-cell battery. About this task The figure indicates the location of the power button with optional fingerprint reader and provides a visual representation of the removal - Dell Vostro 5402 | Service Manual - Page 64
and keyboard assembly. Next steps 1. Install the I/O board. 2. Install the system fan. 3. Install the coin-cell battery. 4. Install the M.2 2280 SSD card or M.2 2230 SSD card. 5. Install the battery (3-cell or 4-cell) based on the configuration. 6. Install the base cover. 7. Follow the procedure in - Dell Vostro 5402 | Service Manual - Page 65
About this task The figure indicates the location of the DC-in and provides a visual representation of the removal procedure. Steps 1. Locate the DC-in port on your computer. 2. Remove the two (M2.5x4) screws, and lift the metal hinge. 3. Remove the single screw (M2x3) screw and lift the DC-in port - Dell Vostro 5402 | Service Manual - Page 66
4. Adhere the transparent sticker. 5. Lower the metal hinge. 6. Replace the two (M2.5x4) screws, and tighten it. Next steps 1. Install the battery (3-cell or 4-cell) based on the configuration. 2. Install the base cover. 3. Follow the procedure in after working inside your computer. Removing the DC - Dell Vostro 5402 | Service Manual - Page 67
About this task The figure indicates the location of the DC-in and provides a visual representation of the removal procedure. Steps 1. Locate the DC-in port on your computer. 2. Remove the two (M2.5x4) screws, and lift the metal hinge. 3. Remove the single screw (M2x3) screw and lift the DC-in port - Dell Vostro 5402 | Service Manual - Page 68
Adhere the transparent sticker. 5. Lower the metal hinge. 6. Replace the two (M2.5x4) screws, and tighten it. Next steps 1. Install the battery (3-cell or 4-cell) based on the configuration. 2. Install the base cover. 3. Follow the procedure in after working inside your computer. Touchpad Removing - Dell Vostro 5402 | Service Manual - Page 69
(3-cell or 4-cell). 4. Remove the speaker (3-cell battery configuration or 4-cell battery configuration). About this task The figure indicates the location of the touchpad and provides a visual representation of the removal procedure. Steps 1. Peel adhesive tape, and - Dell Vostro 5402 | Service Manual - Page 70
assembly. 6. Lower the latch of the touchpad cable once it is connected to the connector on the system board. Next steps 1. Install the speakers (3-cell battery configuration or 4-cell battery configuration). 70 Disassembly and reassembly - Dell Vostro 5402 | Service Manual - Page 71
the procedure in before working inside your computer. 2. Remove the base cover. 3. Remove the battery (3-cell or 4-cell). 4. Remove the speaker (3-cell battery configuration or 4-cell battery configuration). About this task The figure indicates the location of the touchpad and provides a visual - Dell Vostro 5402 | Service Manual - Page 72
3. Lift the touchpad bracket off the palm-rest and keyboard assembly. 4. Open the latch, and disconnect the touchpad cable from the system board. 5. Remove the adhesive tape from the touchpad bracket. 6. Remove the two (M2x2) screws that secure the touchpad bracket to the palm-rest and keyboard - Dell Vostro 5402 | Service Manual - Page 73
once it is connected to the connector on the system board. Next steps 1. Install the speakers (3-cell battery configuration or 4-cell battery configuration). 2. Install the battery (3-cell or 4-cell) based on the configuration. 3. Install the base cover. 4. Follow the procedure in after working - Dell Vostro 5402 | Service Manual - Page 74
Steps 1. Locate the display cable and display hinges on your computer. 2. Remove the transparent sticker covering the display cable to the system board. 3. Peel the tape that secures the display cable to the system board. 4. Open the latch, and disconnect the display cable from the system board. 74 - Dell Vostro 5402 | Service Manual - Page 75
5. Remove the two screws (M2.5x4) and (M2x3) that secure the left-display hinge to the system board. 6. Remove the two screws (M2.5x4) that secure the right-display hinge to the system board. 7. Open the display hinges at an angle of 90 degrees. 8. Gently slide the palm-rest and keyboard assembly - Dell Vostro 5402 | Service Manual - Page 76
on to the connector on the system board and adhere the tape to the system board. Next steps 1. Install the WLAN card. 2. Install the battery (3-cell or 4-cell) based on the configuration. 3. Install the base cover. 4. Follow the procedure in after working inside your computer. Removing the display - Dell Vostro 5402 | Service Manual - Page 77
Disassembly and reassembly 77 - Dell Vostro 5402 | Service Manual - Page 78
78 Disassembly and reassembly - Dell Vostro 5402 | Service Manual - Page 79
Steps 1. Locate the display cable and display hinges on your computer. 2. Remove the transparent sticker covering the display cable to the system board. 3. Peel the tape that secures the display cable to the system board. 4. Open the latch, and disconnect the display cable from the system board. 5. - Dell Vostro 5402 | Service Manual - Page 80
80 Disassembly and reassembly - Dell Vostro 5402 | Service Manual - Page 81
cable on to the connector on the system board and adhere the tape to the system board. Next steps 1. Install the WLAN card. 2. Install the battery 3-cell or 4-cell. 3. Install the base cover. 4. Follow the procedure in after working inside your computer. System board Removing the system board - UMA - Dell Vostro 5402 | Service Manual - Page 82
5. Remove the M.2 2280 SSD. 6. Remove the M.2 2230 SSD. 7. Remove the WLAN card. 8. Remove the system fan. 9. Remove the heat sink. 10. Remove the memory module. 11. Remove the display assembly. About this task The figure indicates the location of the system board and provides a visual - Dell Vostro 5402 | Service Manual - Page 83
keyboard-backlight cable from the system board. 13. Open the latch, and disconnect the keypad cable from the system board. 14. Remove two screws (M2x3) from the system board. 15. Gently release the ports on the system board from the slots on the palm-rest and keyboard assembly and lift the system - Dell Vostro 5402 | Service Manual - Page 84
84 Disassembly and reassembly - Dell Vostro 5402 | Service Manual - Page 85
the connector on the system board and lower the latch. 13. Adhere the tape and transparent sticker that secures the I/O cable to the system board. 14. Connect the display cable onto the connector on the system board and lower the latch. 15. Adhere the tape and transparent sticker that secures the - Dell Vostro 5402 | Service Manual - Page 86
on configuration). 4. Install the system fan. 5. Install the WLAN card. 6. Install the M.2 2230 SSD card. 7. Install the M.2 2280 SSD card. 8. Install the battery (3-cell or 4-cell) based on the configuration. 9. Install the base cover. 10. Follow the procedure in after working inside your computer - Dell Vostro 5402 | Service Manual - Page 87
Disassembly and reassembly 87 - Dell Vostro 5402 | Service Manual - Page 88
keyboard-backlight cable from the system board. 13. Open the latch, and disconnect the keypad cable from the system board. 14. Remove two screws (M2x3) from the system board. 15. Gently release the ports on the system board from the slots on the palm-rest and keyboard assembly and lift the system - Dell Vostro 5402 | Service Manual - Page 89
Disassembly and reassembly 89 - Dell Vostro 5402 | Service Manual - Page 90
tape that secures the I/O cable to the system board. 13. Connect the display cable onto the connector on the system board and lower the latch. 14. Adhere the tape that secures the display cable to the system board. 15. Lower the right metal hinge, and replace the two screws (M2.5x4 - Dell Vostro 5402 | Service Manual - Page 91
Remove the system fan. 9. Remove the speaker (3-cell battery configuration or 4-cell battery configuration). 10. Remove the heat sink. 11. Remove the coin-cell battery. 12. Remove the I/O board. 13. Remove the power button with fingerprint reader. 14. Remove the DC-in port. 15. Remove the touchpad - Dell Vostro 5402 | Service Manual - Page 92
Steps After performing the steps in the pre-requisites, you are left with the palm-rest and keyboard assembly. Installing the palm-rest and keyboard assembly - UMA Prerequisites If you are replacing a component, remove the existing component before performing the installation procedure. About this - Dell Vostro 5402 | Service Manual - Page 93
configuration). 11. Install the system fan. 12. Install the M.2 2230 SSD card. 13. Install the M.2 2280 SSD card. 14. Install the WLAN card. 15. Install the battery (3-cell or 4-cell) based on the configuration. 16. Install the base cover. 17. Follow the procedure in after working inside your - Dell Vostro 5402 | Service Manual - Page 94
. 9. Remove the heat sink discrete. 10. Remove the speaker (3-cell battery configuration or 4-cell battery configuration). 11. Remove the coin-cell battery. 12. Remove the I/O board. 13. Remove the power button with fingerprint reader. 14. Remove the DC-in port. 15. Remove the touchpad. 16. Remove - Dell Vostro 5402 | Service Manual - Page 95
11. Install the SSD-1 (M.2 2230 SSD card or M.2 2280 SSD card). 12. Install the SSD-2 . 13. Install the memory modules. 14. Install the WLAN card. 15. Install the battery (3-cell or 4-cell) based on the configuration. 16. Install the base cover. 17. Follow the procedure in after working inside your - Dell Vostro 5402 | Service Manual - Page 96
drivers Steps 1. Turn on the notebook. 2. Go to Dell.com/support. 3. Click Product Support, enter the Service Tag of your notebook, and then click Submit. NOTE: If you do not have the Service Tag, use the auto detect feature or manually browse for your notebook model. 4. Click Drivers and Downloads - Dell Vostro 5402 | Service Manual - Page 97
about the hardware installed in your computer, such as the amount of RAM and the size of the hard drive. ● Change the system configuration BIOS in Windows • System and setup password Boot menu Press when the Dell logo appears to initiate a one-time boot menu with a list of the valid - Dell Vostro 5402 | Service Manual - Page 98
hard drive). During the Power-on Self-Test (POST), when the Dell logo appears, you can: ● Access System Setup by pressing F2 . BIOS setup NOTE: Depending on the laptop and its installed devices, the items listed ○ Service Tag ○ Asset Tag ○ Manufacture Date ○ Ownership Date ○ Express Service Code - Dell Vostro 5402 | Service Manual - Page 99
Table 2. Overview Option Boot configuration Table 3. Boot configuration Option Boot Sequence Description ○ Signed Firmware Update ● Battery ○ Primary ○ Battery Level ○ Battery State ○ Health ○ AC Adapter ● Processor Information ○ Processor Type ○ Maximum Clock Speed ○ Minimum Clock Speed ○ Current - Dell Vostro 5402 | Service Manual - Page 100
IPV4) ● Onboard NIC (IPV6) NOTE: Legacy Boot mode is not supported on this platform. Secure Boot helps ensure your system boots using only ● KEK ● db ● dbx Description Allows you to set the date and time. The change to the system date and time takes effect immediately. Allows you to enable or disable - Dell Vostro 5402 | Service Manual - Page 101
) Option Disable USB4 PCIE Tunneling Description ● Enable USB Boot Support ● Enable External USB Port By default, all the options are on AC power - By default, set to 100. EcoPower increases the battery life by reducing the display brightness when appropriate. By default Enable EcoPower is enabled - Dell Vostro 5402 | Service Manual - Page 102
Start and Custom Charge Stop. Advanced Configuration This option enables you to maximize the battery health. By default, the Enable Advanced Battery Charge Mode option is disabled. NOTE: The user can charge battery using feature Beginning of Day and Work Period. By default, Work Period is disabled - Dell Vostro 5402 | Service Manual - Page 103
By default, this option is disabled. NOTE: The user can: ● Set Battery Threshold Min = 15, Max = 100 ● Prevent AC power between certain times ● Cool ● Quiet ● Ultra Performance USB Wake Support Wake on Dell USB-C Dock Allows you to connect a Dell USB-C Dock to wake the system from standby mode - Dell Vostro 5402 | Service Manual - Page 104
. Absolute This field allows you to Enable, Disable, or Permanently Disable the BIOS module interface of the optional Absolute Persistence Module service from Absolute® Software. The options are: ● Enabled-This option is enabled by default. ● Disabled ● Permanently Disable Absolute UEFI Boot Path - Dell Vostro 5402 | Service Manual - Page 105
disabled, the BIOS setup can be entered and items that are viewed in Locked mode. Master Password Lockout Allows you to disable master password support. Enable Master Password Lockout - By default, this option is disabled. NOTE: The Hard Disk password has to be cleared before the settings can be - Dell Vostro 5402 | Service Manual - Page 106
then all the automatic boot flow for SupportAssist OS Recovery tool is disabled. BIOSConnect Dell Auto OS Recovery Threshold Allows you to recover cloud service operating system if the main operating system and/or local service operating system fails to boot with the number of failures equal to or - Dell Vostro 5402 | Service Manual - Page 107
Days Keyboard Table 13. Keyboard Option Numlock Enable Fn Lock Options Keyboard Illumination Keyboard Backlight Timeout on AC Keyboard Backlight Timeout on Battery Description Allows you to enable or disable Numlock function when the system boots. Enable Numlock This option is enabled by default - Dell Vostro 5402 | Service Manual - Page 108
15 minutes ● Never NOTE: If Never is selected, the backlight stays on always when the system is running on battery power. Pre-boot behavior Table 14. Pre-boot behavior Option Description Adapter Warnings This option displays warning messages during boot when adapters with little power capacity - Dell Vostro 5402 | Service Manual - Page 109
map I/O. By default, the Enable Intel VT for Direct I/O option is enabled. Performance Table 16. Performance Option Multi Core Support Intel SpeedStep C-States Control Enable Adaptive C-states for Discrete Graphics Intel Turbo Boost Technology Intel Hyper-Threading Technology Description This - Dell Vostro 5402 | Service Manual - Page 110
system board or if an update is available. For laptops, ensure that your computer battery is fully charged and connected to a power before initiating Go to Dell.com/support. ● Enter the Service Tag or Express Service Code and click Submit. ● Click Detect Product and follow the instructions on screen - Dell Vostro 5402 | Service Manual - Page 111
Run to install the updated BIOS settings on your computer. Follow the instructions on the screen. Updating BIOS on systems with BitLocker enabled CAUTION: Dell Support website and copied to the root of the USB drive. ● AC power adapter that is connected to the system. ● Functional system battery to - Dell Vostro 5402 | Service Manual - Page 112
The Flash BIOS opens. 4. Click Flash from file. 112 System setup - Dell Vostro 5402 | Service Manual - Page 113
5. Select external USB device. 6. Once the file is selected, double-click the flash target file and click Submit. System setup 113 - Dell Vostro 5402 | Service Manual - Page 114
7. Click Update BIOS for the system to reboot and flash the BIOS. 114 System setup - Dell Vostro 5402 | Service Manual - Page 115
8. Click Confirm Update BIOS. System setup 115 - Dell Vostro 5402 | Service Manual - Page 116
Once complete, the system reboots and the BIOS update process is completed. System and setup password Table 18. System and setup password Password type System password Setup password Description Password that you must enter to log on to your system. Password that you must enter to access and make - Dell Vostro 5402 | Service Manual - Page 117
Assigning a system setup password Prerequisites You can assign a new System or Admin Password only when the status is in Not Set. About this task To enter the system setup, press F2 immediately after a power-on or reboot. Steps 1. In the System BIOS or System Setup screen, select Security and press - Dell Vostro 5402 | Service Manual - Page 118
options • WiFi power cycle • Releasing Ethernet (RJ-45) cable Built- failures. M-BIST must be manually initiated before POST and can instruction M-Bist Evaluates the health condition of the system board. Press the key and power button. Battery LED light with Solid Amber. Indicates a problem - Dell Vostro 5402 | Service Manual - Page 119
a system board failure. 3. Replace the system board to fix the issue. NOTE: The battery status LED does not illuminate if the system board is functioning properly. Display panel power rail built is no power going to the LCD, the battery status LED flashes a [2,8] LED error code. Troubleshooting 119 - Dell Vostro 5402 | Service Manual - Page 120
LCD Power Rail test. If there is no power going to the LCD, the battery status LED flashes a [2,8] LED error code. Display panel built-in self-test 1. Press and hold the D key, and then press the power button. 2. Release both the D key and the power button when the computer begins POST. 3. The - Dell Vostro 5402 | Service Manual - Page 121
● View error messages that indicate if problems were encountered during the test NOTE: Some Dell. System diagnostic lights Battery-status light Indicates the power and battery-charge status. Solid white - Power adapter is connected and the battery has more than 5 percent charge. Troubleshooting - Dell Vostro 5402 | Service Manual - Page 122
is turned off indicating no memory or RAM is detected. The following table shows different power and battery-status light patterns and associated problems. Table 21. LED codes Diagnostic light Caps Lock status indicator: Indicates whether Caps Lock is enabled or disabled. 122 Troubleshooting - Dell Vostro 5402 | Service Manual - Page 123
website to troubleshoot and fix your computer when it fails to boot into their primary operating system due to software or hardware failures. For more information about the Dell SupportAssist OS Recovery, see Dell SupportAssist OS Recovery User's Guide at www.dell.com/support. Flashing the BIOS - Dell Vostro 5402 | Service Manual - Page 124
troubleshoot and fix problems that may occur with Windows. Dell proposes multiple options for recovering Windows operating system on your Dell personal computer. For more information, see Dell instructions on how to conduct a WiFi power cycle: NOTE: Some ISPs (Internet Service clip to release it from - Dell Vostro 5402 | Service Manual - Page 125
. Availability varies by country and product, and some services may not be available in your area. To contact Dell for sales, technical support, or customer service issues: Steps 1. Go to Dell.com/support. 2. Select your support category. 3. Verify your country or region in the Choose a Country
-
 1
1 -
 2
2 -
 3
3 -
 4
4 -
 5
5 -
 6
6 -
 7
7 -
8
-
9
-
10
-
11
-
12
-
13
-
14
-
15
-
16
-
17
-
18
-
19
-
20
-
21
-
22
-
23
-
24
-
25
-
26
-
27
-
28
-
29
-
30
-
31
-
32
-
33
-
34
-
35
-
36
-
37
-
38
-
39
-
40
-
41
-
42
-
43
-
44
-
45
-
46
-
47
-
48
-
49
-
50
-
51
-
52
-
53
-
54
-
55
-
56
-
57
-
58
-
59
-
60
-
61
-
62
-
63
-
64
-
65
-
66
-
67
-
68
-
69
-
70
-
71
-
72
-
73
-
74
-
75
-
76
-
77
-
78
-
79
-
80
-
81
-
82
-
83
-
84
-
85
-
86
-
87
-
88
-
89
-
90
-
91
-
92
-
93
-
94
-
95
-
96
-
97
-
98
-
99
-
100
-
101
-
102
-
103
-
104
-
105
-
106
-
107
-
108
-
109
-
110
-
111
-
112
-
113
-
114
-
115
-
116
-
117
-
118
-
119
-
120
-
121
-
122
-
123
-
124
-
125
 |
 |

Vostro 5402
Service Manual
Regulatory Model: P130G
Regulatory Type: P130G002
October 2020
Rev. A01