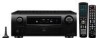
Denon 4310CI Owners Manual - Page 83
Recording, External, Device, Control, Function
 |
UPC - 883795001014
View all Denon 4310CI manuals
Add to My Manuals
Save this manual to your list of manuals |
Page 83 highlights
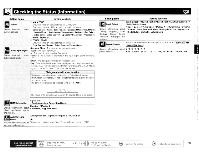
Recording on an External Device (REC OUT mode) You can listen to one program source while recording a differen program source. 1Press . I "ZONE2 SOURCE" is shown on the display. 2 Turn until "RECOUT SOURCE" is displayed. The "REC " indicator lights. ZONE? SOURCE ZONE? PHONO ZONE2 HD Radio RECOUT HD Radio RECOUT SIRIUS RECOUT SOURCE 3 Turn to choose the input source to be recorded. 4 Play the program source. For operating instructions, refer to the respective equipment's operating instructions. 5 Start recording. For operating instructions, refer to the respective equipment's operating instructions. Other Operations NOTE • Recordings you make are for your personal enjoyment and should not be used for other purposes without permission of the copyright holder. • Input sources for which "Delete" is selected at "Source Delete" (page 421cannot be selected. Turn the power on for all the equipment connected by HDMI cable. 2 Set the HDMI control function for all equipment connected by HDMI cable. Set "HDMI Control" - "Control" (o page 37) to "ON". Please consult the operating instructions for the connected equipment to check the settings. Carryout steps 1 and 2 should any of the equipment be plugged out. HDMI Control Function When you make an HDMI connection with a TV or player compatible with AVR-4310CI and HDMI control functions, you can perform the following operations by setting the HDMI control function of each device. u AVR-4310C1power off can be linked to the TV power off step. When you set "Output audio from amp" in the TV audio output setup operation, you can switch the amp power on. -I You can switch audio output devices with a TV operation. J You can adjust AVR-4310CI volume in the TV volume adjustment operation. • You can switch AVR-4310CI input source through linkage to TV input switching. u When playing the player, the AVR-4310CI input function switches to the function of that player. 3 Switch the television input to the HDMI connected to the AVR-4310C1. Switch the AVR-4310C1 input to the HDMI input 4 source and check if the picture from the player is ok. 5 When you turn the TV's power to standby, check that the power of the AVR-4310CI and player also goes on standby. If the HDMI control function does not operate properly, check the following points. • Is the TV or player compatible with the HDMI control function? • Is the AVR-4310C1 properly set? • Is the "HDMI Control" - "Control" (r page 37) set to "ON"? • Is the "Power Off Control" (0 - page 37) set to "ON"? • Is the "Control Monitor" ([C' page 371 set for the monitor output connected to television? • Are the HDMI control function settings of all equipment correct? • To cancel, press , then turn until "ZONE2 SOURCE" is displayed. • Make a test recording before starting the actual recording. • Signals are only output to the analog REC OUT connectors when the digital signals input to the digital input connectors (OPTICAL/ COAXIAL) are PCM (2-channel) signals. • Digital audio signals input to the DENON LINK or HDMI connectors are not output to the REC OUT connectors, so connect using the OPTICAL or COAXIAL connectors. • Sources selected with the REC OUT mode are output from ZONE2 as well. • In the REC OUT mode, the remote control unit's ZONE2 mode buttons cannot be operated. • The "XM" and "HD Radio" digital audio output signals are not output from the OPTICAL2 output connectors. Also, network audio signals (Internet radio, music server, USB) are not output if they are copyright-protected. • When you want to listen to TV audio by AVR-4310C1, connect optical digital or analog audio (t page 18 "Connecting the TV"). • When using these functions set as follows: "HDMI Control" - "Control" page 37) set to "ON". NOTE • When "Control" is set to "ON", it consumes more standby power. • The HDMI control function controls operations of a TV that is compatible with the HDMI control function. Make sure that the TV and HDMI are connected when you perform HDMI control. • When you power off AVR-4310C1, the HDMI control function does not operate. Either power on or set to standby. • Some functions may not operate depending on the connected TV or player. Check the owner's manual of each device for details beforehand. • When "Control" is set to "ON", it is not possible to assign an HDMI terminal to "TV" at "Input Assign" Oirpage 47). NOTE Should any of the operations below be performed, the interlocking function may be reset, in which case, repeat step's 1 and 2. • "Input Assign" - "HDMI" (er page 471 setting has changed. • "Monitor Out" (CFpage 371 setting is changed. • There is a change to the connection between the equipment and the HDMI, or an increase in equipment. 80
-
 1
1 -
2
-
3
-
4
-
5
-
6
-
7
-
8
-
9
-
10
-
11
-
12
-
13
-
14
-
15
-
16
-
17
-
18
-
19
-
20
-
21
-
22
-
23
-
24
-
25
-
26
-
27
-
28
-
29
-
30
-
31
-
32
-
33
-
34
-
35
-
36
-
37
-
38
-
39
-
40
-
41
-
42
-
43
-
44
-
45
-
46
-
47
-
48
-
49
-
50
-
51
-
52
-
53
-
54
-
55
-
56
-
57
-
58
-
59
-
60
-
61
-
62
-
63
-
64
-
65
-
66
-
67
-
68
-
69
-
70
-
71
-
72
-
73
-
74
-
75
-
76
-
77
-
 78
78 -
 79
79 -
 80
80 -
 81
81 -
 82
82 -
 83
83 -
 84
84 -
 85
85 -
 86
86 -
 87
87 -
 88
88 -
89
-
90
-
91
-
92
-
93
-
94
-
95
-
96
-
97
-
98
-
99
-
100
-
101
-
102
-
103
-
104
-
105
-
106
-
107
-
108
-
109
-
110
-
111
-
112
-
113
-
114
-
115
-
116
-
117
-
118
-
119
-
120
-
121
-
122
-
123
-
124
-
125
-
126
-
127
-
128
-
129
-
130
-
131
-
132
-
133
-
134
-
135
-
136
-
137
-
138
 |
 |
