Denon D-107 Owners Manual - Page 21
Adjusting The Tone, 12. Playing Cds - d f 107
 |
UPC - 081757504850
View all Denon D-107 manuals
Add to My Manuals
Save this manual to your list of manuals |
Page 21 highlights
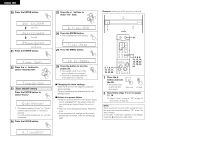
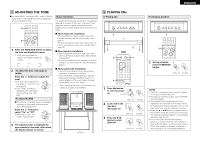
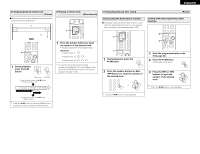
ENGLISH 11 ADJUSTING THE TONE 2 The bass (BASS), mid-range (MID), treble (TREBLE) super dynamic bass (SDB) can each be adjusted to achieve the desired tone. 1 TIME TITLE FOLDER SLEEP TONE/SDB DISPLAY ENTER MENU STOP PLAY/PAUSE /BAND VOLUME PRESET + 2 - MUTE FUNCTION 1 Press the TONE/SDB button to adjust the tone and display the mode. Each time you press this button, the display changes as follows: TONE/SDB Bass 0dB Mid 0dB SDB Off Treble 0dB 2 To adjust the bass, mid-range or treble Press the +/− buttons to adjust the level. • The level can be adjusted in the range of −10 to 0 to +10 PRESET + in steps of 2. - • The "TONE" indicator is displayed when the level is set at anything other than 0dB. To adjust the SDB 2 The volume of the bass sound is increased according to the overall volume and the above BASS adjustment. Press the +/− buttons to select "On" or "Off". • When set to "On", the "SDB" indicator lights. PRESET + - About installation The quality of the sound produced from the speakers depends on the size of the room, the type of room (Japanese style or western style) and how the speakers are mounted. Adjust the sound to suit your tastes. 2 About main unit installation When installing on a desk or table, mount the included stand and set the unit vertically. (See page 7.) The disc may fall out of the disc holder if the unit is set in any direction other than vertically. (See page 12.) 2 About speaker installation • Set the speakers sufficiently apart from each other to achieve a suitable stereo effect (sense of expansion). • It is recommended that the speakers be placed at least 7 cm from the D-107. (See the diagram below.) 2 About subwoofer installation • The set's sound balance is set assuming the subwoofer is installed on the floor. • If the subwoofer is placed against a wall, the bass sound may seem amplified due to the sound reflecting off the wall. Adjust the bass sound (BASS) to suit your tastes. See "Adjusting the tone" for instructions on adjusting the bass sound (BASS). 7 cm or greater 3 The adjusted value is displayed for approximately 5 seconds, after which the display returns to normal. On floor 12 PLAYING CDs (1) Playing CDs ON / STANDBY PERSONAL AUDIO SYSTEM / CD RECEIVER FUNCTION 2 / BAND VOLUME 1 2 3 2 OPEN / CLOSE 5 POWER 1 4 7 10 TIME PROG / DIRECT 2 3 CALL 5 6 CLEAR 8 9 RANDOM REPEAT +10 TITLE FOLDER SLEEP TONE/SDB DISPLAY ENTER MENU 1 3 STOP PLAY/PAUSE /BAND VOLUME PRESET 1 Press the button ON / STANDBY to turn the power on. Lit green POWER 2 Load a CD in the disc door. (See page 12.) (Main unit) (RC-909) OPEN / CLOSE 5 3 Press the 1/3 button to start playback. (Main unit) (RC-909) PLAY/PAUSE (Main unit) (RC-909) (2) Stopping playback ON / STANDBY PERSONAL AUDIO SYSTEM / CD RECEIVER FUNCTION 2 / BAND VOLUME 1 TONE/SDB DISPLAY ENTER MENU STOP PLAY/PAUSE /BAND VOLUME 1 PRESET + - MUTE FUNCTION 1 During playback, press the 2/BAND button. 2 / BAND STOP /BAND (Main unit) (RC-909) NOTES: • "No Disc" is displayed when no disc is loaded or the disc is loaded inside out. • According to recording quality, some CD-R/RW cannot be played. • The all-track/1-track remaining time is not displayed if the information on the disc cannot be read properly due to scratches or dirt. In this case, some time may be required for cueing. • When the 5 or 1/3 button is pressed while in the standby mode, the power turns on and the disc loading/unloading operation or the playback operation is performed. • Do not use CDs that have the exposed adhesive or marks remaining from cellophane tape, rental CD labels, or other sources. Use of CDs in this condition will result in difficulty in removing the CD or could cause breakdown. 21
-
 1
1 -
2
-
3
-
4
-
5
-
6
-
7
-
8
-
9
-
10
-
11
-
12
-
13
-
14
-
15
-
 16
16 -
 17
17 -
 18
18 -
 19
19 -
 20
20 -
 21
21 -
 22
22 -
 23
23 -
 24
24 -
 25
25 -
 26
26 -
27
-
28
-
29
-
30
-
31
-
32
-
33
-
34
-
35
-
36
-
37
-
38
-
39
-
40
-
41
-
42
-
43
-
44
-
45
-
46
-
47
-
48
-
49
-
50
-
51
-
52
-
53
-
54
-
55
-
56
-
57
-
58
-
59
-
60
-
61
-
62
-
63
-
64
-
65
-
66
-
67
-
68
-
69
-
70
-
71
-
72
-
73
-
74
-
75
-
76
-
77
-
78
-
79
-
80
 |
 |
