Dewalt DHS790AT2 Instruction Manual - Page 15
Installing and Removing the Corded Power Supply into
 |
View all Dewalt DHS790AT2 manuals
Add to My Manuals
Save this manual to your list of manuals |
Page 15 highlights
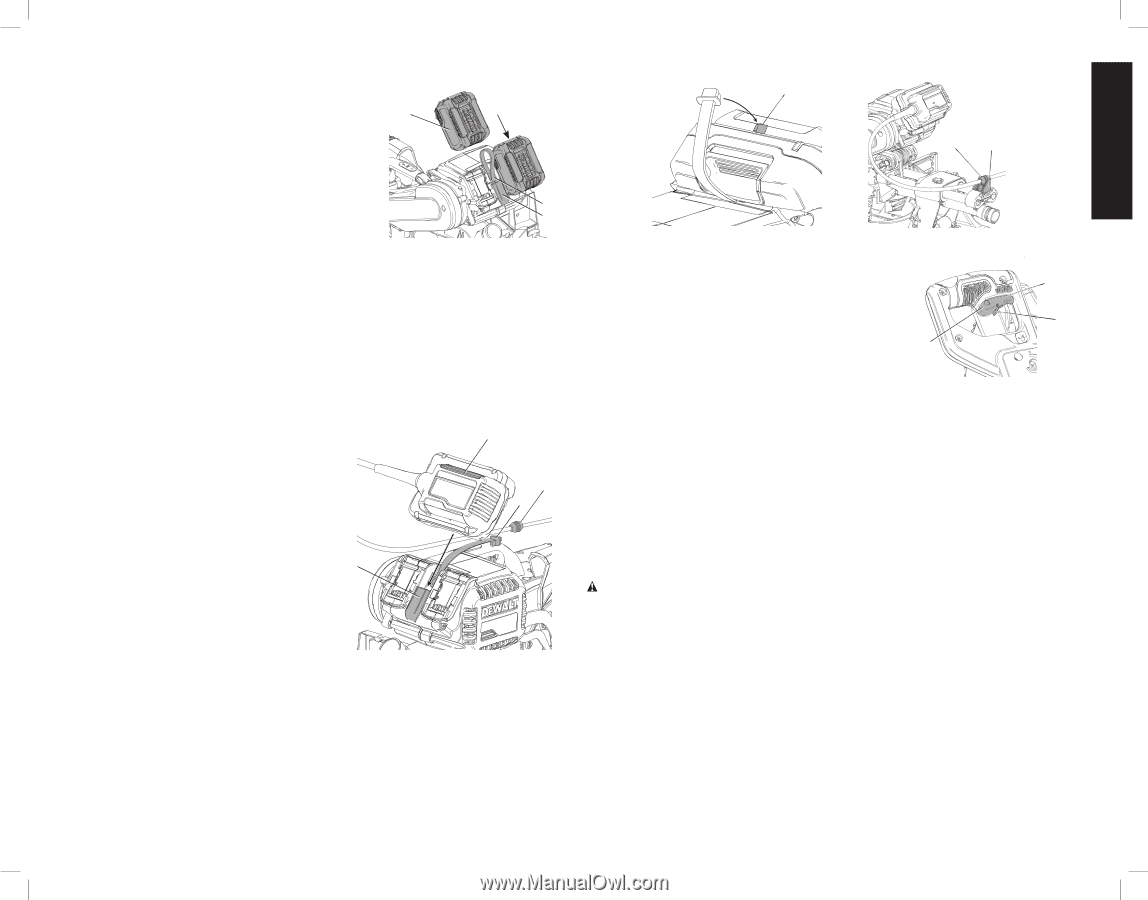
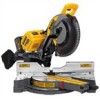
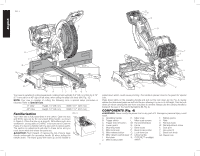
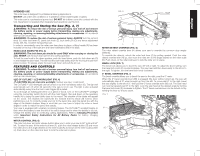
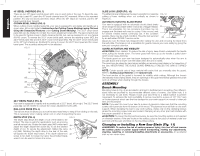
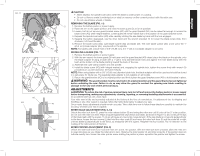
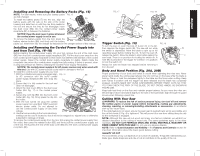
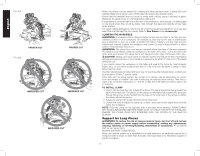
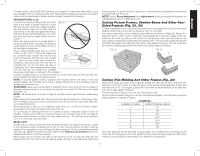
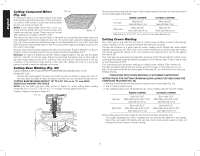
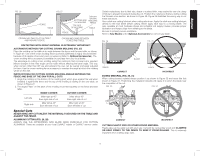
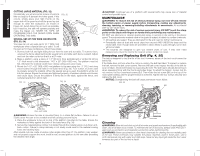
English Installing and Removing the Battery Packs (Fig. 15) NOTE: For best results, make sure your battery packs FIG. 15 are fully charged. To install the battery packs (T) into the tool, align the T BA battery packs with the rails on the side of the motor housing and slide them in until they are firmly seated in the tool and ensure that they do not disengage. Insert the dust cover (BG) into the corded power supply receptacle (BF) in between the batteries. NOTICE: Keep the dust cover in place whenever the corded power supply is not in use. BG BF To remove the battery packs from the tool, press the battery release button (BA) and firmly pull the battery packs out. Insert them into the charger as described in the charger section of this manual. Installing and Removing the Corded Power Supply into and from Tool (Fig. 16-18) Before inserting the corded power supply into your tool, remove the end of the dust cover (BG) from the tool's corded power supply receptacle (BF). Pull the dust cover away from the tool's corded power supply receptacle so that it does not interfere with insertion of the corded power supply. Inspect the corded power supply receptacle for debris. Debris inside the receptacle can prevent the corded power supply from fully seating. If debris is present, clean it using low pressure air. Refer to Cleaning the Corded Power Supply Receptacle. NOTICE: The corded power supply is for AC power sources only when used with this tool. Use with DC power sources could result in damage to the tool. To install the corded power supply into your tool: 1. With the corded power supply unplugged, align FIG. 16 BE its AC connector with the tool's corded power supply receptacle (BF) then snap into place. 2. Ensure that it is fully seated in the tool and BD does not disengage. BG 3. Attach the dust cover (BG) to the dust cover holder (BH Fig. 17) in the corded power supply. 4. Secure the cord clip (BD) into the tool's cord holder (BC, Fig. 18). Firmly press the clip into BF the holder. 5. With the tool turned off, plug the corded power supply into a standard 120V household electric power outlet. Do not attempt to use the corded power supply on any other voltage. 6. Use the tool according to the tool instructions, making sure the cord is located so that it will not be stepped on, tripped over, or otherwise subjected to damage or stress. To remove the corded power supply from the tool, first unplug the corded power supply from the outlet, then press the release button (BE) and firmly pull the corded power supply out of the tool. Firmly press the end of the dust cover (BG) into the tool's corded power supply receptacle (BF). FIG. 17 FIG. 18 BH BD BC Trigger Switch (Fig. 19) FIG. 19 To turn the saw on, push the lock-off button (C) to the left, then depress the trigger switch (B). The saw will run while BI the switch is depressed. Allow the blade to spin up to full operating speed before making the cut. To turn the saw off, release the switch. Allow the blade to stop before raising the C saw head. There is no provision for locking the switch on. A hole (BI) is provided in the trigger for insertion of a padlock B to lock the switch off. Always be sure the blade has stopped before removing it from the kerf. Body and Hand Position (Fig. 20A, 20B) Proper positioning of your body and hands is crucial when operating the miter saw. Never place hands inside the cutting area between the two red lines on the base while the blade is turning. Clamp or hold the workpiece tightly to the table and the fence when cutting. Keep both hands in position until the trigger has been released and the blade has completely stopped. ALWAYS MAKE DRY RUNS (UNPOWERED) BEFORE FINISH CUTS SO THAT YOU CAN CHECK THE PATH OF THE BLADE. DO NOT CROSS HANDS, AS SHOWN IN FIGURE 20B. Keep both feet firmly on the floor and maintain proper balance. As you move the miter arm left and right, follow it and stand slightly to the side of the saw blade. Sight through the guard louvers when following a pencil line. Cutting With Your Saw WARNING: To reduce the risk of serious personal injury, turn tool off and remove the battery packs or power supply before transporting, making any adjustments, cleaning, repairing, or removing/installing attachments or accessories. An accidental start-up can cause injury. If the slide feature is not used, ensure the saw head is pushed back as far as possible and the rail lock knob (V, Fig. 4) is tightened. This will prevent the saw from sliding along its rails as the workpiece is engaged. NOTE: Although this saw will cut wood and many non-ferrous materials, we will limit our detailed discussion to the cutting of wood only. The same guidelines apply to the other materials. DO NOT CUT FERROUS (IRON AND STEEL) MATERIALS, MASONRY OR FIBER CEMENT WITH THIS SAW. Do not use any abrasive blades. NOTE: Refer to Guard Actuation and Visibility in the Features and Controls section for important information about the lower guard before cutting. QUALITY OF CUT The smoothness of any cut depends on a number of variables. Things like material being cut, blade type, blade sharpness and rate of cut all contribute to the quality of the cut. 13
-
 1
1 -
2
-
3
-
4
-
5
-
6
-
7
-
8
-
9
-
 10
10 -
 11
11 -
 12
12 -
 13
13 -
 14
14 -
 15
15 -
 16
16 -
 17
17 -
 18
18 -
 19
19 -
 20
20 -
21
-
22
-
23
-
24
-
25
-
26
-
27
-
28
-
29
-
30
-
31
-
32
-
33
-
34
-
35
-
36
-
37
-
38
-
39
-
40
-
41
-
42
-
43
-
44
-
45
-
46
-
47
-
48
-
49
-
50
-
51
-
52
-
53
-
54
-
55
-
56
-
57
-
58
-
59
-
60
-
61
-
62
-
63
-
64
-
65
-
66
-
67
-
68
-
69
-
70
-
71
-
72
-
73
-
74
-
75
-
76
 |
 |