Epson ELP-5500 User Manual - Page 104
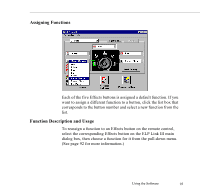
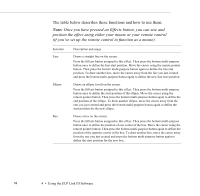
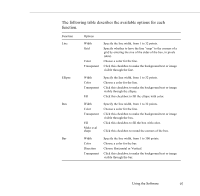
The table below describes these functions and how to use them.
 |
UPC - 010343820371
View all Epson ELP-5500 manuals
Add to My Manuals
Save this manual to your list of manuals |
Page 104 highlights
The table below describes these functions and how to use them. Note: Once you have pressed an Effects button, you can size and position the effect using either your mouse or your remote control (if you've set up the remote control to function as a mouse). Function Line Ellipse Box Description and usage Draws a straight line on the screen. Press the Effects button assigned to this effect. Then press the bottom multi-purpose button once to define the line start position. Move the cursor using the remote pointer button. Then press the bottom multi-purpose button again to define the line end position. To draw another line, move the cursor away from the line you just created and press the bottom multi-purpose button again to define the new line start position. Draws an ellipse (oval) on the screen. Press the Effects button assigned to this effect. Then press the bottom multi-purpose button once to define the start position of the ellipse. Move the cursor using the remote pointer button. Then press the bottom multi-purpose button again to define the end position of the ellipse. To draw another ellipse, move the cursor away from the one you just created and press the bottom multi-purpose button again to define the start position for the new ellipse. Draws a box on the screen. Press the Effects button assigned to this effect. Then press the bottom multi-purpose button once to define the position of one corner of the box. Move the cursor using the remote pointer button. Then press the bottom multi-purpose button again to define the position of the opposite corner of the box. To draw another box, move the cursor away from the one you just created and press the bottom multi-purpose button again to define the start position for the new box. 94 4 • Using the ELP Link III Software
-
 1
1 -
2
-
3
-
4
-
5
-
6
-
7
-
8
-
9
-
10
-
11
-
12
-
13
-
14
-
15
-
16
-
17
-
18
-
19
-
20
-
21
-
22
-
23
-
24
-
25
-
26
-
27
-
28
-
29
-
30
-
31
-
32
-
33
-
34
-
35
-
36
-
37
-
38
-
39
-
40
-
41
-
42
-
43
-
44
-
45
-
46
-
47
-
48
-
49
-
50
-
51
-
52
-
53
-
54
-
55
-
56
-
57
-
58
-
59
-
60
-
61
-
62
-
63
-
64
-
65
-
66
-
67
-
68
-
69
-
70
-
71
-
72
-
73
-
74
-
75
-
76
-
77
-
78
-
79
-
80
-
81
-
82
-
83
-
84
-
85
-
86
-
87
-
88
-
89
-
90
-
91
-
92
-
93
-
94
-
95
-
96
-
97
-
98
-
 99
99 -
 100
100 -
 101
101 -
 102
102 -
 103
103 -
 104
104 -
 105
105 -
 106
106 -
 107
107 -
 108
108 -
 109
109 -
110
-
111
-
112
-
113
-
114
-
115
-
116
-
117
-
118
-
119
-
120
-
121
-
122
-
123
-
124
-
125
-
126
-
127
-
128
-
129
-
130
-
131
-
132
-
133
-
134
-
135
-
136
-
137
-
138
-
139
-
140
-
141
-
142
-
143
-
144
-
145
-
146
-
147
-
148
-
149
-
150
-
151
-
152
-
153
-
154
-
155
-
156
 |
 |