Epson ELPDC11 Document Camera User's Guide - Page 27
Using the On-screen Menu, Making Image Adjustments
 |
View all Epson ELPDC11 Document Camera manuals
Add to My Manuals
Save this manual to your list of manuals |
Page 27 highlights
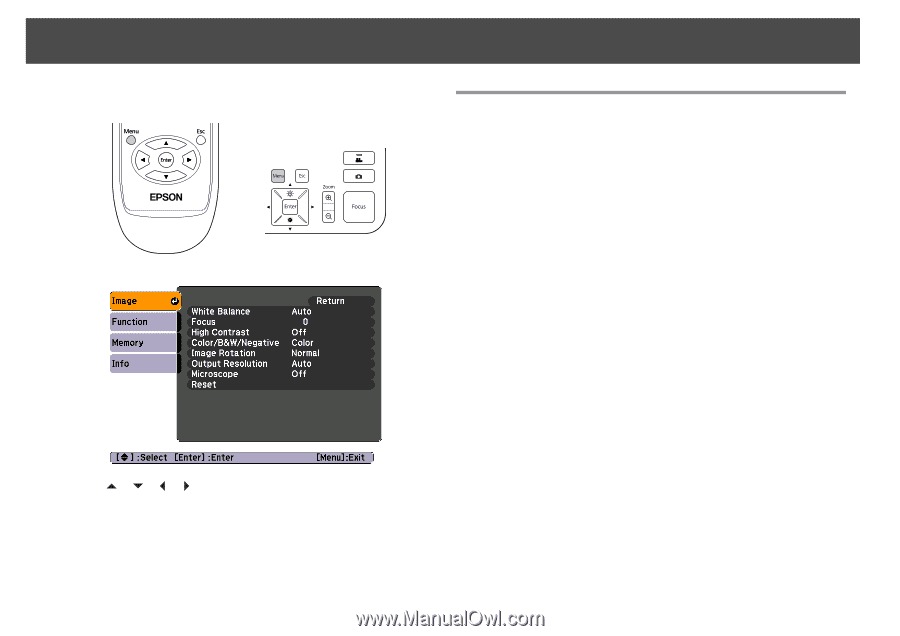
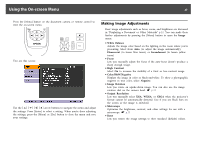
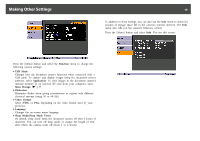
Using the On-screen Menu 27 Press the [Menu] button on the document camera or remote control to view the on-screen menu. You see this screen: Use the arrow buttons to navigate the menu and adjust the settings. Press [Enter] to select a setting. When you're done adjusting the settings, press the [Menu] or [Esc] button to close the menu and save your settings. Making Image Adjustments Basic image adjustments such as focus, zoom, and brightness are discussed in "Displaying a Document or Other Materials" p.22. You can make these further adjustments by pressing the [Menu] button to open the Image menu: • White Balance Adjusts the image color based on the lighting in the room where you're presenting. Select from Auto (to adjust the image automatically), Fluorescent (to lessen blue tones), or Incandescent (to lessen yellow tones). • Focus Lets you manually adjust the focus if the auto-focus doesn't produce a sharp enough image. • High Contrast Select On to increase the visibility of a faint or low-contrast image. • Color/B&W/Negative Displays the image in color or black-and-white. To show a photographic negative in true color, select Negative. • Image Rotation Lets you rotate an upside-down image. You can also use the image rotation dial on the camera head. s p.22 • Output Resolution Lets you manually select XGA, WXGA, or SXGA when the projector's format cannot be automatically detected. Use if you see black bars on the screen or the image is stretched. • Microscope Optimizes the brightness, contrast, and other settings for use with a microscope. s p.23 • Reset Lets you return the image settings to their standard (default) values.
-
 1
1 -
2
-
3
-
4
-
5
-
6
-
7
-
8
-
9
-
10
-
11
-
12
-
13
-
14
-
15
-
16
-
17
-
18
-
19
-
20
-
21
-
 22
22 -
 23
23 -
 24
24 -
 25
25 -
 26
26 -
 27
27 -
 28
28 -
 29
29 -
 30
30 -
 31
31 -
 32
32 -
33
-
34
-
35
-
36
-
37
-
38
-
39
-
40
-
41
-
42
-
43
-
44
-
45
-
46
-
47
-
48
-
49
-
50
-
51
-
52
-
53
-
54
-
55
-
56
-
57
-
58
-
59
-
60
-
61
-
62
-
63
-
64
-
65
 |
 |