Epson ELPDC11 Document Camera User's Guide - Page 37
Displaying a Slideshow, d
 |
View all Epson ELPDC11 Document Camera manuals
Add to My Manuals
Save this manual to your list of manuals |
Page 37 highlights
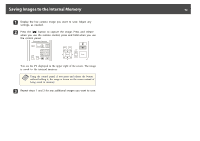
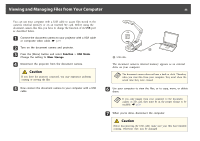
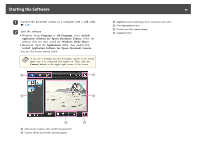
Displaying a Slideshow 37 Once you have stored images in the document camera's internal memory or on an SD card, you can display a slideshow. a In addition to images captured with the document camera, you can display photos taken with a digital camera by inserting its SD card. You can also display images copied to the document camera or an SD card from your computer (s p.35), but they must be in the proper format. s p.50 a Press the [Menu] button and select Memory. b Select Internal Memory (to view images in internal memory) or SD Card (to view images on your SD card, if inserted). You see a screen like this: A Highlight the arrow and press [Enter] to view more images c To rotate an image, use the arrow buttons to highlight it and press [Enter] to select it. (Press [Enter] again to deselect it.) A checkmark is added to the image. In the same way, select any additional images you want to rotate. Select Rotate. All checkmarked images are rotated 90 degrees clockwise. a Image quality may decrease slightly after rotating an image. Also, if your photo is time-stamped, the date will be changed to a default value. d Use the arrow buttons to highlight each image to be displayed in the slideshow, and press [Enter] to select it. (Press [Enter] again to deselect it.) A checkmark is added to the selected images. a To add checkmarks to all images, choose Select All. To remove all checkmarks, choose Select All again. e Select Slideshow to display the first image in the slideshow. f Press [ ] to advance to the next image. Press [ ] to return to the previous image. g End the slideshow by pressing [ ] while the last image is displayed. Or press [Menu] or [Esc] to end the slideshow at any time.
-
 1
1 -
2
-
3
-
4
-
5
-
6
-
7
-
8
-
9
-
10
-
11
-
12
-
13
-
14
-
15
-
16
-
17
-
18
-
19
-
20
-
21
-
22
-
23
-
24
-
25
-
26
-
27
-
28
-
29
-
30
-
31
-
 32
32 -
 33
33 -
 34
34 -
 35
35 -
 36
36 -
 37
37 -
 38
38 -
 39
39 -
 40
40 -
 41
41 -
 42
42 -
43
-
44
-
45
-
46
-
47
-
48
-
49
-
50
-
51
-
52
-
53
-
54
-
55
-
56
-
57
-
58
-
59
-
60
-
61
-
62
-
63
-
64
-
65
 |
 |