Epson EX5200 User Manual - Page 31
Connecting to a Computer, Connecting to the USB Port - remote
 |
View all Epson EX5200 manuals
Add to My Manuals
Save this manual to your list of manuals |
Page 31 highlights
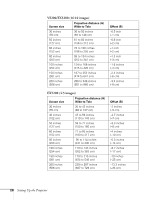
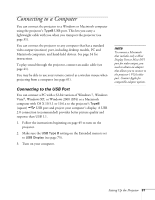
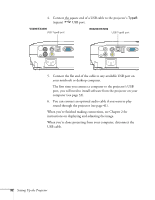
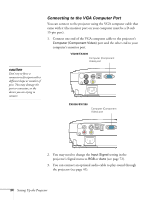
Connecting to a Computer You can connect the projector to a Windows or Macintosh computer using the projector's TypeB USB port. This lets you carry a lightweight cable with you when you transport the projector (see page 31). You can connect the projector to any computer that has a standard video output (monitor) port, including desktop models, PC and Macintosh computers, and hand-held devices. See page 34 for instructions. To play sound through the projector, connect an audio cable (see page 41). You may be able to use your remote control as a wireless mouse when projecting from a computer (see page 61). Connecting to the USB Port You can connect a PC with a 32-bit version of Windows 7, Windows Vista®, Windows XP, or Windows 2000 (SP4) or a Macintosh computer with OS X 10.5.1 or 10.6.x to the projector's TypeB (square) USB port and project your computer's display. A USB 2.0 connection (recommended) provides better picture quality and response than USB 1.1. 1. Follow the instructions beginning on page 45 to turn on the projector. 2. Make sure the USB Type B setting on the Extended menu is set to USB Display (see page 75). 3. Turn on your computer. note To connect a Macintosh that includes only a Mini Display Port or Mini-DVI port for video output, you need to obtain an adapter that allows you to connect to the projector's VGA video port. Contact Apple for compatible adapter options. Setting Up the Projector 31
-
 1
1 -
2
-
3
-
4
-
5
-
6
-
7
-
8
-
9
-
10
-
11
-
12
-
13
-
14
-
15
-
16
-
17
-
18
-
19
-
20
-
21
-
22
-
23
-
24
-
25
-
 26
26 -
 27
27 -
 28
28 -
 29
29 -
 30
30 -
 31
31 -
 32
32 -
 33
33 -
 34
34 -
 35
35 -
 36
36 -
37
-
38
-
39
-
40
-
41
-
42
-
43
-
44
-
45
-
46
-
47
-
48
-
49
-
50
-
51
-
52
-
53
-
54
-
55
-
56
-
57
-
58
-
59
-
60
-
61
-
62
-
63
-
64
-
65
-
66
-
67
-
68
-
69
-
70
-
71
-
72
-
73
-
74
-
75
-
76
-
77
-
78
-
79
-
80
-
81
-
82
-
83
-
84
-
85
-
86
-
87
-
88
-
89
-
90
-
91
-
92
-
93
-
94
-
95
-
96
-
97
-
98
-
99
-
100
-
101
-
102
-
103
-
104
-
105
-
106
-
107
-
108
-
109
-
110
-
111
-
112
-
113
-
114
-
115
-
116
-
117
-
118
-
119
-
120
-
121
-
122
-
123
-
124
-
125
-
126
 |
 |