Epson EX5200 User Manual - Page 35
Connecting to Video Equipment - audio output
 |
View all Epson EX5200 manuals
Add to My Manuals
Save this manual to your list of manuals |
Page 35 highlights
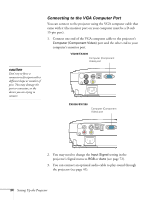
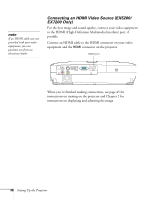
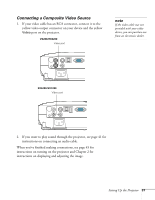
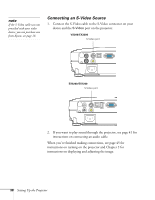
4. You may also be able to use the remote control as a wireless mouse (see page 61). When you've finished making connections, see page 45 for instructions on turning on the projector and Chapter 2 for instructions on displaying and adjusting the image. Connecting to Video Equipment You can connect several video sources to the projector at the same time. Before starting, look at your video equipment to determine its available video output connections: ■ EX5200/EX7200 only: If your video device has an HDMI connector, see "Connecting an HDMI Video Source (EX5200/ EX7200 Only)" on page 36. ■ If your video device has a yellow RCA video output connector, see "Connecting a Composite Video Source" on page 37. ■ If your video device has an S-Video connector, see "Connecting an S-Video Source" on page 38. ■ If your video device has a component video port (three connectors labeled either Y/Cb/Cr or Y/Pb/Pr), see "Connecting a Component Video Source" on page 39. ■ If your video device has an RGB video port, see "Connecting an RGB Video Source" on page 40. After connecting video cables, you may also want to connect an optional audio cable to play sound through the projector; see page 41. If you connect using an HDMI cable (EX5200/EX7200 only), the video and sound are both transferred and you won't need to connect any additional cables for audio. Setting Up the Projector 35
-
 1
1 -
2
-
3
-
4
-
5
-
6
-
7
-
8
-
9
-
10
-
11
-
12
-
13
-
14
-
15
-
16
-
17
-
18
-
19
-
20
-
21
-
22
-
23
-
24
-
25
-
26
-
27
-
28
-
29
-
 30
30 -
 31
31 -
 32
32 -
 33
33 -
 34
34 -
 35
35 -
 36
36 -
 37
37 -
 38
38 -
 39
39 -
 40
40 -
41
-
42
-
43
-
44
-
45
-
46
-
47
-
48
-
49
-
50
-
51
-
52
-
53
-
54
-
55
-
56
-
57
-
58
-
59
-
60
-
61
-
62
-
63
-
64
-
65
-
66
-
67
-
68
-
69
-
70
-
71
-
72
-
73
-
74
-
75
-
76
-
77
-
78
-
79
-
80
-
81
-
82
-
83
-
84
-
85
-
86
-
87
-
88
-
89
-
90
-
91
-
92
-
93
-
94
-
95
-
96
-
97
-
98
-
99
-
100
-
101
-
102
-
103
-
104
-
105
-
106
-
107
-
108
-
109
-
110
-
111
-
112
-
113
-
114
-
115
-
116
-
117
-
118
-
119
-
120
-
121
-
122
-
123
-
124
-
125
-
126
 |
 |
