Epson EX5200 User Manual - Page 51
Adjusting the Position of the Image, Adjusting the Image Shape, Displaying and Adjusting the Image
 |
View all Epson EX5200 manuals
Add to My Manuals
Save this manual to your list of manuals |
Page 51 highlights
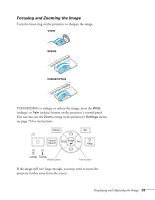
Adjusting the Position of the Image If the image is too low on the screen, you can use the front adjustable foot to raise it. 1. Press the foot release lever up and lift the front of the projector. 2. Once the image is positioned where you want it, release the lever to lock the foot in position. 3. If the image is tilted or you need to fine-tune the height of the image, you can turn the projector's adjustable rear feet. Raising the projector may cause the image shape to distort or "keystone," but you can correct the shape as described below. Adjusting the Image Shape You can maintain a rectangular image by placing the projector directly in front of the screen and keeping it level. This also produces the best picture quality. If the projector is tilted up or down (up to 30°), or placed at an angle, the shape may "keystone" and you may need to correct the image shape. The EX5200 and EX7200 projectors include an Auto Keystone function that detects and corrects vertical keystone distortion. It takes about one second after the projector starts for the image to be corrected. Displaying and Adjusting the Image 51
-
 1
1 -
2
-
3
-
4
-
5
-
6
-
7
-
8
-
9
-
10
-
11
-
12
-
13
-
14
-
15
-
16
-
17
-
18
-
19
-
20
-
21
-
22
-
23
-
24
-
25
-
26
-
27
-
28
-
29
-
30
-
31
-
32
-
33
-
34
-
35
-
36
-
37
-
38
-
39
-
40
-
41
-
42
-
43
-
44
-
45
-
 46
46 -
 47
47 -
 48
48 -
 49
49 -
 50
50 -
 51
51 -
 52
52 -
 53
53 -
 54
54 -
 55
55 -
 56
56 -
57
-
58
-
59
-
60
-
61
-
62
-
63
-
64
-
65
-
66
-
67
-
68
-
69
-
70
-
71
-
72
-
73
-
74
-
75
-
76
-
77
-
78
-
79
-
80
-
81
-
82
-
83
-
84
-
85
-
86
-
87
-
88
-
89
-
90
-
91
-
92
-
93
-
94
-
95
-
96
-
97
-
98
-
99
-
100
-
101
-
102
-
103
-
104
-
105
-
106
-
107
-
108
-
109
-
110
-
111
-
112
-
113
-
114
-
115
-
116
-
117
-
118
-
119
-
120
-
121
-
122
-
123
-
124
-
125
-
126
 |
 |
