Epson S60600 User Manual - Page 106
Performing Pre-storage Maintenance, All Nozzles, Head1/Head2, Selected Nozzles, Execute With Selection
 |
View all Epson S60600 manuals
Add to My Manuals
Save this manual to your list of manuals |
Page 106 highlights
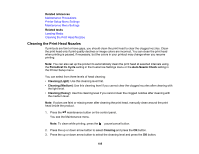
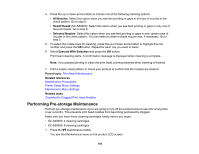
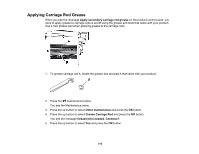
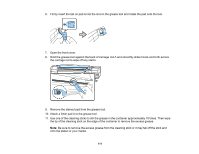
4. Press the up or down arrow button to choose one of the following cleaning options: • All Nozzles: Select this option when you see faint printing or gaps in all rows of nozzles in the check pattern. Go to step 6. • Head1/Head2 (SC-S60600): Select this option when you see faint printing or gaps in only one of the print heads. Go to step 6. • Selected Nozzles: Select this option when you see faint printing or gaps in only certain rows of nozzles in the check pattern. You can select to clean multiple nozzle rows, if necessary. Go to step 5. 5. To select the nozzle rows for cleaning, press the up or down arrow button to highlight the row number and press the OK button. Repeat for each row you want to clean. 6. Select Execute With Selection and press the OK button. Print head cleaning starts. A confirmation message is displayed when cleaning is complete. Note: If you paused printing to clean the print head, printing resumes when cleaning is finished. 7. Print a nozzle check pattern or check your printout to confirm that the nozzles are cleared. Parent topic: Print Head Maintenance Related references Maintenance Precautions Printer Setup Menu Settings Maintenance Menu Settings Related tasks Checking for Clogged Print Head Nozzles Performing Pre-storage Maintenance Perform pre-storage maintenance if you are going to turn off the product and not use it for a long time (over a month). This prevents print head nozzles from becoming permanently clogged. Make sure you have these cleaning cartridges handy before you begin: • SC-S40600: 4 cleaning cartridges • SC-S60600: 8 cleaning cartridges 1. Press the maintenance button. You see the Maintenance menu on the product LCD screen. 106
-
 1
1 -
2
-
3
-
4
-
5
-
6
-
7
-
8
-
9
-
10
-
11
-
12
-
13
-
14
-
15
-
16
-
17
-
18
-
19
-
20
-
21
-
22
-
23
-
24
-
25
-
26
-
27
-
28
-
29
-
30
-
31
-
32
-
33
-
34
-
35
-
36
-
37
-
38
-
39
-
40
-
41
-
42
-
43
-
44
-
45
-
46
-
47
-
48
-
49
-
50
-
51
-
52
-
53
-
54
-
55
-
56
-
57
-
58
-
59
-
60
-
61
-
62
-
63
-
64
-
65
-
66
-
67
-
68
-
69
-
70
-
71
-
72
-
73
-
74
-
75
-
76
-
77
-
78
-
79
-
80
-
81
-
82
-
83
-
84
-
85
-
86
-
87
-
88
-
89
-
90
-
91
-
92
-
93
-
94
-
95
-
96
-
97
-
98
-
99
-
100
-
 101
101 -
 102
102 -
 103
103 -
 104
104 -
 105
105 -
 106
106 -
 107
107 -
 108
108 -
 109
109 -
 110
110 -
 111
111 -
112
-
113
-
114
-
115
-
116
-
117
-
118
-
119
-
120
-
121
-
122
-
123
-
124
-
125
-
126
-
127
-
128
-
129
-
130
-
131
-
132
-
133
-
134
-
135
-
136
-
137
-
138
-
139
-
140
-
141
-
142
-
143
-
144
-
145
-
146
-
147
-
148
-
149
 |
 |
