Epson S60600 User Manual - Page 43
Printing the Amount of Media Remaining, Media Size Check
 |
View all Epson S60600 manuals
Add to My Manuals
Save this manual to your list of manuals |
Page 43 highlights
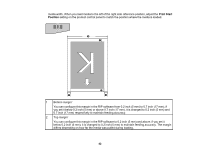
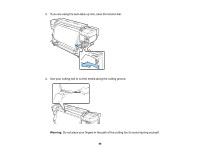
3 Left margin2, 3 You select this margin as the Side Margin(Left) setting on the product control panel. The default setting is 0.2 inch (5 mm), but you can select from 0.12 inch (3 mm) to 0.98 inch (25 mm). 4 Right margin2, 3 You select this margin as the total of the values for the Print Start Position (default setting is 0) and Side Margin(Right) (default setting is 0.2 inch [5 mm]) settings on the product control panel. You can select from 0.12 inch (3 mm) to 32.5 inches (825 mm). 5 Media width 11.8 to 64 inches (300 mm to 1626 mm); if Media Size Check is off, the product assumes this is 64 inches (1626 mm) regardless of the actual width. 1 The configured margin and the actual print results may differ depending on the RIP software you use. Contact the RIP manufacturer for more information. 2 Depending on the RIP software, you may be able to use it to set these margins. Contact the RIP manufacturer for more information. 3 When using the media holding plates, leave margins of at least 0.4 inch (10 mm) to avoid printing over the plates. If the total of the print data width and the left and right margins exceeds the printable area, a portion of the print data will not print. Parent topic: Media Handling Related references Printer Setup Menu Settings Printing the Amount of Media Remaining After you print, you can print the amount of media remaining on the leading edge of the remaining roll. This lets you enter the number the next time you load the media for the most accurate accounting of the media remaining on each roll Note: You must have turned on the Remaining Setup setting on the product control panel to calculate the amount of media remaining. 1. Make sure your product is ready to print. 2. Press the media setup button, select Media Remaining in the displayed menu, and press the OK button. 3. Select Print Remaining Length and press the OK button. 43
-
 1
1 -
2
-
3
-
4
-
5
-
6
-
7
-
8
-
9
-
10
-
11
-
12
-
13
-
14
-
15
-
16
-
17
-
18
-
19
-
20
-
21
-
22
-
23
-
24
-
25
-
26
-
27
-
28
-
29
-
30
-
31
-
32
-
33
-
34
-
35
-
36
-
37
-
 38
38 -
 39
39 -
 40
40 -
 41
41 -
 42
42 -
 43
43 -
 44
44 -
 45
45 -
 46
46 -
 47
47 -
 48
48 -
49
-
50
-
51
-
52
-
53
-
54
-
55
-
56
-
57
-
58
-
59
-
60
-
61
-
62
-
63
-
64
-
65
-
66
-
67
-
68
-
69
-
70
-
71
-
72
-
73
-
74
-
75
-
76
-
77
-
78
-
79
-
80
-
81
-
82
-
83
-
84
-
85
-
86
-
87
-
88
-
89
-
90
-
91
-
92
-
93
-
94
-
95
-
96
-
97
-
98
-
99
-
100
-
101
-
102
-
103
-
104
-
105
-
106
-
107
-
108
-
109
-
110
-
111
-
112
-
113
-
114
-
115
-
116
-
117
-
118
-
119
-
120
-
121
-
122
-
123
-
124
-
125
-
126
-
127
-
128
-
129
-
130
-
131
-
132
-
133
-
134
-
135
-
136
-
137
-
138
-
139
-
140
-
141
-
142
-
143
-
144
-
145
-
146
-
147
-
148
-
149
 |
 |