Fagor Lux Lcd Multicooker User Manual - Page 15
Yogurt Making in Glass Jars
 |
View all Fagor Lux Lcd Multicooker manuals
Add to My Manuals
Save this manual to your list of manuals |
Page 15 highlights
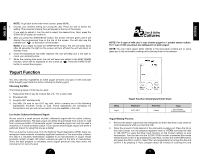
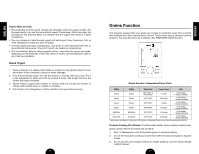
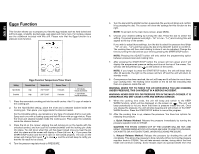
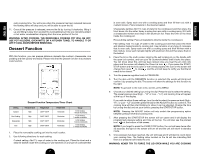
ENGLISH confirm by pressing START/STOP. Use a thermometer to make sure that proper temperature has been reached. 3. Remove the removable cooking pot from heat using a kitchen towel or oven mitts and allow the milk to cool to anywhere between 100°F-110°F. To accelerate the cooling down process, place the removable cooking pot in cold water. Do not let it cool below 90°F. 4. Add the yogurt or starter culture packet and use a silicone whisk to mix it with the milk until the consistency is smooth with no lumps remaining. 5. Place the lid on the cooker; align the self-locking pin with the unlocked symbol and turn your lid counterclockwise until the locking pin clicks into place. The screen will display the Close Lid icon ... . If you press the START/STOP button to begin cooking and the lid is open or not locked properly, the icon on the screen will change from open ....... to close ...... , and the unit will beep to notify you that the lid needs to be closed. Turn the pressure regulator knob to STEAM when using the yogurt function. Turn the dial until the Yogurt function is selected (the words will blink) and confirm it by pressing the dial. The preset cooking time is 8 hours. Depending on the flavor of yogurt you like best, you can choose how long to cook the yogurt for by adjusting the time. To do that, turn the dial to your desired time and then press the START/STOP button to confirm it. The longest cooking time is 24 hours. The preparation time impacts the flavor of the yogurt. With a longer cooking time, the yogurt will have a tarter flavor. With a shorter time, the yogurt will have a milder flavor. 6. Press the START/STOP button to begin the yogurt function. The screen will turn green and it will display the programmed time at the top of the screen. You will also see the preheat icon ....... on the bottom of the screen. NOTE: If you forget to press the START/STOP button, the unit will beep twice after 30 seconds, the light on the screen will turn off and the unit will return to standby mode. 7. Once the temperature has been reached, the unit will beep and it will begin to count down. 8. When the cooking time ends, the unit will beep to let you know that the function is done and the unit will switch back to standby mode. 9. When the yogurt is ready, remove the lid. There may be some yellowish liquid, whey, on top of the yogurt. This is normal, whey contains nutrients and protein. Mix it back into the yogurt. 10. If you prefer regular yogurt, cover and place it in the refrigerator for 2 to 3 hours before serving, or until yogurt cools down. If you prefer Greek yogurt, please refer to page 28. NOTE: THE MULTI-COOKER SHOULD REMAIN PERFECTLY STILL DURING THE INCUBATION PROCESS. DO NOT MOVE THE APPLIANCE; DO NOT REMOVE THE REMOVABLE COOKING POT OR THE LID AS THIS WILL AFFECT THE FIRMNESS OF THE YOGURT. DO NOT ADD ANY FLAVORING BEFORE COMPLETING THE INCUBATION PROCESS. 26 Yogurt Making in Glass Jars: 1. Remove the starter yogurt from the refrigerator so that it has time to get closer to room temperature while you heat the milk. 2. When you heat the milk in glass jars, add 1 cup of water into the removable cooking pot, then insert the trivet and steamer basket rack and place your glass jars on top. Place the lid on the multi-cooker and turn the pressure regulator knob to STEAM. Select the SLOW COOK function to heat the milk to 180-185°F by turning the dial and confirm it by pressing the dial. Next, choose the CUSTOM function and press the dial to confirm. Select the Low temperature by turning the dial and confirm it by pressing it. Next, program about 30 minutes of cooking time and confirm by pressing START/STOP. Use a thermometer to make sure that proper temperature has been reached. 3. Next, allow the milk to cool to lukewarm (100-110°F). To accelerate the cooling down process, take out the jars with the help of a jar lifter. Do not let it cool below 90°F. 4. Add the plain yogurt with live active cultures and use a spoon to mix it with the milk until the consistency is smooth with no lumps remaining. 5. Place the lid on the multi-cooker; align the self-locking pin on the handle with the open lock symbol, and turn it counterclockwise until the locking pin clicks into place. The screen will display a Close Lid icon ....... If you press the START/STOP button to begin cooking and the lid is open or not locked properly, the icon on the screen will change from open (i.9) to close ic10), and the unit will beep to notify you that the lid needs to be closed. Turn the pressure regulator knob to STEAM. Turn the dial until the Yogurt function is selected (the words will blink) and confirm it by pressing the dial. The preset cooking time is 8 hours. Depending on the flavor of yogurt you like best, you can choose how long to cook the yogurt for by adjusting the time. In order to do that, turn the dial to select the desired time and then press the START/STOP button to confirm it. The longest cooking time is 24 hours. The preparation time impacts the yogurt taste. With a longer cooking time, the yogurt will have a tarter flavor. With a shorter time, the yogurt will have a milder flavor. 6. Press the START/STOP button to begin the yogurt function. The screen will turn green and it will display the programmed time at the top. You will also see the preheat icon ....... on the bottom of the screen. NOTE: If you forget to press the START/STOP button, the unit will beep twice after 30 seconds, the light on the screen will turn off and the unit will return to standby mode. 7. Once the temperature has been reached, the unit will beep and it will begin to count down. 8. When the cooking time ends, the unit will beep to let you know that the function is done and the unit will switch back to standby mode. 9. When the yogurt is ready, remove the lid. There may be some yellowish liquid, whey, on top of the yogurt. This is normal, whey contains nutrients and protein. Mix it back into the yogurt. 10. If you prefer regular yogurt, cover and place in the refrigerator for 2 to 3 hours before serving, or until yogurt cools. If you prefer making Greek yogurt, please see below. 27 ENGLISH
-
 1
1 -
2
-
3
-
4
-
5
-
6
-
7
-
8
-
9
-
 10
10 -
 11
11 -
 12
12 -
 13
13 -
 14
14 -
 15
15 -
 16
16 -
 17
17 -
 18
18 -
 19
19 -
 20
20 -
21
-
22
-
23
-
24
-
25
-
26
-
27
-
28
-
29
-
30
-
31
-
32
-
33
-
34
-
35
-
36
-
37
-
38
-
39
-
40
-
41
-
42
-
43
-
44
-
45
-
46
-
47
-
48
-
49
-
50
-
51
-
52
-
53
-
54
-
55
-
56
-
57
-
58
-
59
-
60
-
61
-
62
-
63
 |
 |
