Foxconn MARS English Manual. - Page 90
Create RAID5 Parity
 |
View all Foxconn MARS manuals
Add to My Manuals
Save this manual to your list of manuals |
Page 90 highlights
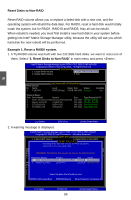
Create RAID5 (Parity) 1. Select "1.Create RAID Volume" from the main menu and press . 2. In "Name" item, you can input a device name for the RAID5 system and press to apply it. Here, we name it as TryRAID5 to replace the default Volume0. IInntteell((RR)) MMaattrriixx SSttoorraaggee MMaannaaggeerr ooppttiioonn RROOMM vv75..60..00..11000161 ICH9R wRAID5 CCooppyyrriigghhtt((CC)) 22000033--0074 IInntteell CCoorrppoorraattiioonn.AlAl lRl RigihgthstsRReseesrevrevde.d. [ CREATE VOLUME MENU ] Name: TVroylRumAIeD05 RAID Level: RAID0(Stripe) Disks: Select Disks Strip Size: 128KB Capacity: 0.0 GB Create Volume [ HELP ] Enter a unique volume name that has no special characters and is 16 characters or less. 5 [↑↓]-Change [TAB]-Next [ESC]-Previous Menu [Enter]-Select 3. In "RAID Level" item, you can use Up or Down arrow key to make a selection from one of RAID0, 1, 5, 10 items. Select RAID5(Parity) and press . IInntteell((RR)) MMaattrriixx SSttoorraaggee MMaannaaggeerr ooppttiioonn RROOMM vv75..60..00..11000161 ICH9R wRAID5 CCooppyyrriigghhtt((CC)) 22000033--0074 IInntteell CCoorrppoorraattiioonn. AlAl lRl RigihgthstsRReseesrevrevde.d. [ CREATE VOLUME MENU ] Name: TryRAID5 RAID Level: RAID50(PSatrripitye) Disks: Select Disks Strip Size: 64KB Capacity: 0.0 GB Create Volume [ HELP ] Choose the RAID level: RAID 0: Stripes data (performance). RAID1: Mirrors data (redundancy). RAID 10: Mirrors data and stripes the mirror. RAID 5: Stripes data and parity. [↑↓]-Change [TAB]-Next [ESC]-Previous Menu [Enter]-Select 83
-
 1
1 -
2
-
3
-
4
-
5
-
6
-
7
-
8
-
9
-
10
-
11
-
12
-
13
-
14
-
15
-
16
-
17
-
18
-
19
-
20
-
21
-
22
-
23
-
24
-
25
-
26
-
27
-
28
-
29
-
30
-
31
-
32
-
33
-
34
-
35
-
36
-
37
-
38
-
39
-
40
-
41
-
42
-
43
-
44
-
45
-
46
-
47
-
48
-
49
-
50
-
51
-
52
-
53
-
54
-
55
-
56
-
57
-
58
-
59
-
60
-
61
-
62
-
63
-
64
-
65
-
66
-
67
-
68
-
69
-
70
-
71
-
72
-
73
-
74
-
75
-
76
-
77
-
78
-
79
-
80
-
81
-
82
-
83
-
84
-
 85
85 -
 86
86 -
 87
87 -
 88
88 -
 89
89 -
 90
90 -
 91
91 -
 92
92 -
 93
93 -
 94
94 -
 95
95 -
96
-
97
-
98
-
99
-
100
-
101
-
102
-
103
-
104
-
105
-
106
-
107
-
108
-
109
-
110
 |
 |
