Fujitsu 5110C Operator's Guide - Page 20
Functions of the operator panel - scanner software
 |
UPC - 097564306075
View all Fujitsu 5110C manuals
Add to My Manuals
Save this manual to your list of manuals |
Page 20 highlights
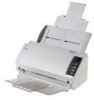
CONTENTS 1.2 Functions of the operator panel INTRODUCTION 1 NAMES AND FUNCTIONS OF PARTS 1.1 Names and functions of parts 1.2 Functions of the operator panel 2 BASIC SCANNER OPERATIONS 3 SCANNING VARIOUS TYPES OF DOCUMENTS 4 DAILY CARE 5 REPLACING CONSUMABLES 6 TROUBLESHOOTING 7 DOCUMENT SPECIFICATIONS FOR ADF 8 OPTIONS 9 SCANNER SPECIFICATIONS Appendix No. Name 1 Function No. display 2 Function button 3 Send to button 4 Scan button 5 Power button 6 LED Function Indicates the function No. and error status. Changes the Function activated by the Send to button. Launches the linked application software. Turns the scanner ON and OFF. Lights when the scanner is turned ON. Indications on the Function Number display Indication 8 P 0 1 U E Meaning Blinks only one time upon turning on the scanner. Indicates that the scanner has been turned ON and is being initialized. Indicates that initialization will soon end. Indicates that initialization has ended successfully. The scanner is now in "Ready Status". Indicates that a temporary error occurred when documents were being scanned. A number appearing in alternation following the U (i.e. 1, 2 and 4) refers to the type of error. To return the scanner to the ready status ("1"), press "Scan" or "Send to" button. Indicates that a device (hardware) alarm has occurred during scanning of documents. "E" and the alarm Number (2 to 9 and c ) will appear alternately. To return the scanner to the ready status ("1"), press "Scan" or "Send to" button. If this alarm occurs, turn the power off and on again. If the alarm continues after turning the power on again, contact your service engineer.
-
 1
1 -
2
-
3
-
4
-
5
-
6
-
7
-
8
-
9
-
10
-
11
-
12
-
13
-
14
-
 15
15 -
 16
16 -
 17
17 -
 18
18 -
 19
19 -
 20
20 -
 21
21 -
 22
22 -
 23
23 -
 24
24 -
 25
25 -
26
-
27
-
28
-
29
-
30
-
31
-
32
-
33
-
34
-
35
-
36
-
37
-
38
-
39
-
40
-
41
-
42
-
43
-
44
-
45
-
46
-
47
-
48
-
49
-
50
-
51
-
52
-
53
-
54
-
55
-
56
-
57
-
58
-
59
-
60
-
61
-
62
-
63
-
64
-
65
-
66
-
67
-
68
-
69
-
70
-
71
-
72
-
73
-
74
-
75
-
76
-
77
-
78
-
79
-
80
-
81
-
82
-
83
-
84
-
85
-
86
-
87
-
88
-
89
-
90
-
91
-
92
-
93
-
94
-
95
-
96
-
97
-
98
-
99
-
100
-
101
-
102
-
103
-
104
-
105
-
106
-
107
-
108
-
109
-
110
-
111
-
112
-
113
-
114
-
115
-
116
-
117
-
118
-
119
-
120
-
121
-
122
-
123
-
124
-
125
-
126
-
127
-
128
-
129
-
130
-
131
-
132
-
133
-
134
-
135
-
136
-
137
 |
 |
