Garmin GPSMAP 172C Owner's Manual - Page 100
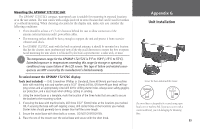
Installing the Unit on the Mounting Bracket, To tilt the unit
 |
UPC - 753759043537
View all Garmin GPSMAP 172C manuals
Add to My Manuals
Save this manual to your list of manuals |
Page 100 highlights
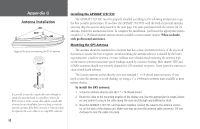
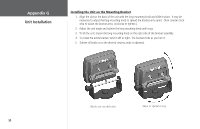
Appendix G Unit Installation Installing the Unit on the Mounting Bracket 1. Align the slot on the back of the unit with the long mounting knob and slide in place. It may be necessary to adjust the long mounting knob to spread the bracket arms apart. (Turn counter-clockwise to widen the bracket arms, clockwise to tighten.) 2. Adjust the unit angle and tighten the long mounting knob until snug. 3. To tilt the unit, loosen the long mounting knob on the right side of the bracket assembly. 4. To rotate the entire bracket, twist it left or right. The bracket clicks as you turn it. 5. Tighten all knobs once the desired viewing angle is obtained. Slide the unit onto the bracket Adjust for optimal viewing 90
-
 1
1 -
2
-
3
-
4
-
5
-
6
-
7
-
8
-
9
-
10
-
11
-
12
-
13
-
14
-
15
-
16
-
17
-
18
-
19
-
20
-
21
-
22
-
23
-
24
-
25
-
26
-
27
-
28
-
29
-
30
-
31
-
32
-
33
-
34
-
35
-
36
-
37
-
38
-
39
-
40
-
41
-
42
-
43
-
44
-
45
-
46
-
47
-
48
-
49
-
50
-
51
-
52
-
53
-
54
-
55
-
56
-
57
-
58
-
59
-
60
-
61
-
62
-
63
-
64
-
65
-
66
-
67
-
68
-
69
-
70
-
71
-
72
-
73
-
74
-
75
-
76
-
77
-
78
-
79
-
80
-
81
-
82
-
83
-
84
-
85
-
86
-
87
-
88
-
89
-
90
-
91
-
92
-
93
-
94
-
 95
95 -
 96
96 -
 97
97 -
 98
98 -
 99
99 -
 100
100 -
 101
101 -
 102
102 -
 103
103 -
 104
104 -
 105
105 -
106
-
107
-
108
-
109
-
110
 |
 |

Installing the Unit on the Mounting Bracket
1.
Align the slot on the back of the unit with the long mounting knob and slide in place.
It may be
necessary to adjust the long mounting knob to spread the bracket arms apart.
(Turn counter-clock-
wise to widen the bracket arms, clockwise to tighten.)
2.
Adjust the unit angle and tighten the long mounting knob until snug.
3.
To tilt the unit, loosen the long mounting knob on the right side of the bracket assembly.
4.
To rotate the entire bracket, twist it left or right.
The bracket clicks as you turn it.
5.
Tighten all knobs once the desired viewing angle is obtained.
Slide the unit onto the bracket
Adjust for optimal viewing
º0
Appendix G
Unit Installation