Garmin GPSMAP 172C Owner's Manual - Page 103
Installing and Removing, Data Cards, To install a data card, To remove a data card
 |
UPC - 753759043537
View all Garmin GPSMAP 172C manuals
Add to My Manuals
Save this manual to your list of manuals |
Page 103 highlights
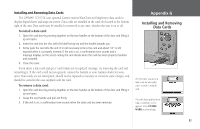
Installing and Removing Data Cards The GPSMAP 172/172C uses optional Garmin marine BlueChart and MapSource data cards to display digital charts and maps on-screen. Data cards are installed in the card slot located at the bottom right of the unit. Data cards may be installed or removed at any time, whether the unit is on or off. To install a data card: 1. Open the card door by pressing together on the two handles at the bottom of the door and lifting it up and open. 2. Insert the card into the slot, with the label facing top and the handle towards you. 3. Firmly push the card into the unit. It in not necessary to force the card and about 1/2" is still exposed when it is properly inserted. If the unit is on, a confirmation tone sounds and a message displays on the screen noting the card details when the card has been properly installed and accepted. 4. Close the cover. If you insert a data card and get a 'card format not recognized' message, try removing the card and reinserting it. If the card is still not recognized, contact the Garmin or your Garmin dealer for assistance. Data cards are not waterproof, should not be exposed to moisture or excessive static charges, and should be stored in the case supplied with the card. To remove a data card: 1. Open the card door by pressing together on the two handles at the bottom of the door and lifting it up and open. 2. Grasp the card handle and pull out firmly. 3. If the unit is on, a confirmation tone sounds when the data card has been removed. Appendix G Installing and Removing Data Cards The first time you insert a data card, the unit takes a few seconds to read the card. Once the data card has been read, a summary screen appears. Press ENTER/ MARK to acknowledge. 93
-
 1
1 -
2
-
3
-
4
-
5
-
6
-
7
-
8
-
9
-
10
-
11
-
12
-
13
-
14
-
15
-
16
-
17
-
18
-
19
-
20
-
21
-
22
-
23
-
24
-
25
-
26
-
27
-
28
-
29
-
30
-
31
-
32
-
33
-
34
-
35
-
36
-
37
-
38
-
39
-
40
-
41
-
42
-
43
-
44
-
45
-
46
-
47
-
48
-
49
-
50
-
51
-
52
-
53
-
54
-
55
-
56
-
57
-
58
-
59
-
60
-
61
-
62
-
63
-
64
-
65
-
66
-
67
-
68
-
69
-
70
-
71
-
72
-
73
-
74
-
75
-
76
-
77
-
78
-
79
-
80
-
81
-
82
-
83
-
84
-
85
-
86
-
87
-
88
-
89
-
90
-
91
-
92
-
93
-
94
-
95
-
96
-
97
-
 98
98 -
 99
99 -
 100
100 -
 101
101 -
 102
102 -
 103
103 -
 104
104 -
 105
105 -
 106
106 -
 107
107 -
 108
108 -
109
-
110
 |
 |
