HP 9500n HP Color LaserJet 9500n and 9500hdn - Software Technical Reference - Page 172
External Fonts (PCL 6 and PCL 5c only), Installing external fonts
 |
UPC - 808736429672
View all HP 9500n manuals
Add to My Manuals
Save this manual to your list of manuals |
Page 172 highlights
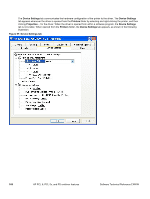
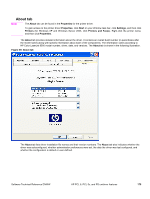
External Fonts (PCL 6 and PCL 5c only) The External Fonts option allows you to install and remove external fonts for the printer. External fonts can be soft fonts or cartridge fonts. Clicking the External Fonts option causes the Properties button to appear. Clicking the Properties button opens the Font DIMM Installer dialog box, which is shown in the following illustration. Figure 58: Font DIMM Installer dialog box Installing external fonts Follow these steps to install external fonts. 1. Click Start, Settings, Printers (Printers and Faxes in Windows XP and Windows Server 2003), right-click on the name of the printer, and then click Properties. 2. Click the Device Settings tab. 3. Click the External Fonts setting. The Properties button appears. 4. Click the Properties button. The Font DIMM Installer dialog box appears. 5. Type the name and path of the font metric file in the Printer Font File Location text box or click Browse to locate the file on your computer. The font file names appear in the Font(s) to be Added window. 6. Select the fonts you want to add, and then click Add. The fonts are installed and the file names appear in the Installed Font(s) window. 7. Click OK to close the Font DIMM Installer dialog box. Removing external fonts 1. Click Start, Settings, Printers (Printers and Faxes in Windows XP and Windows Server 2003), right-click on the name of the printer, and then click Properties. 2. Click the Device Settings tab. 3. Click the External Fonts setting. The Properties button appears. 4. Click the Properties button. The Font DIMM Installer dialog box appears. 170 HP PCL 6, PCL 5c, and PS unidriver features Software Technical Reference ENWW
-
 1
1 -
2
-
3
-
4
-
5
-
6
-
7
-
8
-
9
-
10
-
11
-
12
-
13
-
14
-
15
-
16
-
17
-
18
-
19
-
20
-
21
-
22
-
23
-
24
-
25
-
26
-
27
-
28
-
29
-
30
-
31
-
32
-
33
-
34
-
35
-
36
-
37
-
38
-
39
-
40
-
41
-
42
-
43
-
44
-
45
-
46
-
47
-
48
-
49
-
50
-
51
-
52
-
53
-
54
-
55
-
56
-
57
-
58
-
59
-
60
-
61
-
62
-
63
-
64
-
65
-
66
-
67
-
68
-
69
-
70
-
71
-
72
-
73
-
74
-
75
-
76
-
77
-
78
-
79
-
80
-
81
-
82
-
83
-
84
-
85
-
86
-
87
-
88
-
89
-
90
-
91
-
92
-
93
-
94
-
95
-
96
-
97
-
98
-
99
-
100
-
101
-
102
-
103
-
104
-
105
-
106
-
107
-
108
-
109
-
110
-
111
-
112
-
113
-
114
-
115
-
116
-
117
-
118
-
119
-
120
-
121
-
122
-
123
-
124
-
125
-
126
-
127
-
128
-
129
-
130
-
131
-
132
-
133
-
134
-
135
-
136
-
137
-
138
-
139
-
140
-
141
-
142
-
143
-
144
-
145
-
146
-
147
-
148
-
149
-
150
-
151
-
152
-
153
-
154
-
155
-
156
-
157
-
158
-
159
-
160
-
161
-
162
-
163
-
164
-
165
-
166
-
 167
167 -
 168
168 -
 169
169 -
 170
170 -
 171
171 -
 172
172 -
 173
173 -
 174
174 -
 175
175 -
 176
176 -
 177
177 -
178
-
179
-
180
-
181
-
182
-
183
-
184
-
185
-
186
-
187
-
188
-
189
-
190
-
191
-
192
-
193
-
194
-
195
-
196
-
197
-
198
-
199
-
200
-
201
-
202
-
203
-
204
-
205
-
206
-
207
-
208
-
209
-
210
-
211
-
212
-
213
-
214
-
215
-
216
-
217
-
218
-
219
-
220
-
221
-
222
-
223
-
224
-
225
-
226
-
227
-
228
-
229
-
230
-
231
-
232
-
233
-
234
-
235
-
236
-
237
-
238
-
239
-
240
-
241
-
242
-
243
-
244
-
245
-
246
-
247
-
248
-
249
-
250
-
251
-
252
-
253
-
254
-
255
-
256
-
257
-
258
-
259
-
260
-
261
-
262
-
263
-
264
-
265
-
266
-
267
-
268
-
269
-
270
-
271
-
272
-
273
-
274
-
275
-
276
-
277
-
278
-
279
-
280
-
281
-
282
-
283
-
284
-
285
-
286
 |
 |
