HP BladeSystem c3000 HP BladeSystem c-Class Enclosure Troubleshooting Guide - Page 20
HP BladeSystem c7000 Enclosure Insight Display action and verification
 |
View all HP BladeSystem c3000 manuals
Add to My Manuals
Save this manual to your list of manuals |
Page 20 highlights
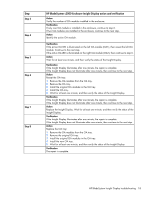
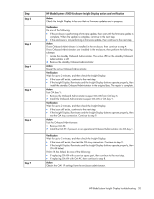
Step Step 2 Step 3 Step 4 Step 5 Step 6 Step 7 HP BladeSystem c7000 Enclosure Insight Display action and verification Action Check the Insight Display to be sure that no firmware updates are in progress. Verification Do one of the following: • If the enclosure is performing a firmware update, then wait until the firmware update is complete. When the update is complete, continue to the next step. • If the enclosure is not performing a firmware update, then continue to the next step. Action If one Onboard Administrator is installed in the enclosure, then continue to step 4. If two Onboard Administrators are installed in the enclosure, then perform the following substeps: 1 Locate the standby Onboard Administrator. The active LED on the standby Onboard Administrator is off. 2 Remove the standby Onboard Administrator. Action Reseat the active Onboard Administrator. Verification Wait for up to 2 minutes, and then check the Insight Display. • If the issue still exists, continue to the next step. • If the Insight Display illuminates and the Insight Display buttons operate properly, then install the standby Onboard Administrator in the original bay. The repair is complete. Action Test OA bay Y: 1 Remove the Onboard Administrator (suspect OA #X) from OA bay X. 2 Install the Onboard Administrator (suspect OA #X) in OA bay Y. Verification Wait for up to 2 minutes, and then check the Insight Display. • If the issue still exists, continue to the next step. • If the Insight Display illuminates and the Insight Display buttons operate properly, then test the OA tray connection. Continue to step 9. Action Test the Onboard Administrator: 1 Remove OA #X. 2 Install the OA #Y, if present, or an operational Onboard Administrator into OA bay 1. Verification Wait for up to 2 minutes, and then check the Insight Display. • If the issue still exists, then test the OA tray connection. Continue to step 9. • If the Insight Display illuminates and the Insight Display buttons operate properly, then OA #X failed. If OA #X has failed, do one of the following: • If replacing OA #X with a service spare part, then continue to the next step. • If replacing OA #X with OA #Y, then continue to step 8. Action Obtain the OA1 IP settings from the enclosure administrator. HP BladeSystem Insight Display troubleshooting 20
-
 1
1 -
2
-
3
-
4
-
5
-
6
-
7
-
8
-
9
-
10
-
11
-
12
-
13
-
14
-
 15
15 -
 16
16 -
 17
17 -
 18
18 -
 19
19 -
 20
20 -
 21
21 -
 22
22 -
 23
23 -
 24
24 -
 25
25 -
26
-
27
-
28
-
29
-
30
-
31
-
32
-
33
-
34
-
35
-
36
-
37
-
38
-
39
-
40
-
41
-
42
-
43
-
44
-
45
-
46
-
47
-
48
-
49
-
50
-
51
-
52
-
53
-
54
-
55
-
56
-
57
-
58
-
59
-
60
-
61
-
62
-
63
-
64
-
65
-
66
-
67
-
68
-
69
-
70
-
71
-
72
-
73
-
74
-
75
-
76
-
77
-
78
-
79
-
80
-
81
-
82
-
83
-
84
-
85
-
86
-
87
-
88
-
89
-
90
-
91
-
92
-
93
-
94
-
95
-
96
-
97
-
98
-
99
-
100
-
101
-
102
-
103
-
104
-
105
-
106
-
107
-
108
 |
 |
