HP C7770B HP Designjet 500 Plus - Pocket Guide
HP C7770B - DesignJet 500 Color Inkjet Printer Manual
 |
UPC - 725184439704
View all HP C7770B manuals
Add to My Manuals
Save this manual to your list of manuals |
HP C7770B manual content summary:
- HP C7770B | HP Designjet 500 Plus - Pocket Guide - Page 1
i pocket guide ? how do I... hp designjet 500 series printers hp designjet 800 series printers - HP C7770B | HP Designjet 500 Plus - Pocket Guide - Page 2
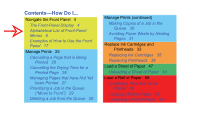
Paper Waste by Nesting Pages 31 Replace Ink Cartridges and Printheads 33 Replacing Ink Cartridges 35 Replacing Printheads 38 Load a Sheet of Paper 47 Unloading a Sheet of Paper 54 Load a Roll of Paper 55 Installing a New Roll on the Printer 55 Loading a Roll of Paper 58 Unloading a Roll of Paper - HP C7770B | HP Designjet 500 Plus - Pocket Guide - Page 3
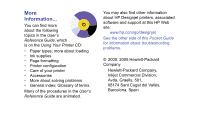
are animated. You may also find other information about HP Designjet printers, associated software and support at this HP Web site: www.hp.com/go/designjet See the other side of this Pocket Guide for information about troubleshooting problems. © 2000, 2005 Hewlett-Packard Company Hewlett-Packard - HP C7770B | HP Designjet 500 Plus - Pocket Guide - Page 4
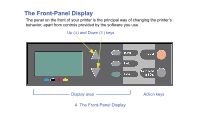
The Front-Panel Display The panel on the front of your printer is the principal way of changing the printer's behavior, apart from controls provided by the software you use. Up (Δ) and Down (∇) keys Display area 4 The Front-Panel Display Action keys - HP C7770B | HP Designjet 500 Plus - Pocket Guide - Page 5
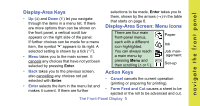
on page 6. Display-Area Screen: Menu Icons There are four main front-panel menus, Paper If further choices can be made for a menu item, the symbol " " appears to reach a main menu by pressing Menu and then scrolling (Δ or ∇). Ink Job management Set-up • Back takes you to the previous screen, - HP C7770B | HP Designjet 500 Plus - Pocket Guide - Page 6
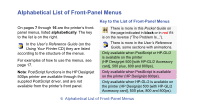
in the HP Designjet 500ps printer are available through the supplied PostScript driver, and are not available from the printer's front panel. Key to the List of Front-Panel Menus 23 There is more in this Pocket Guide on the page indicated in black or in red if it is on the reverse ("The Problem Is - HP C7770B | HP Designjet 500 Plus - Pocket Guide - Page 7
→ Align 44 printheads → Altitude → Page format→ Size→ ANSI sizes → I/O setup→ Card ID→ Appletalk (depends on card) → Page format→ Size→ ARCH sizes → PS settings→ Encoding→ → Drying time→ ASCII Automatic → Graphic language→ Automatic [HP Designjet 800 series printers only] → Page - HP C7770B | HP Designjet 500 Plus - Pocket Guide - Page 8
→ → Color settings→ Replace Ink 35 cartridges CMYK → Calibration 22 (paper advance) → Graphic Language→ CALS/G4 [HP Designjet 800 series printers only] → Queue/copies→ Cancel 25 # Jobname→ (print in progress or waiting) [HP Designjet 800 series printers only] → I/O setup→ Card ID - HP C7770B | HP Designjet 500 Plus - Pocket Guide - Page 9
→ Cutter (on/off) → Defects in 15 images (Troubleshooting) → HP-GL/2 settings→ Define palette → Drying time 17 (none, automatic, manual) → PS settings→ Encoding (ASCII, Binary, Automatic) → Log→ Errors → Queue/copies→ Delete (print 29 # Jobname→ already printed) [HP Designjet 800 - HP C7770B | HP Designjet 500 Plus - Pocket Guide - Page 10
on card) → I/O setup → I/O setup→ I/O timeout → Image quality 15 (Troubleshooting) → Advanced options→ Optimize for→ Images → Information (ink cartridges, printheads) → Printer Information → Information→ Ink cartridges Replace Ink 35 cartridges 10 Alphabetical List of Front - HP C7770B | HP Designjet 500 Plus - Pocket Guide - Page 11
navigate the front panel Ink menu → Information→ Ink cartridges→ Ink levels → Page format→ Size→ Inked area → I/O setup→ Card ID→ IP address (depends on card) → Page format→ Size→ ISO sizes → Graphic Language [HP Designjet 800 series printers only] → Front Panel→ Language (national) → - HP C7770B | HP Designjet 500 Plus - Pocket Guide - Page 12
Move print to 29 top [HP Designjet 800 series printers only] → Color settings→ CMYK→ Native CMYK → Color settings→ RGB→ Native RGB → Nest settings→ Nest (on/off) 31 [HP Designjet 800 series only] → Nest settings→ Nest 31 wait time [HP Designjet 800 series printers only] → Print quality - HP C7770B | HP Designjet 500 Plus - Pocket Guide - Page 13
[HP Designjet 800 series printers only] → Page format→ Print (paper) size → Print quality (best, normal, draft; also Set-Up→Advanced Options) → Print quality 15 (poor) (Troubleshooting) → Page format→ Size→ Printed area - see Inked area → Printer information → Information→ Printheads - HP C7770B | HP Designjet 500 Plus - Pocket Guide - Page 14
quality settings→Reduced speed [HP Designjet 800 series printers only] → Color settings→ Rendering intent → Replace ink 38 cartridges → Replace 38 printheads → Queue/copies→ Reprints/ 30 # Jobname→ copies → I/O setup→ Card setup→ Advanced→ Reset card → Color settings→ RGB → Roll - HP C7770B | HP Designjet 500 Plus - Pocket Guide - Page 15
→Reduced speed [HP Designjet 800 series printers only] → Color settings→ RGB→ sRGB → Color settings→ CMYK→ SWOP → Advanced options→ Optimize for→ Drawings/Text → I/O setup→ I/O Timeout → Color settings→ CMYK→ → ing TOYO Troubleshoot- 15 (image quality) Alphabetical List of Front-Panel - HP C7770B | HP Designjet 500 Plus - Pocket Guide - Page 16
→ Select paper type → Unload roll 64 → Unload 54 sheet → Nest settings→ Wait time 31 16 Alphabetical List of Front-Panel Menus - HP C7770B | HP Designjet 500 Plus - Pocket Guide - Page 17
Minutes 1 From the table on page 9, the menu ( structure is shown as: → Drying time ); then press the Enter key... 2 Starting from the main Paper menu, press the Down key (∇) once... ...to enter the Ink menu: ...until the Ink menu ( ) is highlighted Examples of How to Use the Front Panel 17 - HP C7770B | HP Designjet 500 Plus - Pocket Guide - Page 18
then press Enter again... ...to select Manual drying time: The number of times you have to press the Down key depends on: • which model of printer-HP Designjet 500 or 800 series, • whether you have an accessory card installed on an HP Designjet 500 series printer, • which options were recently used - HP C7770B | HP Designjet 500 Plus - Pocket Guide - Page 19
navigate the front panel 6 Press the Up key (Δ) to change the drying time selection from 1 to 2 minutes. Then press Enter to set the two-minute drying time. 7 Finally, press the Menu key to return to the main menu. If the front-panel Buzzer is set On, there will be a short 'beep' to confirm the - HP C7770B | HP Designjet 500 Plus - Pocket Guide - Page 20
800 and 800ps printers only; see page 23 for the HP Designjet 500 plus, or 500 Series with an Accessory card. and then press Enter to enter the Job management menu. 1 From the table on page 8, the menu structure is shown as: → Queue/Copies 2 Starting from the main Paper menu, press the Down - HP C7770B | HP Designjet 500 Plus - Pocket Guide - Page 21
highlighting is on Queue/ copies, by pressing the Up (Δ) or Down key (∇) if necessary. 3 Press Enter to enter the Queue/copies menu. numbers. Suppose the list of jobs are as shown in the diagram. The job that is currently being printed is number 0, whose job name is "Job #7". 4 Suppose that the - HP C7770B | HP Designjet 500 Plus - Pocket Guide - Page 22
5 The options available for the job are listed; 7 Finally, press the Menu key to return to the select Reprints and press Enter again. top-level menu. 6 Press the Up key (Δ) to select three - HP C7770B | HP Designjet 500 Plus - Pocket Guide - Page 23
navigate the front panel Reprints with the HP Designjet 500 Series Printers To obtain extra copies you must have an HP Designjet 500 plus printer, or a 500 Series with an accessory card. Proceed as follows: 1 With Job management highlighted ( ), press Enter. 2 You will either see the message Queue - HP C7770B | HP Designjet 500 Plus - Pocket Guide - Page 24
24 Examples of How to Use the Front Panel - HP C7770B | HP Designjet 500 Plus - Pocket Guide - Page 25
Cancelling a Page that is Being Printed 1 Press the Cancel key on the front panel. The printer advances the paper as though the print were finished. A multi-page job or a big file may take longer to stop printing than other files. Cancel key manage prints - HP C7770B | HP Designjet 500 Plus - Pocket Guide - Page 26
as an image which has had insufficient time to dry could get damaged. 1 Press the Form Feed and Cut key on the front panel. 2 The printer will release the paper and it will fall into the paper bin. 26 Cancelling the Drying Time for a Printed Page - HP C7770B | HP Designjet 500 Plus - Pocket Guide - Page 27
available on the HP Designjet 800 Series. (You can obtain reprints on the 500 plus, or on the 500 Series if an accessory card is installed; see been printed. See also page 31, Avoiding Paper Waste by Nesting Pages. • You can send pages to the printer without waiting for the current page to finish - HP C7770B | HP Designjet 500 Plus - Pocket Guide - Page 28
effect. • Files are printed as they are received, and are not stored in the queue. • The printer will not accept another file sent from the computer until the current page has finished printing and the printer is ready. • You cannot use nesting. If you turn queueing off while pages are still in - HP C7770B | HP Designjet 500 Plus - Pocket Guide - Page 29
choose Move to front. If nesting is turned on (see page 31, Avoiding Paper Waste by Nesting Pages) the prioritized job may still be nested with others. the queue as more files are sent. However, if you have sent a file in error and want to avoid any chance of it being reprinted, you can delete it by - HP C7770B | HP Designjet 500 Plus - Pocket Guide - Page 30
Making Copies of a Job in the Queue Has the job already been printed? Yes No What to do Use Reprints (see right) Use Copies (see right) In all cases, the job must still be in the queue. Copies and Reprints Having selected the job and chosen Copies or Reprints (from the Job Management ( ) menu), - HP C7770B | HP Designjet 500 Plus - Pocket Guide - Page 31
Nesting can only be used with roll paper. Nesting means placing pages side-by-side on the paper (rather than one after the other), to avoid wasting paper. The Printer Tries to Nest Pages When... • The printer is loaded with roll paper rather than sheet paper; and • In the front-panel menus, Queue - HP C7770B | HP Designjet 500 Plus - Pocket Guide - Page 32
of these values if The number you want to use the least represents amount of paper. The printer will the number of search all through the queue for minutes that suitable pages. It will nest the the printer pages according to an algorithm waits, after that, for most combinations of receiving - HP C7770B | HP Designjet 500 Plus - Pocket Guide - Page 33
that place minute droplets of ink onto the paper. They are located under the main window at the top of the printer. A Printhead Note: Setup printheads are special nonprinting components required only before installing the printer. Ink Cartridges: Your printer uses HP No. 10 Black and HP No. 82 Cyan - HP C7770B | HP Designjet 500 Plus - Pocket Guide - Page 34
your HP Designjet printer. Printheads should not need replacing so often, only when problems of image quality occur. If you find problems with the image quality, follow the procedure on page 16 in The Problem Is...Image Quality in this Pocket Guide. Location of Printheads and Ink Cartridges 34 Ink - HP C7770B | HP Designjet 500 Plus - Pocket Guide - Page 35
replace ink cartridges and printheads Replacing Ink Cartridges If the printer detects that an ink cartridge needs replacing, you will see a message with four icons (explained below), referring from left to right to the Cyan (•), Black (•), Magenta (•) and Yellow (•) cartridges. The icons may be any - HP C7770B | HP Designjet 500 Plus - Pocket Guide - Page 36
1 To replace a cartridge*, first open the ink cartridge cover. 2 Then remove the ink cartridge. * Don't replace cartridges during printing. 36 Replacing Ink Cartridges - HP C7770B | HP Designjet 500 Plus - Pocket Guide - Page 37
replace ink cartridges and printheads 3 Insert the ink cartridge into its correct position, pushing it down until it clicks into place. Colored labels on the ink cartridges must correspond with the same colored labels on the printer. Arrows on the cartridges point towards the front of the printer. - HP C7770B | HP Designjet 500 Plus - Pocket Guide - Page 38
Ink System ( ) and press Enter. In the second example, the magenta printhead is faulty (the cross flashes). If you identified a printhead as being faulty during the Troubleshooting routine (see page 16 on the reverse of this Pocket Guide), the icon shows a flashing exclamation mark. If the printer - HP C7770B | HP Designjet 500 Plus - Pocket Guide - Page 39
cartridges and printheads Follow these Steps to Replace Printheads 1 From the main front-panel menu, select Ink System ( ) and press Enter. 3 Wait for the front panel to display "Open window to replace printheads". Then open the window and locate the carriage assembly. 2 Select Replace Printheads - HP C7770B | HP Designjet 500 Plus - Pocket Guide - Page 40
4 Release the latch on the printhead cover. You may need to hold this latch up out of the way during the next steps. 5 Lift up the printhead cover; this will give you access to the printheads. 40 Replacing Printheads - HP C7770B | HP Designjet 500 Plus - Pocket Guide - Page 41
replace ink cartridges and printheads 6 To remove a printhead, lift up the blue handle. 7 With controlled force, pull the blue handle upwards until the printhead is released from the carriage assembly. Replacing Printheads 41 - HP C7770B | HP Designjet 500 Plus - Pocket Guide - Page 42
8 Remove the tape from the new printheads. 9 Insert a new printhead, ensuring that the colored label on the printhead corresponds to that on the printhead slot. 42 Replacing Printheads - HP C7770B | HP Designjet 500 Plus - Pocket Guide - Page 43
replace ink cartridges and printheads 10 When you have replaced all printheads that need replacing, pull the printhead cover down over the printheads. 11 Close the latch on the printhead cover by catching the hook over the latch and moving the handle towards the back. Replacing Printheads 43 - HP C7770B | HP Designjet 500 Plus - Pocket Guide - Page 44
the procedure yourself, for example, after clearing a paper jam, as follows: 1 From the main front-panel menu, select Ink System ( ) and press Enter. 2 Select Align Printheads and press Enter. After the replacement of the printheads, the printer checks that they are all functioning correctly - HP C7770B | HP Designjet 500 Plus - Pocket Guide - Page 45
are supported for alignment; the printer will tell you if you load the wrong type. Among those supported are: Bright White Inkjet Paper, Coated Paper, Heavy Coated Paper and Plain paper. Color Calibration Color calibration is the process of matching the ink with the paper. When new printheads have - HP C7770B | HP Designjet 500 Plus - Pocket Guide - Page 46
3 Choose Status and press Enter. You will see something like the following: 5 The printer will print and use a small calibration pattern to ensure an optimal match between the paper and the ink. 4 If the paper loaded is not as shown, choose Calibrate paper. 46 Replacing Printheads - HP C7770B | HP Designjet 500 Plus - Pocket Guide - Page 47
Δ or ∇ key to select Load sheet and press the Enter key. The following message will appear, with a list of paper types: 2 Press Enter. The following prompt will appear: 4 Select the type of paper you are loading (using the Δ and ∇ keys) and press Enter. The default selection is whatever you used - HP C7770B | HP Designjet 500 Plus - Pocket Guide - Page 48
Open the window; the vacuum-which will hold the paper in place-comes on. 6 The front panel displays: Lift the blue lever up to lift the rollers. 48 Loading a Sheet of Paper - HP C7770B | HP Designjet 500 Plus - Pocket Guide - Page 49
7 If you are using large sheets of paper, make sure that the bin is in its unfolded position by pulling it out if necessary, so that the sheet can rest inside it. 8 The front panel displays: load a sheet of paper Loading a Sheet of Paper 49 - HP C7770B | HP Designjet 500 Plus - Pocket Guide - Page 50
shown in the following diagram; load the sheet of paper by performing these steps. 8a Place the sheet of paper onto the platen. Make sure it is perfectly flat and the front edge of the paper is straight. Air suction holds the paper onto the printer throughout the next few steps. 50 Loading a Sheet - HP C7770B | HP Designjet 500 Plus - Pocket Guide - Page 51
8b Follow the instructions in the diagram below to load the paper. Push the paper under these rollers up to the blue line Align the paper with this blue line load a sheet of paper Loading a Sheet of Paper 51 - HP C7770B | HP Designjet 500 Plus - Pocket Guide - Page 52
8c Lower the blue lever. 9 The front panel displays: 10 The front panel displays: Close the window. 52 Loading a Sheet of Paper - HP C7770B | HP Designjet 500 Plus - Pocket Guide - Page 53
paper bin. The printer now: • loads the sheet • checks the alignment of the paper. If the sheet is correctly aligned, the printer accepts the single sheet and gives a "beep". If it is not correctly aligned, the sheet is ejected; the front panel displays help instructions. Loading a Sheet of Paper - HP C7770B | HP Designjet 500 Plus - Pocket Guide - Page 54
Unloading a Sheet of Paper To unload a sheet, press the Form Feed and Cut key on the front panel. Use caution when performing this procedure as an image which has had insufficient time to dry could get damaged. 54 Unloading a Sheet of Paper - HP C7770B | HP Designjet 500 Plus - Pocket Guide - Page 55
load a roll of paper Installing a New Roll on the Printer 1 If your printer has legs, make sure the printer wheels are locked (the brake lever is pressed down) to prevent the printer from moving. 2 At the back of the printer, remove the empty spindle by pulling firmly on each end as indicated - HP C7770B | HP Designjet 500 Plus - Pocket Guide - Page 56
the blue colored stop from the end of the spindle, and stand the spindle vertically, with the fixed stop on the floor (see right). 4 Slide the new roll of paper on to the spindle. Make sure the orientation of the paper is loaded it down as far as it will go. 56 Installing a New Roll on the Printer - HP C7770B | HP Designjet 500 Plus - Pocket Guide - Page 57
load a roll of paper 6 With the blue colored roll stop on the right (as seen from the back of the printer), slide the spindle into the printer left and then right, as shown by the arrows. The paper should be oriented on the roll exactly as shown below. Installing a New Roll on the Printer 57 - HP C7770B | HP Designjet 500 Plus - Pocket Guide - Page 58
3 Select Roll load and press Enter. The following message will appear, with a list of paper types. The default selection is whatever you used last time. 2 Press Enter. The following message will appear: 4 Select the type of paper (using the Δ and ∇ keys) and press Enter. 5 The front panel displays - HP C7770B | HP Designjet 500 Plus - Pocket Guide - Page 59
lever. 6 The front panel displays: load a roll of paper From the front of the printer, lean over the top and feed the paper towards you into the slot at the back of the printer, as shown on the next page. (You may find it easier if the media bin is pushed back out of - HP C7770B | HP Designjet 500 Plus - Pocket Guide - Page 60
60 Loading a Roll of Paper - HP C7770B | HP Designjet 500 Plus - Pocket Guide - Page 61
7 The front panel displays: At the front of the printer, align the paper against the blue line as shown here: load a roll of paper Loading a Roll of Paper 61 - HP C7770B | HP Designjet 500 Plus - Pocket Guide - Page 62
Lower the blue paper-load lever. 8 The front panel displays: The printer checks the alignment of the paper. If it is not correctly aligned, the front panel displays help instructions. 9 The printer trims the edge of the roll... 62 Loading a Roll of Paper - HP C7770B | HP Designjet 500 Plus - Pocket Guide - Page 63
a roll of paper 10 ...and then displays: 11 When the front panel displays the following, the printer is ready to print. If the print is large, open the paper bin. If there is an excess of loose paper, wrap it back onto the roll by turning the roll; then press Enter. Loading a Roll of Paper 63 - HP C7770B | HP Designjet 500 Plus - Pocket Guide - Page 64
insufficient time to dry could get damaged. To unload a roll from the printer: select Unload roll from the front-panel Paper menu; lift the blue paper lever; pull the paper through to the back of the machine until it is free; wind the paper back onto the roll; then lower the blue lever. 64 Unloading - HP C7770B | HP Designjet 500 Plus - Pocket Guide - Page 65
i pocket guide ! the problem is... hp designjet 500 series printers hp designjet 800 series printers printed in the European Union - HP C7770B | HP Designjet 500 Plus - Pocket Guide - Page 66
CD, for further information about using your HP Designjet 500 or 800 Series printer. The other side of this Pocket Guide contains information about how to: • Navigate the Front Panel (page 4) • Manage Prints (page 25) • Replace Ink Cartridges and Printheads (page 33) • Load/Unload Sheet Media (page - HP C7770B | HP Designjet 500 Plus - Pocket Guide - Page 67
clogging up the cutter guide or other moving parts. To remove jammed paper: 1 Open the window. paper jam there is probably paper jammed in the printer. Paper jams can have various causes: • The paper is too thick or too thin for the printer, or is otherwise not supported • The paper is creased or - HP C7770B | HP Designjet 500 Plus - Pocket Guide - Page 68
area on the left or the right. Which way you are able to move it depends on where the paper is jammed. CAUTION When moving the printhead carriage, touch only the black plastic parts. 4 If necessary, carefully move the paper cutter out of the way to the left, or to the right depending on where the - HP C7770B | HP Designjet 500 Plus - Pocket Guide - Page 69
brushing it away or with a vacuum cleaner. paper jam CAUTION The area where the printhead carriage is parked can get quite dirty; be careful not to get ink on your hands. 9 Close the window and switch on the printer. 6 Carefully remove any of the jammed paper which you can easily lift up and out - HP C7770B | HP Designjet 500 Plus - Pocket Guide - Page 70
→ Standard alignment.) Note that you do not have to interpret the patterns printed by the Printhead Alignment routine. 13 If the cutter seems to be causing the problem, check in the User's Reference Guide on the Using Your Printer CD that the type of paper is supported by the 6 Removing Jammed - HP C7770B | HP Designjet 500 Plus - Pocket Guide - Page 71
from other software? • If the printer is connected to a network, try using it when connected directly to your computer. • If the printer is connected to your computer through any other intermediate devices, such as switch boxes, buffer boxes, cable adapters, cable converters, and so on, try using - HP C7770B | HP Designjet 500 Plus - Pocket Guide - Page 72
front • The file may be too large for the printer's memory. This is the case if the front panel panel. displays "Out of memory. Data was lost". Look • You may have a problem with your application on your computer screen for any error driver. Is your software configured for this message; some - HP C7770B | HP Designjet 500 Plus - Pocket Guide - Page 73
are usually controlled by the driver or software you are using.) See → Nest → Nest wait. • Did you specify the right media type when loading the media? See → Select paper type. • The printhead may need replacing. See page 38 on the reverse of this Pocket Guide. No Output or Slow Output - HP C7770B | HP Designjet 500 Plus - Pocket Guide - Page 74
10 No Output or Slow Output - HP C7770B | HP Designjet 500 Plus - Pocket Guide - Page 75
memory is installed on the formatter (accessory) card, for PostScript or HP-GL/2, that is installed at the back of the printer; - Check the interface cable between your computer and the printer; language you use. See → Graph. Lang. - Check the software settings for the page size. Typical problems - HP C7770B | HP Designjet 500 Plus - Pocket Guide - Page 76
Page format → Size → Inked area is set. • An HP-GL job prints incorrectly or not at all - HP-GL is not supported by these printers. • The entire image is or unintelligible - Check and if necessary replace the interface cable between your computer and the printer; - Try changing the language setting. - HP C7770B | HP Designjet 500 Plus - Pocket Guide - Page 77
→ Color settings → Color / monochrome → Color / Grayscale / True black. • Page format or Rotate does not work - These options are available only on the HP Designjet 800 Series, or if you have an HP-GL/2 accessory card installed in your HP Designjet 500 Series printer; - Try installing extra memory - HP C7770B | HP Designjet 500 Plus - Pocket Guide - Page 78
• The print is not the one you were expecting - You may have printed an internal print (for example, a printhead alignment print). There is a further list of problems and how to fix them in the on-line User's Reference Guide, on the Using Your Printer CD. 14 Unexpected or Wrong Output - HP C7770B | HP Designjet 500 Plus - Pocket Guide - Page 79
However, if a message, like "Problems detected in INK CARTRIDGES" appears in the front panel of your printer, follow the instructions given for that message in the "Front-Panel Error Messages" section starting on page 25 of this Pocket Guide. The following guide applies to situations where you (and - HP C7770B | HP Designjet 500 Plus - Pocket Guide - Page 80
procedure, and indicate the main actions that take place. 2 Select Troubleshooting and press Enter. 3 The printer first checks to see whether the printheads are aligned. Misalignment of the printheads is a common cause of image quality problems. If they are not aligned, you are prompted 16 The - HP C7770B | HP Designjet 500 Plus - Pocket Guide - Page 81
do not have to interpret the patterns printed by the Printhead Alignment routine.) See page 44 on the reverse of this Pocket Guide. 4 If the printheads do not seem to require alignment, the printer prints Diagnostic Print A, several blocks of color and a block of thin black broken lines (the lines - HP C7770B | HP Designjet 500 Plus - Pocket Guide - Page 82
in the blocks of color in Diagnostic Print A, for example white streaks or bands, the printer will try to clean the printheads that have the problem. A printhead can be cleaned up to three times this way; after that it cannot be cleaned and you will be told; the Troubleshooting routine will finish - HP C7770B | HP Designjet 500 Plus - Pocket Guide - Page 83
If you answer that a color is defective, the printer tries to clean that printhead. If the printhead cleaning process completes, Diagnostic Print B is printed again and you are asked the same questions again. 11 Afterwards, if problems with images remain, use the Troubleshooting procedure again. If - HP C7770B | HP Designjet 500 Plus - Pocket Guide - Page 84
of the Troubleshooting Procedure START HERE Printer checks whether Printhead Alignment (a likely cause of problems) is required Printhead Alignment is required Printer recommends Aligning Printheads (Standard or Special) If possible, printer tries to Clean Printheads If printheads have been - HP C7770B | HP Designjet 500 Plus - Pocket Guide - Page 85
If printheads have been cleaned 3 times, Troubleshooting finishes If possible, printer tries to Clean Printheads No and Magenta, Yellow and Black Printer prints Diagnostic Print B Are Cyan patterns in Diagnostic Print B OK? The Troubleshooting Procedure 21 Yes (all OK) No problems detected - HP C7770B | HP Designjet 500 Plus - Pocket Guide - Page 86
to the amount it advances between printing swaths of data. (See page 47, "Load a Sheet of Paper" on the reverse of this Pocket Guide.) The pattern printed is solely for the use of the printer; you are not expected to relate any of its characteristics to the quality of your images. 1 From - HP C7770B | HP Designjet 500 Plus - Pocket Guide - Page 87
printed side up with the dotted line at the top (that is, rotated 90º). 5 Now select Measure pattern and press Enter. The printer reads the calibration pattern and makes the appropriate internal adjustments. Direction of paper when loading (measuring pattern)-step 5 Advance Calibration Routine 23 - HP C7770B | HP Designjet 500 Plus - Pocket Guide - Page 88
24 Advance Calibration Routine - HP C7770B | HP Designjet 500 Plus - Pocket Guide - Page 89
the relevant procedures elsewhere in this Pocket Guide (in the How Do I... part) or in the User's Reference Guide (indicated by the symbol ), which you can find on the Using Your Printer CD. Message Alignment error Press ENTER to continue Alignment error due to printheads. Press ENTER to see faulty - HP C7770B | HP Designjet 500 Plus - Pocket Guide - Page 90
details of the replacement procedure, see page 35 on the reverse of this Pocket Guide. The printer was performing a calibration of its color system, but encountered an error. Press the Enter key. The printer has detected that one or more of the printheads is missing or has an error, as indicated by - HP C7770B | HP Designjet 500 Plus - Pocket Guide - Page 91
Your product warranty only applies when you use HP ink. Any damage caused to your printer resulting from the use of non-HP ink cartridges is not the responsibility of Hewlett-Packard. If you want to replace the non-HP ink cartridges, select Replace and press the Enter key. Otherwise, select Continue - HP C7770B | HP Designjet 500 Plus - Pocket Guide - Page 92
for damage from use of non-HP printheads. Replace Continue Ink cartridge replacement required Explanation and Action The printer has determined that one or more of the printheads is not an HP product. Your product warranty only applies when you use HP printheads. Any damage caused to your - HP C7770B | HP Designjet 500 Plus - Pocket Guide - Page 93
before the printheads can be replaced. First replace the faulty, empty or missing ink cartridges and then replace the printheads. See "Replacing Ink Cartridges" on page 35 and "Replacing Printheads" on page 38 on the reverse of this Pocket Guide. You are replacing printheads, but the printer has - HP C7770B | HP Designjet 500 Plus - Pocket Guide - Page 94
Explanation and Action Install missing cartridges before replacing printheads Normal printheads found Open window and replace with SETUP printheads You are replacing printheads, but the printer has detected that one or more cartridges are missing. The missing cartridges must be installed before - HP C7770B | HP Designjet 500 Plus - Pocket Guide - Page 95
cover is not securely closed. Open the window and check the printhead cover. The procedure is described on page 38 on the reverse of this Pocket Guide. Note: This message may also appear following a paper jam, as the printer cannot detect the exact reason for the problem. In this case you may have - HP C7770B | HP Designjet 500 Plus - Pocket Guide - Page 96
Quality (in the Setup menu) to Fast or Normal instead of Best. If the problem persists, you may have to add more memory to the formatter card that is installed in the back of the printer. The printer ran out of paper while printing the calibration pattern. Load a sheet or roll that is at least 65 - HP C7770B | HP Designjet 500 Plus - Pocket Guide - Page 97
print quality. Press the Enter key to create the calibration pattern. See "Advance Calibration Routine" on page 22. During the loading of paper, the printer has detected that the paper is skewed too much, that is, it has not been loaded straight enough. ('Skew' is the angle between the actual - HP C7770B | HP Designjet 500 Plus - Pocket Guide - Page 98
following the normal procedure, to solve this problem. See "Loading a Sheet of Paper" on page 47 and "Loading a Roll of Paper" on page 58 on the reverse of this Pocket Guide. During the loading of paper, the printer has detected that no paper has been loaded. Either: Press the Enter key to restart - HP C7770B | HP Designjet 500 Plus - Pocket Guide - Page 99
minimum requirement. While loading paper into the printer (roll or sheet), the printer has found that it is paper, or the Cancel key to stop the load process. The Troubleshooting utility has found that the single sheet loaded in the printer is too small for a Diagnostic Print. Load a roll of paper - HP C7770B | HP Designjet 500 Plus - Pocket Guide - Page 100
the paper axis calibration pattern. Load a roll or sheet that is at least 65 cm (25 inches) long and 50 cm (20 inches) wide. The printer is trying to perform a scan of the calibration pattern, but the pattern was not found. Reload the sheet that was printed by the Create pattern part of - HP C7770B | HP Designjet 500 Plus - Pocket Guide - Page 101
error messages Message Possibly a paper jam 1. Open window 2. Switch power off 3. Clear paper path 4. Switch power on 5. Align printheads Printhead replacement not available now. Cancel print jobs before replacement Explanation and Action There may be paper jammed in the printer. (The printer - HP C7770B | HP Designjet 500 Plus - Pocket Guide - Page 102
was unable to clean the printheads fully. You should use the Troubleshooting routine (see page 16) to correct any image quality problems that may be apparent; alternatively, you should replace the printheads (see page 38 on the reverse of this Pocket Guide). The printer is attempting to print a job - HP C7770B | HP Designjet 500 Plus - Pocket Guide - Page 103
be aligned. Press the Enter key to continue. Load a sheet or roll of paper, and select Align printheads from the Ink menu. See "Aligning Printheads" on page 44 on the reverse of this Pocket Guide. The printer has detected that the printheads need to be aligned. Press the Enter key to align them. See - HP C7770B | HP Designjet 500 Plus - Pocket Guide - Page 104
follow the instructions to replace the faulty ink cartridges. Reload paper There is an error in the paper, as shown in another message. Use the normal procedure to reload the paper, as described on the other side of this Pocket Guide. Replace empty cartridges before replacing printheads You have - HP C7770B | HP Designjet 500 Plus - Pocket Guide - Page 105
a roll, the printer cannot detect the side edge of the paper. A possible cause is that the media is transparent (clear); only non-clear media are supported. Either: Press the Enter key to restart the loading procedure; Or: Press the Cancel key to cancel paper loading. Front-Panel Error Messages 41 - HP C7770B | HP Designjet 500 Plus - Pocket Guide - Page 106
Cancel key to cancel paper loading. Sheet not loaded The printer is trying to perform a scan of the calibration pattern, but no sheet was Load sheet with printed pattern found. Load the sheet that was printed by the Create pattern part of the calibration routine. 42 Front-Panel Error Messages - HP C7770B | HP Designjet 500 Plus - Pocket Guide - Page 107
key to stop the process. If the paper is on a roll, follow the instructions on page 58 on the reverse of this Pocket Guide. The printer has finished the Troubleshooting routine and will not at this stage perform further cleaning on the printheads because this could damage the other ones. However - HP C7770B | HP Designjet 500 Plus - Pocket Guide - Page 108
print. The Troubleshooting utility has found that there is no paper loaded in the printer. Load a roll of paper. Unable to initialize ink system. The system cannot successfully complete the startup. Call HP representative. Call HP for service. Unable to prepare ink system. Open window to check - HP C7770B | HP Designjet 500 Plus - Pocket Guide - Page 109
printer as printheads approved by HP, though the printer can still use them. Press the Enter key. The printer has detected that the color calibrations have not been performed on this paper type, and the system is configured to do them. To calibrate color for the current paper type, select Ink menu - HP C7770B | HP Designjet 500 Plus - Pocket Guide - Page 110
. Refer to guide for instructions. Warning: printheads not aligned Explanation and Action The color calibrations for the paper that is loaded have been lost. Follow the procedure described in "Advance Calibration Routine" on page 22. The printer has detected that the printheads have not been - HP C7770B | HP Designjet 500 Plus - Pocket Guide - Page 111
(HP Designjet 500 and 800 Series products) HP Product Printer and Related HP Hardware: Software: Printhead: Ink Cartridge: of HP black ink or 200 cc of HP color ink have been cycled through the printhead, whichever occurs first Until the original HP ink is depleted as indicated by the printer, or - HP C7770B | HP Designjet 500 Plus - Pocket Guide - Page 112
maintenance or modification; b Software, interfacing, media, parts, or supplies not provided or supported by HP; or c Operation outside the product's specifications. 4 For HP printer products, the use of a refilled or nonoriginal HP consumable product (ink, printhead or ink cartridge) does - HP C7770B | HP Designjet 500 Plus - Pocket Guide - Page 113
replaced. 9 HP products may contain remanufactured parts or components equivalent to new in performance or may have been subject to incidental use. 10 HP services, such as onsite service, may be available for any authorized HP service facility where the listed HP product is distributed by HP - HP C7770B | HP Designjet 500 Plus - Pocket Guide - Page 114
customer's sole and exclusive remedies. 2 TO THE EXTENT ALLOWED BY LOCAL LAW, EXCEPT FOR THE OBLIGATIONS SPECIFICALLY SET FORTH IN THIS WARRANTY STATEMENT, IN NO EVENT SHALL HP OR ITS THIRD PARTY SUPPLIERS BE LIABLE FOR DIRECT, INDIRECT, SPECIAL, INCIDENTAL, OR CONSEQUENTIAL DAMAGES, WHETHER BASED - HP C7770B | HP Designjet 500 Plus - Pocket Guide - Page 115
ADDITION TO, THE MANDATORY STATUTORY RIGHTS APPLICABLE TO THE SALE OF HP PRODUCTS TO SUCH CUSTOMERS. Revision: June 23, 2000 Regulatory Notices You can obtain current Material Safety Data Sheets for the ink systems used in the printer by mailing a request to this address: Hewlett-Packard Customer - HP C7770B | HP Designjet 500 Plus - Pocket Guide - Page 116
Product Identification Numbers HP Designjet 500 Series: C7769X, C7770X HP Designjet 800 Series: C7779X, C7780X (where X is any single letter) This device complies with part 15 of the FCC rules. Operation is subject to the following two conditions: (1) This device may not cause harmful interference, - HP C7770B | HP Designjet 500 Plus - Pocket Guide - Page 117
Problems". part 15 of the FCC Rules. These limits are designed to provide reasonable protection against harmful interference in a commercial environment. This equipment generates, uses, and can radiate radio frequency energy and, if not installed and used in accordance with the instructions - HP C7770B | HP Designjet 500 Plus - Pocket Guide - Page 118
emissions from digital apparatus set out in the Radio Interference Regulations of the Canadian Department of Communications. When connected to LAN cables using print server accessories, this digital apparatus does not exceed the Class A limits for radio noise emissions from digital apparatus set - HP C7770B | HP Designjet 500 Plus - Pocket Guide - Page 119
legal information Chinese EMI statement Class B Taiwanese EMI statement Class A for LAN cables connection using print server accessory Korean EMI statement Address Hewlett-Packard Company Manager of Corporate Product Regulations 3000 Hanover Street Palo Alto, CA 94304 650/ - HP C7770B | HP Designjet 500 Plus - Pocket Guide - Page 120
< 70 dB, am Arbeitsplatz, im Normalbetrieb, nach DIN 45635 T. 19. Telecommunications Statement Telecommunications General Approval (UK) The HP Designjet 500 and 800 Series printers, models C7769X, C7770X, C7779X, and C7780X (where X is any single letter) are approved under Approval Number NS/G/ 1234 - HP C7770B | HP Designjet 500 Plus - Pocket Guide - Page 121
that the product Product Family: Model Numbers: Product Options: HP Designjet 500 and 800 series Inkjet Printers C7769X, C7770X, C7779X and C7780X (where X represents any single letter) All conforms to the following Product Specifications: Safety: IEC 60950:1999 / EN 60950:2000 Declaration of - HP C7770B | HP Designjet 500 Plus - Pocket Guide - Page 122
product was tested in a typical configuration with HP Personal Computer Systems and peripherals. 2 This Device complies with Part 15 of the FCC Rules. Operation is The product exhibits Class A operation when connected to LAN cables using print server accessories. 4 Except clause 9.5 which was - HP C7770B | HP Designjet 500 Plus - Pocket Guide - Page 123
legal information Sant Cugat del Vallès (Barcelona), November 10th, 2005 Josep-Maria Pujol Hardware Quality Manager Local contacts for regulatory topics only: Contact in Europe: Hewlett-Packard GmbH, HQ-TRE, Herrenberger Strasse 140, 71034 Böblingen, Germany. Contact in USA: Hewlett-Packard - HP C7770B | HP Designjet 500 Plus - Pocket Guide - Page 124
60 Declaration of Conformity
-
 1
1 -
 2
2 -
 3
3 -
 4
4 -
 5
5 -
 6
6 -
 7
7 -
8
-
9
-
10
-
11
-
12
-
13
-
14
-
15
-
16
-
17
-
18
-
19
-
20
-
21
-
22
-
23
-
24
-
25
-
26
-
27
-
28
-
29
-
30
-
31
-
32
-
33
-
34
-
35
-
36
-
37
-
38
-
39
-
40
-
41
-
42
-
43
-
44
-
45
-
46
-
47
-
48
-
49
-
50
-
51
-
52
-
53
-
54
-
55
-
56
-
57
-
58
-
59
-
60
-
61
-
62
-
63
-
64
-
65
-
66
-
67
-
68
-
69
-
70
-
71
-
72
-
73
-
74
-
75
-
76
-
77
-
78
-
79
-
80
-
81
-
82
-
83
-
84
-
85
-
86
-
87
-
88
-
89
-
90
-
91
-
92
-
93
-
94
-
95
-
96
-
97
-
98
-
99
-
100
-
101
-
102
-
103
-
104
-
105
-
106
-
107
-
108
-
109
-
110
-
111
-
112
-
113
-
114
-
115
-
116
-
117
-
118
-
119
-
120
-
121
-
122
-
123
-
124
 |
 |

hp
designjet 500 series printers
hp
designjet 800 series printers
?
how do I…
pocket guide
i