HP DL785 HP ProLiant DL785 G5 and G6 Servers - Maintenance and Service Guide, - Page 48
SPI (core I/O) board, Re-entering the server serial number and product ID, System battery
 |
UPC - 883585262809
View all HP DL785 manuals
Add to My Manuals
Save this manual to your list of manuals |
Page 48 highlights
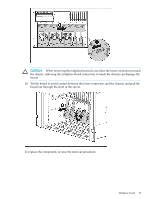
To replace the component, reverse the removal procedure. SPI (core I/O) board The System Peripheral Interconnect (SPI) board implements all the logic to support the internal devices and the standard connectivity of the product. The board includes a RAID5 SAS controller which supports up to eight of the sixteen embedded SAS disk drives. CAUTION: Only authorized technicians trained by HP should attempt to remove the SPI board. If you believe the SPI board requires replacement, contact HP Technical Support before proceeding. The procedures for removing and replacing the SPI board are the same as other expansion boards. See "Expansion boards" (page 42). IMPORTANT: If replacing the SPI board or clearing NVRAM, you must re-enter the server serial number through RBSU ("Re-entering the server serial number and product ID" (page 48)). Re-entering the server serial number and product ID After you replace the SPI board, you must re-enter the server serial number and the product ID. 1. During the server startup sequence, press F9 to access RBSU. 2. Select the Advanced Options menu. 3. Select Serial Number. The following warning displays: Warning: The serial number should ONLY be modified by qualified service personnel. This value should always match the serial number located on the chassis. 4. Press Enter to clear the warning. 5. Enter the serial number. 6. Select Product ID. The following warning displays: Warning: The Product ID should ONLY be modified by qualified service personnel. This value should always match the Product ID located on the chassis. 7. Enter the product ID and press Enter. 8. Press Escape to close the menu. 9. Press Escape to exit RBSU. 10. Press F10 to confirm exiting RBSU. The server automatically reboots. System battery CAUTION: Before starting this procedure, read the information about protecting against electrostatic discharge ("Preventing electrostatic discharge" (page 23)). If the server no longer automatically displays the correct date and time, you might need to replace the battery that provides power to the real-time clock. Under normal use, battery life is five to ten years. WARNING! The computer contains an internal lithium manganese dioxide, a vanadium pentoxide, or an alkaline battery pack. A risk of fire and burns exists if the battery pack is not properly handled. To reduce the risk of personal injury: • Do not attempt to recharge the battery. • Do not expose the battery to temperatures higher than 60°C (140°F). • Do not disassemble, crush, puncture, short external contacts, or dispose of in fire or water. • Replace only with the spare battery designated for this product. To remove the battery: 48 Removal and replacement procedures
-
 1
1 -
2
-
3
-
4
-
5
-
6
-
7
-
8
-
9
-
10
-
11
-
12
-
13
-
14
-
15
-
16
-
17
-
18
-
19
-
20
-
21
-
22
-
23
-
24
-
25
-
26
-
27
-
28
-
29
-
30
-
31
-
32
-
33
-
34
-
35
-
36
-
37
-
38
-
39
-
40
-
41
-
42
-
 43
43 -
 44
44 -
 45
45 -
 46
46 -
 47
47 -
 48
48 -
 49
49 -
 50
50 -
 51
51 -
 52
52 -
 53
53 -
54
-
55
-
56
-
57
-
58
-
59
-
60
-
61
-
62
-
63
-
64
-
65
-
66
-
67
-
68
-
69
-
70
-
71
-
72
-
73
-
74
-
75
-
76
-
77
-
78
-
79
-
80
-
81
-
82
-
83
-
84
-
85
-
86
-
87
-
88
-
89
-
90
 |
 |