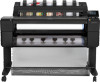
HP DesignJet T1530 Assembly Instructions
HP DesignJet T1530 Manual
 |
View all HP DesignJet T1530 manuals
Add to My Manuals
Save this manual to your list of manuals |
HP DesignJet T1530 manual content summary:
- HP DesignJet T1530 | Assembly Instructions - Page 1
EN HP DesignJet T900 and T1500 Printer Series Assembly Instructions FR HP DesignJet T900 et T1500 Série Printer Instructions d'assemblage DE HP DesignJet T900 und T1500 Printer Serie Anleitung zum Zusammenbau IT Stampanti HP DesignJet serie T900 e T1500 Istruzioni per l'installazione ES Printer HP - HP DesignJet T1530 | Assembly Instructions - Page 2
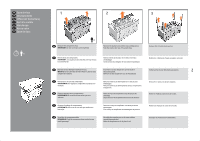
EN Open the box FR Ouvrez la boîte DE Öffnen der Verpackung IT Aprire la scatola ES Abra la caja PT Abra a caixa NL Open de doos 10' x2 1 2 3 x2 EN Remove the components tray. IMPORTANT: Do not cut straps until requested. Remove the stacker arm and the two packing pieces. Take the stacker arm - HP DesignJet T1530 | Assembly Instructions - Page 3
4 5 6 7 180° x2 x2 EN Slide the box forward on the pallet to create a space. Carefully roll the box 180° onto the floor. Remove the wooden pallet. FR Faites coulisser la boîte en avant sur la palette pour créer un espace. Faites doucement rouler la boîte de 180° sur le sol. Retirez la - HP DesignJet T1530 | Assembly Instructions - Page 4
la bustina essiccante. Extraiga la bolsa desecante. Remova o saco dissecante. Verwijder het zakje met droogmiddel. EN Assemble the stand FR Assemblage du support DE Zusammenbauen des Stand- fußes IT Assemblaggio del piedistallo ES Montaje del soporte PT Monte a base NL De voet in elkaar zetten 20 - HP DesignJet T1530 | Assembly Instructions - Page 5
11 12 13 14 5 EN Locate the stand pieces: 1. Left leg / 2. Basket Assembly / 3. Right leg / 4. Crossbar / 5. Screwdriver FR Localisez les pièces du socle : 1. Montant gauche / 2. Assemblage du panier / 3. Montant droit / 4. Barre transversale / 5. Tournevis DE Suchen Sie die Teile des Standfuß - HP DesignJet T1530 | Assembly Instructions - Page 6
transversale du montant droit avec les 5 vis, mais sans les visser complètement. Serrez complètement les 10 vis : gauches et droites. Tournez le support de 180° pour le placer en position verticale. DE Befestigen Sie den Querstange mit 5 Schrauben am Ziehen Sie alle 10 Schrauben vollständig fest - HP DesignJet T1530 | Assembly Instructions - Page 7
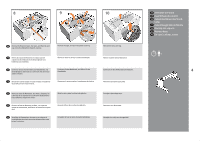
not to catch the plastic bag between the stand and printer. Fixez le support à l'imprimante en insérant le rectangle et le cercle en place. Important : the stand assembly to the printer body with 2 screws each side. Fixez le support à l'imprimante avec 2 vis de chaque côté. 20 Check the 4 wheels are - HP DesignJet T1530 | Assembly Instructions - Page 8
21 90° EN Rotate the printer 90°. FR Faites pivoter l'imprimante de 90°. DE Drehen Sie den Drucker um 90°. IT Ruotare la stampante di 90°. ES Gire la impresora 90°. PT Gire a impressora em 90°. NL Draai de printer 90°. 22 23 x2 90° x2 Rotate the printer 90° into the upright position. Remove - HP DesignJet T1530 | Assembly Instructions - Page 9
24 25 26 27 EN Remove the box. FR Retirez la boîte. DE Entfernen Sie die Abdeckung. IT Rimuovere il contenitore. ES Extraiga la caja. PT Remova a caixa. NL Verwijder de kap. x2 Remove the 2 end caps. Retirez les 2 embouts de protection. Entfernen Sie die zwei Endkappen. Rimuovere i 2 fermi - HP DesignJet T1530 | Assembly Instructions - Page 10
28 29 EN Remove the screws from the stacker. FR Retirez les vis du chargeur. DE Entfernen Sie die Schrauben vom Stapler. IT Rimuovere le viti dell'impilatore. ES Retire los tornillos de la apiladora. PT Remova os parafusos do empilhador. NL Verwijder de schroeven uit de stapelaar. Unfold the - HP DesignJet T1530 | Assembly Instructions - Page 11
32 33 34 35 EN Open the printer cover (1) and remove the carton piece (2). FR Ouvrez le capot de l'imprimante (1) et retirez le papier cartonné (2). IMPORTANT: in the following step you must remove the carriage retainter; be very careful not to touch the encoder strip. IMPORTANT : Dans l'étape - HP DesignJet T1530 | Assembly Instructions - Page 12
EN Assemble the basket 36 37 38 FR Assemblage du panier DE Zusammenbauen der Ablage IT Installazione del raccoglitore ES Montaje de la cesta PT Monte o cesto NL De mand in elkaar zetten 5' x2 EN Locate the basket pieces and connect the 2 elbows. FR Localisez les pièces du panier et - HP DesignJet T1530 | Assembly Instructions - Page 13
39 40 41 42 EN Slot the bar through the basket. FR Insérez la barre via le panier. DE Schieben Sie die Strebe durch die Ablage. IT Infilare la barra attraverso il raccoglitore. ES Encaje la barra a través de la cesta. PT Encaixe a barra por meio do cesto. NL Schuif de staaf door de mand. Slot - HP DesignJet T1530 | Assembly Instructions - Page 14
43 EN Set up the printer 44 45 JFAR Configuration de l'imprimante ZHDCEN Einrichten des Druckers ZHITW Installazione della stampante KEOS Configuración de la impresora IPDT Instalar a impressora NL De printer opstellen EN Move the printer to its final destination. FR Placez l'imprimante à - HP DesignJet T1530 | Assembly Instructions - Page 15
the back only. Lock the wheels. Select your language on the touch screen, and confirm it. The front panel will ask you to install the ink cartridges. FR Remarque : Assurez-vous que les câbles ne pendent pas afin d'éviter les bourrages papier lors de l'impression avec le panier. DE Hinweis - HP DesignJet T1530 | Assembly Instructions - Page 16
van de inktpatroon (links en rechts). Schud alle inktpatronen. Insert the ink cartridges: black, gray, and matte black on the left, cyan, right. A beep is heard when the cartridges are inserted correctly. Close the ink cartridge covers (left and right). Insérez les cartouches d'encre : noir, - HP DesignJet T1530 | Assembly Instructions - Page 17
54 55 56 57 EN The printer will now prepare the ink system for use. When the process finishes a message appears asking you to open the window. FR L'imprimante va maintenant préparer le système d'encre - HP DesignJet T1530 | Assembly Instructions - Page 18
58 59 60 61 EN Open the printhead cover by pulling the handle down. Remove the orange caps from inside the carriage. Insert the printhead. FR Ouvrez le couvercle de la tête d'impression en tirant sur la poignée vers le bas. Retirez les capuchons orange de l'intérieur du chariot. DE Öffnen - HP DesignJet T1530 | Assembly Instructions - Page 19
62 63 64 65 EN Lift the printhead cover handle. Push the handle down to clip the cover to the bar. Pull the handle down to close the cover. Push down to close the cover completely. FR Soulevez la poignée du couvercle de la tête d'impression. Poussez la poignée vers le bas pour attacher le - HP DesignJet T1530 | Assembly Instructions - Page 20
66 67 EN Load the paper FR Chargement du papier DE Laden von Papier IT Caricamento della carta 10' ES Carga del papel PT Coloque o papel NL Plaats het papier EN Close the window and press OK. FR Fermez le capot et appuyez sur OK. DE Schließen Sie das Fenster und drücken Sie auf OK. IT - HP DesignJet T1530 | Assembly Instructions - Page 21
69 70 71 72 EN Remove the spindle and remove the orange tape and carton piece. Unlock (1), and remove the blue hub (2). FR Retirez la bobine et retirez le ruban orange et le papier cartonné. Déverrouillez (1) et retirez le concentrateur bleu (2). DE Entnehmen Sie die Spindel und entfernen - HP DesignJet T1530 | Assembly Instructions - Page 22
l'interno. Enrolle el papel. Role o papel para inseri-lo. Rol het papier erin. T1500 Series only: follow steps 68 - 75 for the 2nd roll. T1500 Série uniquement : suivez les étapes 68 à 75 pour le second rouleau. Nur T1500 Serie: Führen Sie die Schritte 68-75 für die zweite Rolle durch. 22 Solo - HP DesignJet T1530 | Assembly Instructions - Page 23
Solo para los usuarios de MAC: para un control completo de este producto DesignJet; HP recomienda instalar y utilizar el software del producto de HP. Apenas para usuários de MAC: para controle total deste produto DesignJet; A HP recomenda a instalação e o uso de software de software. Alleen voor Mac - HP DesignJet T1530 | Assembly Instructions - Page 24
is correctly connected to the Internet. 2.Enable Web Services during initial setup of the printer, or later following the instructions on the front panel. The printer may need to restart if it has updated its firmware. Mobile Printing With HP Mobile Printing Solutions you can print straight from - HP DesignJet T1530 | Assembly Instructions - Page 25
Airprint, no es necesario realizar ninguna instalación. • Para la impresión desde Android, instale la aplicación HP Print Service desde Google Play. Para obtener más información, visite: http://www.hp.com/go/designjetmobility Imprima usando smartphone ou tablet • A impressão no iOS é feita por meio - HP DesignJet T1530 | Assembly Instructions - Page 26
instructions. For USB connections: Connecting your product before installing the software can lead to product errors. On the DVD you will find: Software installation (drivers with HP Utility) / Documentation / Support For latest information please visit: http://www.hp.com/go/T930/support - HP DesignJet T1530 | Assembly Instructions - Page 27
printer security (you will need the printer code and an account at the HP Connected: http://www.hp.com/go/hpconnected). FR Facultatif : Gestion de la sécurité printer dans HP Connected. Lorsque vous activez des services Web, l'imprimante est en mode déverrouiller ce qui signifie que toute personne - HP DesignJet T1530 | Assembly Instructions - Page 28
to change without notice. The only warranties for HP products and services are set forth in the express warranty statements accompanying such products and services. Nothing herein should be construed as constituting an additional warranty. HP shall not be liable for technical or editorial errors
-
 1
1 -
 2
2 -
 3
3 -
 4
4 -
 5
5 -
 6
6 -
 7
7 -
8
-
9
-
10
-
11
-
12
-
13
-
14
-
15
-
16
-
17
-
18
-
19
-
20
-
21
-
22
-
23
-
24
-
25
-
26
-
27
-
28
 |
 |
1
© Copyright 2015 HP Development Company, L.P.
Large Format Division
Camí de Can Graells 1-21 · 08174
Sant Cugat del Vallès
Barcelona · Spain
All rights reserved
Printed in XXX
HP DesignJet T900 and T1500
Printer Series
Assembly Instructions
HP DesignJet T900 et T1500
Série Printer
Instructions d’assemblage
HP DesignJet T900 und T1500
Printer Serie
Anleitung zum Zusammenbau
Stampanti HP DesignJet
serie T900 e T1500
Istruzioni per l’installazione
Printer HP DesignJet
series T900 y T1500
Instrucciones de montaje
Séries HP DesignJet T900 e T1500
Printer
Instruções de montagem
HP DesignJet T900 en -T1500
Printer-serie
Instructies voor het opstellen
EN: Please read these instructions carefully.
These assembly instructions explain how to assemble
the printer. Because spare screws are supplied, some screws may remain unused after assembly of
the printer.
FR: Veuillez lire attentivement ces instructions.
Ces instructions d’assemblage expliquent comment
assembler l’imprimante.
Des vis de rechange étant fournies, certaines vis pourront rester inutilisées après l’assemblage de
l’imprimante.
DE:Lesen Sie diese Anleitungen sorgfältig durch.
Dieses Dokument enthält Anleitungen für den
Zusammenbau des Druckers.
Zum Lieferumfang gehören Ersatzschrauben, sodass nach dem Zusammenbau einige Schrauben übrig
bleiben.
IT: Leggere attentamente queste istruzioni.
Queste istruzioni descrivono la procedura d’installazione
della stampante.
Poiché vengono fornite viti di riserva, alcune potrebbero risultare inutilizzate dopo l’installazione della
stampante.
ES: Lea atentamente estas instrucciones.
Estas instrucciones de montaje explican cómo se monta la
impresora.
Como también se incluyen tornillos de repuesto, después de montar la impresora pueden quedar
algunos sin utilizar.
PT: Leia as instruções com atenção.
Essas instruções de montagem explicam como montar a
impressora.
Como são fornecidos parafusos sobressalentes, alguns podem permanecer sem uso depois da
montagem da impressora.
NL: Lees deze instructies aandachtig door.
In deze assemblage-instructies wordt beschreven hoe de
printer wordt gemonteerd.
Omdat er reserveschroeven zijn geleverd, kunnen er na assemblage van de printer enkele ongebruikte
schroeven overblijven.
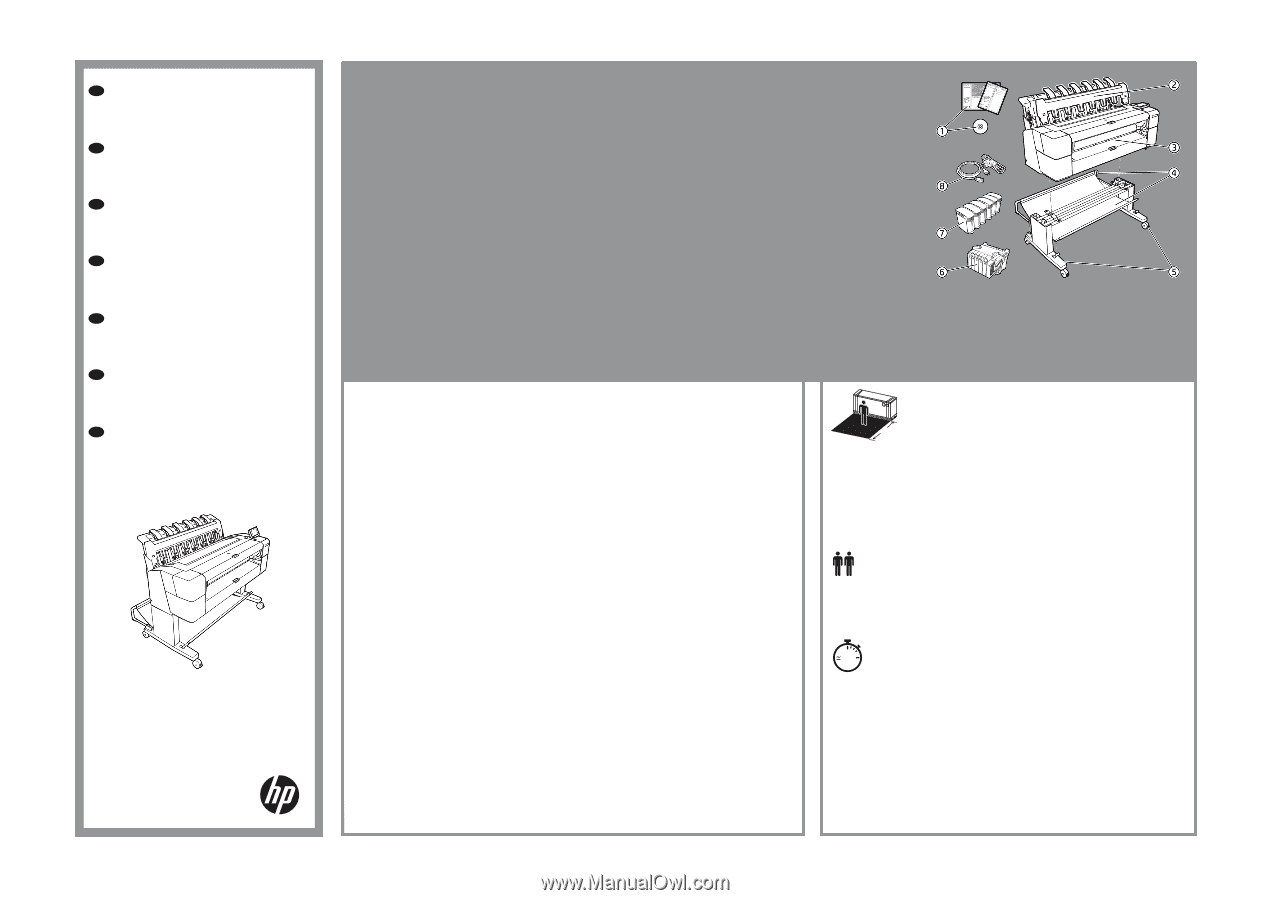
EN:
The size of the crate is
1470mm X 754mm X 550mm
. The space
required for assembly is 2.5m (8.5 feet) in front. /
FR :
La taille de
l’emballage est
1470mm X 754mm X 550mm
. L’espace requis pour
l’ensemble est 2,5 mètres (8,5 pieds) à l’avant. /
DE:
Größe der
Verpackungskiste:
1470mm X 754mm X 550mm
. Der erforderliche
Raum für den Zusammenbau beträgt 2,5 m zur Vorderseite hin. /
IT:
Le dimensioni
della cassa sono
1470mm X 754mm X 550mm
. Lo spazio necessario per il montaggio è
2,5
m sul lato anteriore. /
ES:
Las dimensiones de la caja son:
1470mm X 754mm X
550mm
. Espacio: El espacio necesario para el montaje es de 2,5 m por la parte
delantera.
/
PT:
O tamanho da caixa é de
1470mm X 754mm X 550mm
. O space: O
espaço
necessário para a montagem é de 2,5 m (8,5 pés) à frente. /
NL:
Het formaat
van de kist is
1470mm X 754mm X 550mm
. De ruimte vereist voor de montage 2,5 m
aan de voorzijde.
EN:
2 people are required to perform certain tasks. /
FR :
L’exécution de certaines
tâches nécessite la présence de 2 personnes. /
DE:
Für bestimmte Tätigkeiten werden
2 Personen benötigt. /
IT:
Per determinate operazioni, sono necessarie 2 persone. / ES:
Algunas tareas se deben realizar entre 2 personas. /
PT:
São necessárias 2 pessoas para
a realização de determinadas tarefas. /
NL:
Voor bepaalde taken zijn 2 personen nodig.
100’
EN:
Time required for assembly of the printer is approximately
100 minutes . /
FR :
Le temps requis pour l’assemblage de l’imprimante est d’environ
100 minutes. /
DE:
Der Zusammenbau des Druckers dauert etwa 100 Minuten. /
IT:
L’installazione della stampante richiede circa 100 minuti. /
ES:
El tiempo de montaje
de la impresora es aproximadamente de 100 minutos. /
PT:
O tempo necessário para
a montagem da impressora é de aproximadamente 100 minutos. /
NL:
De vereiste tijd
voor assemblage van de printer is ongeveer 100 minuten.
EN:
Tools required: Screwdriver (included). /
FR :
Outils nécessaires : Tournevis (fourni). /
DE:
Erforderliches Werkzeug: Schraubendreher (enthalten). /
IT:
Strumenti neces-
sari: cacciavite (incluso). /
ES:
Herramientas requeridas: Destornillador (incluido). /
PT:
Ferramentas necessárias: Chave de fenda (incluída). /
NL:
Benodigd gereedschap:
Schroevendraaier (inbegrepen).
2.5m
8.5ft
NL
PT
ES
IT
DE
FR
EN
EN:
Crate contents
1. Documentation: Assembly
Instructions, Introductory info, CD
2. Stacker accessory
3. Printer
4. Basket
5. Stand accessory pieces
6. Printhead
7. Ink cartridges
8. Power cords
Note: roll and LAN cable not
included.
FR:
Contenu de l’emballage
1. Documentation : Instructions
d’assemblage, Informations de
base, CD
2. Accessoire du chargeur
3. Imprimante
4. Panier
5. Accessoires du support
6. Tête d’impression
7. Cartouches d’encre
8. Cordons d’alimentation
Remarque : Rouleau et câble LAN
non inclus.
DE:
Inhalt der Kiste
1. Dokumentation: Anleitung zum
Anleitungen, Einführende
Informationen, CD
2. Staplerzubehör
3. Drucker
4. Ablage
5. Standfuß-Zubehörteile
6. Druckkopf
7. Tintenpatronen
8. Netzkabel
Hinweis: Rolle und LAN-Kabel sind
nicht im Lieferumfang enthalten.
IT:
Contenuto della scatola
1. Documentazione: Istruzioni
per l’installazione, Informazioni
introduttive, CD
2. Impilatore
3. Stampante
4. Raccoglitore
5. Componenti accessori
piedistallo
6. Testina di stampa
7. Cartucce di inchiostro
8. Cavi di alimentazione
Nota: rotolo e cavo LAN non inclusi.
ES:
Contenido de la caja
1. Documentación: Módulo
Instrucciones, Información
preliminar, CD
2. Accesorio de la apiladora
3. Impresora
4. Cesta
5. Piezas del accesorio del
soporte
6. Cabezal de impresión
7. Cartuchos de tinta
8. Cables de alimentación
Nota: el rollo y el cable LAN no
están incluidos.
PT:
Conteúdo da caixa
1. Documentação: Montagem
Instruções, Informações de
introdução, CD
2. Acessório de empilhamento
3. Impressora
4. Cesto
5. Peças acessórias da base
6. Cabeçote de impressão
7. Cartuchos de tinta
8. Cabos de força
Nota: os cabos de rolo e LAN
não estão incluídos.
NL:
Inhoud van de kist
1. Documentatie: module
Instructies, inleidende
informatie, cd
2. Stapelaaraccessoire
3. Printer
4. Mand
5. Delen van
staanderaccessoire
6. Printkop
7. Inktpatronen
8. Netsnoeren
Let op: rol en LAN-kabel niet
meegeleverd.
*L2Y24-90008*
L2Y24-90008