HP Designjet T620 HP Designjet T620 Printer Series - Users Guide - Page 19
Choose which connection method to use, Connect directly to a computer (Windows), Software installation
 |
View all HP Designjet T620 manuals
Add to My Manuals
Save this manual to your list of manuals |
Page 19 highlights
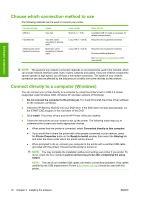
Software installation Choose which connection method to use The following methods can be used to connect your printer. Connection type USB 2.0 Fast Ethernet Jetdirect print server (optional accessory) Speed Very fast Very fast; varies according to network traffic Moderate; varies according to network traffic Cable length Short (5 m = 16 ft) Long (100 m = 328 ft) Other factors A certified USB 2.0 cable is necessary for reliable communication. Requires extra equipment (switches) Long (100 m = 328 ft) Requires extra equipment (switches) Provides additional features See http://www.hp.com/go/jetdirect/ for more details NOTE: The speed of any network connection depends on all components used in the network, which can include network interface cards, hubs, routers, switches and cables. If any one of these components cannot operate at high speed, you will have a low-speed connection. The speed of your network connection can also be affected by the total amount of traffic from other devices on the network. Connect directly to a computer (Windows) You can connect your printer directly to a computer by using the printer's built-in USB 2.0 socket (supported under Windows 2000, Windows XP and later versions of Windows). 1. Do not connect the computer to the printer yet. You must first install the printer driver software on the computer, as follows. 2. Insert the HP Start-Up Kit DVD into your DVD drive. If the DVD does not start automatically, run the START.EXE program in the root folder of the DVD. 3. Click Install. The printer drivers and the HP Printer Utility are installed. 4. Follow the instructions on your screen to set up the printer. The following notes help you to understand the screens and make appropriate choices. ● When asked how the printer is connected, select Connected directly to this computer. ● If you would like to share the printer with other people connected to your network, press the Printer Properties button in the Ready to Install window, then select the Sharing tab and enter the name under which the printer will be shared. ● When prompted to do so, connect your computer to the printer with a certified USB cable (provided with the printer). Ensure that the printer is turned on. NOTE: You may complete the installation without connecting your printer if you prefer. To do so, check the box marked I want to connect my printer after completing the setup wizard. NOTE: The use of non-certified USB cables can lead to connectivity problems. Only cables certified by the USB Implementor's Forum (http://www.usb.org/) should be used with this printer. 10 Chapter 2 Installing the software ENWW
-
 1
1 -
2
-
3
-
4
-
5
-
6
-
7
-
8
-
9
-
10
-
11
-
12
-
13
-
 14
14 -
 15
15 -
 16
16 -
 17
17 -
 18
18 -
 19
19 -
 20
20 -
 21
21 -
 22
22 -
 23
23 -
 24
24 -
25
-
26
-
27
-
28
-
29
-
30
-
31
-
32
-
33
-
34
-
35
-
36
-
37
-
38
-
39
-
40
-
41
-
42
-
43
-
44
-
45
-
46
-
47
-
48
-
49
-
50
-
51
-
52
-
53
-
54
-
55
-
56
-
57
-
58
-
59
-
60
-
61
-
62
-
63
-
64
-
65
-
66
-
67
-
68
-
69
-
70
-
71
-
72
-
73
-
74
-
75
-
76
-
77
-
78
-
79
-
80
-
81
-
82
-
83
-
84
-
85
-
86
-
87
-
88
-
89
-
90
-
91
-
92
-
93
-
94
-
95
-
96
-
97
-
98
-
99
-
100
-
101
-
102
-
103
-
104
-
105
-
106
-
107
-
108
-
109
-
110
-
111
-
112
-
113
-
114
-
115
-
116
-
117
-
118
-
119
-
120
-
121
-
122
-
123
-
124
-
125
-
126
-
127
-
128
-
129
-
130
-
131
-
132
-
133
-
134
-
135
-
136
-
137
-
138
-
139
-
140
-
141
-
142
-
143
-
144
-
145
-
146
-
147
-
148
-
149
-
150
-
151
-
152
-
153
-
154
-
155
-
156
-
157
-
158
-
159
-
160
-
161
-
162
-
163
-
164
-
165
-
166
-
167
-
168
-
169
 |
 |
