HP Designjet T620 HP Designjet T620 Printer Series - Users Guide - Page 48
Maintain paper, Change the drying time, Turn the automatic cutter on and off, Feed and cut the paper
 |
View all HP Designjet T620 manuals
Add to My Manuals
Save this manual to your list of manuals |
Page 48 highlights
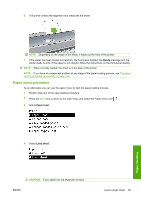
Maintain paper To maintain paper quality, follow the recommendations below. ● Store rolls covered by another piece of paper or cloth ● Store cut sheets covered and clean or brush them before loading them in the printer ● Clean input and output platens and cut sheet tray ● Always keep the window of your printer closed NOTE: Photo and coated paper requires careful handling, see The print is scuffed or scratched on page 128. Change the drying time You may wish to change the drying time setting to suit special printing conditions such as multiple prints where time is of higher importance or when you need to be sure ink is dry before handling. Select the Setup menu icon , then Print retrieval > Select drying time. You can select: ● Extended, to set a longer than recommended time to ensure ink is completely dry ● Optimal, to set the default and recommended time for your selected paper ● Reduced, to set a shorter than recommended time when quality is of lower importance ● None, to disable the drying time and remove your print as soon as it finishes printing CAUTION: If the ink is not dry when the print is removed it could leave ink in the output tray and marks on the print. NOTE: If you cancel the drying time during a print, the printer may not feed and cut the paper right away due to the printhead maintenance, which runs in parallel. If the dry time is zero, the printer cuts the paper and then performs the printhead maintenance. However, if the dry time is greater than zero, the printer does not cut the paper until after the printhead maintenance has completed, even if you press the Form feed and cut key . Turn the automatic cutter on and off To turn the printer's paper cutter on or off, go to the front panel and press the Menu key to return to the main menu. Select the Setup menu icon , then Print retrieval > Enable cutter and change the cutter option. NOTE: When cutting between jobs is disabled the paper can still be cut while it is loaded. To completely disable the cutter, use the HP Color Center within the HP Printer Utility, and customize your paper to make it uncuttable. NOTE: To cut rolled paper while the automatic cutter is disabled, see Feed and cut the paper on page 42. Feed and cut the paper To feed and cut the paper when the automatic cutter has been disabled, press the Form feed and cut key on the front panel. The paper advances and the printer makes a straight cut on the front edge. Paper handling 42 Chapter 5 Paper handling ENWW
-
 1
1 -
2
-
3
-
4
-
5
-
6
-
7
-
8
-
9
-
10
-
11
-
12
-
13
-
14
-
15
-
16
-
17
-
18
-
19
-
20
-
21
-
22
-
23
-
24
-
25
-
26
-
27
-
28
-
29
-
30
-
31
-
32
-
33
-
34
-
35
-
36
-
37
-
38
-
39
-
40
-
41
-
42
-
 43
43 -
 44
44 -
 45
45 -
 46
46 -
 47
47 -
 48
48 -
 49
49 -
 50
50 -
 51
51 -
 52
52 -
 53
53 -
54
-
55
-
56
-
57
-
58
-
59
-
60
-
61
-
62
-
63
-
64
-
65
-
66
-
67
-
68
-
69
-
70
-
71
-
72
-
73
-
74
-
75
-
76
-
77
-
78
-
79
-
80
-
81
-
82
-
83
-
84
-
85
-
86
-
87
-
88
-
89
-
90
-
91
-
92
-
93
-
94
-
95
-
96
-
97
-
98
-
99
-
100
-
101
-
102
-
103
-
104
-
105
-
106
-
107
-
108
-
109
-
110
-
111
-
112
-
113
-
114
-
115
-
116
-
117
-
118
-
119
-
120
-
121
-
122
-
123
-
124
-
125
-
126
-
127
-
128
-
129
-
130
-
131
-
132
-
133
-
134
-
135
-
136
-
137
-
138
-
139
-
140
-
141
-
142
-
143
-
144
-
145
-
146
-
147
-
148
-
149
-
150
-
151
-
152
-
153
-
154
-
155
-
156
-
157
-
158
-
159
-
160
-
161
-
162
-
163
-
164
-
165
-
166
-
167
-
168
-
169
 |
 |
