HP Deskjet 5100 HP Deskjet 5100 Series printer - (English) User Guide - Page 109
envelopes, length guide.
 |
View all HP Deskjet 5100 manuals
Add to My Manuals
Save this manual to your list of manuals |
Page 109 highlights
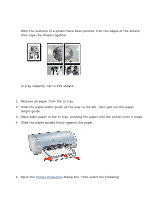
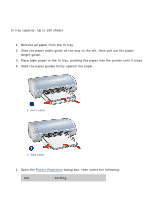
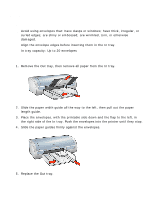
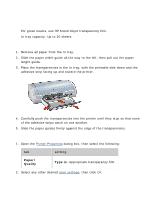
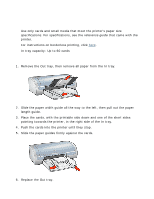
envelopes guidelines q Avoid using envelopes that: have clasps or windows; have thick, irregular, or curled edges; are shiny or embossed; are wrinkled, torn, or otherwise damaged. q Align the envelope edges before inserting them in the In tray. q In tray capacity: Up to 20 envelopes preparing to print 1. Remove the Out tray, then remove all paper from the In tray. 2. Slide the paper width guide all the way to the left, then pull out the paper length guide. 3. Place the envelopes, with the printable side down and the flap to the left, in the right side of the In tray. Push the envelopes into the printer until they stop. 4. Slide the paper guides firmly against the envelopes. 5. Replace the Out tray.
-
 1
1 -
2
-
3
-
4
-
5
-
6
-
7
-
8
-
9
-
10
-
11
-
12
-
13
-
14
-
15
-
16
-
17
-
18
-
19
-
20
-
21
-
22
-
23
-
24
-
25
-
26
-
27
-
28
-
29
-
30
-
31
-
32
-
33
-
34
-
35
-
36
-
37
-
38
-
39
-
40
-
41
-
42
-
43
-
44
-
45
-
46
-
47
-
48
-
49
-
50
-
51
-
52
-
53
-
54
-
55
-
56
-
57
-
58
-
59
-
60
-
61
-
62
-
63
-
64
-
65
-
66
-
67
-
68
-
69
-
70
-
71
-
72
-
73
-
74
-
75
-
76
-
77
-
78
-
79
-
80
-
81
-
82
-
83
-
84
-
85
-
86
-
87
-
88
-
89
-
90
-
91
-
92
-
93
-
94
-
95
-
96
-
97
-
98
-
99
-
100
-
101
-
102
-
103
-
 104
104 -
 105
105 -
 106
106 -
 107
107 -
 108
108 -
 109
109 -
 110
110 -
 111
111 -
 112
112 -
 113
113 -
 114
114 -
115
-
116
-
117
-
118
-
119
-
120
-
121
-
122
-
123
-
124
-
125
-
126
-
127
-
128
-
129
-
130
-
131
-
132
-
133
-
134
-
135
-
136
-
137
-
138
-
139
-
140
-
141
-
142
-
143
-
144
-
145
-
146
-
147
-
148
-
149
-
150
-
151
-
152
-
153
-
154
-
155
-
156
-
157
-
158
-
159
-
160
-
161
-
162
-
163
-
164
-
165
-
166
-
167
-
168
-
169
-
170
-
171
-
172
-
173
 |
 |

envelopes
guidelines
●
Avoid using envelopes that: have clasps or windows; have thick, irregular, or
curled edges; are shiny or embossed; are wrinkled, torn, or otherwise
damaged.
●
Align the envelope edges before inserting them in the In tray.
●
In tray capacity: Up to 20 envelopes
preparing to print
1.
Remove the Out tray, then remove all paper from the In tray.
2.
Slide the paper width guide all the way to the left, then pull out the paper
length guide.
3.
Place the envelopes, with the printable side down and the flap to the left, in
the right side of the In tray. Push the envelopes into the printer until they stop.
4.
Slide the paper guides
firmly
against the envelopes.
5.
Replace the Out tray.