HP EliteDesk 705 G2 Maintenance and Service Guide - Page 63
Power switch, and push
 |
View all HP EliteDesk 705 G2 manuals
Add to My Manuals
Save this manual to your list of manuals |
Page 63 highlights
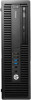
Power switch The power switch is attached to the left, front of the chassis. 1. Prepare the computer for disassembly (Preparation for disassembly on page 19). 2. Remove the access panel (Access panel on page 20). 3. Remove the front bezel (Front bezel on page 20). 4. Rotate the drive cage to its upright position. 5. From the inside of the front of the chassis, press the tab at the top of the power switch (1) and push the top of the power switch away from the front of the chassis (2). 6. Remove the cable from the clips built into the bottom of the chassis, then and disconnect the power switch cable from the system board connector labeled PB/LED. 7. Remove the power switch assembly from the inside of the computer. Power switch 53
-
 1
1 -
2
-
3
-
4
-
5
-
6
-
7
-
8
-
9
-
10
-
11
-
12
-
13
-
14
-
15
-
16
-
17
-
18
-
19
-
20
-
21
-
22
-
23
-
24
-
25
-
26
-
27
-
28
-
29
-
30
-
31
-
32
-
33
-
34
-
35
-
36
-
37
-
38
-
39
-
40
-
41
-
42
-
43
-
44
-
45
-
46
-
47
-
48
-
49
-
50
-
51
-
52
-
53
-
54
-
55
-
56
-
57
-
 58
58 -
 59
59 -
 60
60 -
 61
61 -
 62
62 -
 63
63 -
 64
64 -
 65
65 -
 66
66 -
 67
67 -
 68
68 -
69
-
70
-
71
-
72
-
73
-
74
-
75
-
76
-
77
-
78
-
79
-
80
-
81
-
82
-
83
-
84
-
85
-
86
-
87
-
88
-
89
-
90
-
91
-
92
-
93
-
94
-
95
-
96
-
97
-
98
-
99
-
100
-
101
-
102
-
103
-
104
-
105
-
106
-
107
-
108
-
109
-
110
-
111
-
112
-
113
-
114
-
115
-
116
-
117
-
118
-
119
-
120
-
121
-
122
-
123
-
124
-
125
-
126
-
127
-
128
-
129
-
130
-
131
-
132
-
133
-
134
-
135
-
136
-
137
-
138
-
139
-
140
-
141
-
142
-
143
-
144
-
145
-
146
-
147
-
148
-
149
-
150
-
151
-
152
-
153
 |
 |

Power switch
The power switch is attached to the left, front of the chassis.
1.
Prepare the computer for disassembly (
Preparation for disassembly
on page
19
).
2.
Remove the access panel (
Access panel
on page
20
).
3.
Remove the front bezel (
Front bezel
on page
20
).
4.
Rotate the drive cage to its upright position.
5.
From the inside of the front of the chassis, press the tab at the top of the power switch
(1)
and push the
top of the power switch away from the front of the chassis
(2)
.
6.
Remove the cable from the clips built into the bottom of the chassis, then and disconnect the power
switch cable from the system board connector labeled PB/LED.
7.
Remove the power switch assembly from the inside of the computer.
Power switch
53