HP EliteOne 800 Maintenance & Service Guide HP EliteOne 800 G1 All-in-One
HP EliteOne 800 Manual
 |
View all HP EliteOne 800 manuals
Add to My Manuals
Save this manual to your list of manuals |
HP EliteOne 800 manual content summary:
- HP EliteOne 800 | Maintenance & Service Guide HP EliteOne 800 G1 All-in-One - Page 1
Maintenance & Service Guide HP EliteOne 800 G1 All-in-One - HP EliteOne 800 | Maintenance & Service Guide HP EliteOne 800 G1 All-in-One - Page 2
the U.S. and other countries. The only warranties for HP products and services are set forth in the express warranty statements accompanying such products and services. Nothing herein should be construed as constituting an additional warranty. HP shall not be liable for technical or editorial errors - HP EliteOne 800 | Maintenance & Service Guide HP EliteOne 800 G1 All-in-One - Page 3
failure to follow directions could result in bodily harm or loss of life. CAUTION: Text set off in this manner indicates that failure to follow directions could result in damage to equipment or loss of information. NOTE: Text set off in this manner provides important supplemental information. iii - HP EliteOne 800 | Maintenance & Service Guide HP EliteOne 800 G1 All-in-One - Page 4
iv About This Book - HP EliteOne 800 | Maintenance & Service Guide HP EliteOne 800 G1 All-in-One - Page 5
6 Adjusting the tilt/swivel stand (optional 8 2 Activating and Customizing the Software 9 Activating and customizing the software in Windows 7 9 Activating the Windows operating system 9 Downloading Windows 7 updates 10 Installing or upgrading device drivers 10 Customizing the monitor display - HP EliteOne 800 | Maintenance & Service Guide HP EliteOne 800 G1 All-in-One - Page 6
Cable management ...34 5 Removal and Replacement Procedures All-in One (AIO) Chassis 35 Preparing to disassemble the computer 35 Removing the rear I/O cover 36 Stand ...37 Height-adjustable/recline stand (optional 37 Tilt/swivel stand (optional 39 Installing an access panel security screw 40 - HP EliteOne 800 | Maintenance & Service Guide HP EliteOne 800 G1 All-in-One - Page 7
111 Computer Setup-Power 116 Computer Setup-Advanced 118 Recovering the Configuration Settings 120 7 HP PC Hardware Diagnostics 121 Why run HP PC Hardware Diagnostics - UEFI 121 How to access and run HP PC Hardware Diagnostics - UEFI 121 Downloading HP PC Hardware Diagnostics to a USB device - HP EliteOne 800 | Maintenance & Service Guide HP EliteOne 800 G1 All-in-One - Page 8
8 Troubleshooting without diagnostics 123 Safety and comfort ...123 Before you call for technical support 123 Helpful hints ...124 Solving general problems ...126 Solving power problems ...130 Solving hard drive problems 131 Solving media card reader problems 134 Solving display problems ...135 - HP EliteOne 800 | Maintenance & Service Guide HP EliteOne 800 G1 All-in-One - Page 9
and resetting CMOS 189 Establishing a setup or power-on password 190 Resetting the setup and power-on password 190 Clearing and resetting the CMOS 191 Appendix A Power cord set requirements 193 General requirements ...193 Japanese power cord requirements 193 Country-specific requirements 194 - HP EliteOne 800 | Maintenance & Service Guide HP EliteOne 800 G1 All-in-One - Page 10
x - HP EliteOne 800 | Maintenance & Service Guide HP EliteOne 800 G1 All-in-One - Page 11
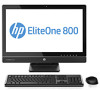
The HP EliteOne 800 G1 All-in-One offers the following features: ● Integrated All-in-One form factor ● Full HD IPS, LCD display (1920 x 1080) with LED backlighting ◦ 58.4-cm (23-inch) diagonal, capacitive touch optional ● Swivel pad under base of stand ● Stand can be configured to height-adjustable - HP EliteOne 800 | Maintenance & Service Guide HP EliteOne 800 G1 All-in-One - Page 12
with up to 16 GB of DDR3 SDRAM memory and dual channel memory support ● Intel integrated graphics ● DisplayPort video out (with audio) for second display support ● Optional MXM graphics card ● DP audio, DP to VGA/DVI/HDMI dongle support ● Integrated Gigabit Ethernet (Intel i217LM GbE LOM) ● Wireless - HP EliteOne 800 | Maintenance & Service Guide HP EliteOne 800 G1 All-in-One - Page 13
optional webcam) 4 16:9 widescreen LED-backlit LCD display 5 Power LED 6 High-performance stereo speakers Component 7 Mute speaker 8 Reduce volume 9 Increase volume 10 Mute microphone 11 Decrease brightness 12 Increase brightness Touch the icon area (7-12 above) to cause the icons - HP EliteOne 800 | Maintenance & Service Guide HP EliteOne 800 G1 All-in-One - Page 14
activity LED 2 HP media card reader (optional) 3 USB 3.0 port, fast-charging 4 USB 3.0 port 5 Microphone/line in jack Component 6 Headset/line out jack 7 Tray-load optical disc drive 8 Optical disc drive eject button 9 Optical disc drive activity LED 10 Power button 4 Chapter - HP EliteOne 800 | Maintenance & Service Guide HP EliteOne 800 G1 All-in-One - Page 15
Access panel 2 Access panel latches 3 Security lock slot 4 Power connector 5 Serial port 6 PS/2 mouse connector 7 PS/2 keyboard connector Component 8 (2) USB 3.0 ports 9 RJ-45 Gigabit Ethernet port 10 (2) USB 3.0 ports 11 DisplayPort connector 12 Stereo audio line out 13 Access - HP EliteOne 800 | Maintenance & Service Guide HP EliteOne 800 G1 All-in-One - Page 16
positions CAUTION: Positioning the computer with the HP logo on the top or on the left is not supported. Adjusting the height-adjustable/recline stand (optional) This stand allows you to: ● adjust the computer height 110 mm (4.3 inches) ● rotate the computer position from landscape to portrait - HP EliteOne 800 | Maintenance & Service Guide HP EliteOne 800 G1 All-in-One - Page 17
WARNING! If the height-adjustable/recline stand is installed, before laying the computer down for service, first grasp the sides of the display and raise the display to the highest position. Do not lay the computer down with the sliding stand in the low position. The stand may suddenly release, - HP EliteOne 800 | Maintenance & Service Guide HP EliteOne 800 G1 All-in-One - Page 18
Adjusting the tilt/swivel stand (optional) This stand allows you to tilt the computer forward up to -5 degrees or backward up to +30 degrees to set it to a comfortable eye level. The tilt/swivel stand has a swivel pad on the underside that allows you to swivel the computer up to 360 degrees left or - HP EliteOne 800 | Maintenance & Service Guide HP EliteOne 800 G1 All-in-One - Page 19
the monitor to permit the required airflow. Activating the Windows operating system The first time you turn on the computer, the operating system is set up and activated automatically. This process takes about 5 to 10 minutes. Carefully read and follow the instructions on the screen to complete - HP EliteOne 800 | Maintenance & Service Guide HP EliteOne 800 G1 All-in-One - Page 20
the monitor refresh rates, screen resolution, color settings, font sizes, and power management settings. For more information, refer to the online documentation provided with the graphics controller utility or the documentation that came with your monitor. Right-click on the Windows desktop, then - HP EliteOne 800 | Maintenance & Service Guide HP EliteOne 800 G1 All-in-One - Page 21
soon as possible after you set up your computer. 1. Point to the upper-right or lower-right corner of the Start screen to display the charms. 2. Click Settings > Change PC Settings > Windows Update. 3. Run Windows Update monthly thereafter. Customizing the monitor display You can customize display - HP EliteOne 800 | Maintenance & Service Guide HP EliteOne 800 G1 All-in-One - Page 22
3 Illustrated parts catalog System parts 12 Chapter 3 Illustrated parts catalog - HP EliteOne 800 | Maintenance & Service Guide HP EliteOne 800 G1 All-in-One - Page 23
assembly (6) Upper rear access panel (7) Rear I/O cover (8) Height adjustment stand (9) Lower rear access panel (10) Top rear trim Display panel (not illustrated) Touch panel kit, with integrated touch glass Non-touch screen Plastic frame for models with a webcam (does not include glass - HP EliteOne 800 | Maintenance & Service Guide HP EliteOne 800 G1 All-in-One - Page 24
material) (1) For use with the graphics card (2) For use with the processor (3) Card reader (4) Fan (5) Speakers (left and right) (6) Mylar cover (power button board) (7) Optical drive latch Optical drive insert HP ultraslim keyed cable lock HP Business Digital Headset Assembly kit - HP EliteOne 800 | Maintenance & Service Guide HP EliteOne 800 G1 All-in-One - Page 25
for bezel) Antenna kit 733499-001 Keyboards and mice Description Keyboard (not illustrated) PS/2 USB Wireless with dongle Smartcard Washable Mouse (not illustrated) PS2, optical Washable Wireless USB, optical USB, laser Spare part number 724718-xx1 724720-xx1 724722-xx1 700510-xx1 701427-xx1 - HP EliteOne 800 | Maintenance & Service Guide HP EliteOne 800 G1 All-in-One - Page 26
module For use in non-touchscreen models For use in touchscreen models (2) Converter board (3) AMD Radeon HD 7650A 2-GB MXM discrete graphics board (4) WLAN modules HP WLAN 802.11 a/g/n, 2x2 16 Chapter 3 Illustrated parts catalog Spare part number 732510-001 736499-001 732493-001 708866-001 701398 - HP EliteOne 800 | Maintenance & Service Guide HP EliteOne 800 G1 All-in-One - Page 27
Windows 8 Professional 700624-601 Memory modules (PC3-10600, 1333- Power button board cable Backlight cable For use with LG and BOE display panels For use with Samsung display panels Optical drive cable (data and power assembly) Hard drive cable (data and power assembly) Touch control cable Touch - HP EliteOne 800 | Maintenance & Service Guide HP EliteOne 800 G1 All-in-One - Page 28
608394-001 DVD-ROM drive 632484-001 Adapter, DisplayPort to VGA 617450-001 Adapter, DisplayPort to HDMI 639135-001 320 GB, 7200 rpm hard drive 642738-001 HP Business Digital Headset 646809-001 160 GB Solid State Drive (SSD) 657958-001 Keyboard, USB hub 661841-001 120 GB Solid State Drive - HP EliteOne 800 | Maintenance & Service Guide HP EliteOne 800 G1 All-in-One - Page 29
Spare part number Description 698208-001 Power button board cable 698210-001 Capacitive strip sensor cable 698211-001 Webcam cable 698226-001 Height adjustment stand 700510-001 Keyboard, washable, for use in the United States 700510-121 Keyboard, washable, for use in French Canada 700510-161 - HP EliteOne 800 | Maintenance & Service Guide HP EliteOne 800 G1 All-in-One - Page 30
for use in French Arabia 701427-KD1 Keyboard, USB, Smartcard, for use in South Korea 701427-L31 Keyboard, USB, Smartcard, for use with international English 703372-001 HP ultraslim keyed cable lock 708866-001 AMD Radeon HD 7650A 2-GB MXM discrete graphics board 719157-001 Blu-ray writer (BD-RE - HP EliteOne 800 | Maintenance & Service Guide HP EliteOne 800 G1 All-in-One - Page 31
D61 Keyboard, PS/2, for use in India 724718-DE1 Keyboard, PS/2, for use USB, for use in Germany 724720-051 Keyboard, USB, for use in France 724720-061 Keyboard, USB, for use in Italy 724720-071 Keyboard, USB, for use in Spain 724720-081 Keyboard, USB, for use in Denmark 724720-091 Keyboard, USB - HP EliteOne 800 | Maintenance & Service Guide HP EliteOne 800 G1 All-in-One - Page 32
for use in Japan 724720-AA1 Keyboard, USB, for use in the People's Republic of China 724720-AB1 Keyboard, USB, for use in Taiwan 724720-B41 Keyboard, USB, for use in BHCSY 724720-BB1 Keyboard, USB, for use in Israel 724720-D61 Keyboard, USB, for use in India 724720-DE1 Keyboard, PS/2, for use - HP EliteOne 800 | Maintenance & Service Guide HP EliteOne 800 G1 All-in-One - Page 33
use in Israel 724722-D61 Keyboard, wireless with dongle, for use in India 724722-DE1 Keyboard, wireless with dongle, for use in French Arabia Drive (SSD) 732490-001 Power button board 732493-001 Converter board 732503-001 Near field communication (NFC) NXP controller (use with NFC assembly kit - HP EliteOne 800 | Maintenance & Service Guide HP EliteOne 800 G1 All-in-One - Page 34
L3 cache) 732507-001 Intel Core i7, 4770s processor (3.1-GHz, 6-MB L3 cache) 732509-001 Standard stand assembly 732510-001 Webcam module for use cable, antenna) for use with NFC controller, spare part number 732503-001 733513-001 Mylar cover (power button board) 733514-001 Speakers (left and - HP EliteOne 800 | Maintenance & Service Guide HP EliteOne 800 G1 All-in-One - Page 35
Spare part number Description 735207-001 Display panel, non-touchscreen models 735208-001 Touch panel kit, with integrated touch glass 736499-001 Webcam module for use in touchscreen models Sequential part number listing 25 - HP EliteOne 800 | Maintenance & Service Guide HP EliteOne 800 G1 All-in-One - Page 36
service. CAUTION: When the computer is plugged into an AC power source, voltage is always applied to the system board. You must disconnect the power cord from the power source before opening the computer not appear to be affected at all and can work perfectly throughout a normal cycle. The device may - HP EliteOne 800 | Maintenance & Service Guide HP EliteOne 800 G1 All-in-One - Page 37
from PCB 7,000 V Packing PCBs in foam-lined box 5,000 V These are then multi-packaged inside plastic tubes, trays, or Styrofoam. Relative Humidity 40% 15,000 V 5,000 V 800 V 700 V 4,000 V 5,000 container. ● Always be properly grounded when touching a sensitive component or assembly. ● Avoid - HP EliteOne 800 | Maintenance & Service Guide HP EliteOne 800 G1 All-in-One - Page 38
standing workstations and are compatible with most types of shoes or boots. On conductive floors or dissipative floor mats, use them on both feet with a maximum of one PCB laminate. Handle them only at static-free work areas. ● Turn off power and input signals before inserting and removing connectors - HP EliteOne 800 | Maintenance & Service Guide HP EliteOne 800 G1 All-in-One - Page 39
cm (4-inch) clearance on all vented sides of the computer and above the monitor to permit the required airflow. ● Never restrict the airflow into the computer by blocking any vents or air intakes. Do not place the keyboard, with the keyboard feet down, directly against the front of the desktop unit - HP EliteOne 800 | Maintenance & Service Guide HP EliteOne 800 G1 All-in-One - Page 40
slots on the monitor with any type of material. ● Install or enable power management functions of the operating system or other software, including sleep states. Routine care General cleaning safety precautions 1. Never use solvents or flammable solutions to clean the computer. 2. Never immerse any - HP EliteOne 800 | Maintenance & Service Guide HP EliteOne 800 G1 All-in-One - Page 41
monitor. ● To clean the monitor body follow the procedures in Cleaning the Computer Case on page 30. Cleaning the mouse Before cleaning the mouse, ensure that the power to the computer is turned the procedures in Cleaning the Computer Case on page 30. Service considerations Listed below are some of - HP EliteOne 800 | Maintenance & Service Guide HP EliteOne 800 G1 All-in-One - Page 42
reassembly process, it can damage the unit. HP strongly recommends that all screws removed during removed or replaced. CAUTION: When servicing this computer, ensure that cables are placed in must be mailed, place the drive in a bubble-pack mailer or other suitable protective packaging and label the - HP EliteOne 800 | Maintenance & Service Guide HP EliteOne 800 G1 All-in-One - Page 43
as monitors or speakers. Lithium coin cell battery The battery that comes with the computer provides power to the real-time clock and has a minimum lifetime of about three years. See the appropriate removal and replacement chapter for the chassis you are working on in this guide for instructions on - HP EliteOne 800 | Maintenance & Service Guide HP EliteOne 800 G1 All-in-One - Page 44
transmit data for only a single drive. SMART ATA drives The Self Monitoring Analysis and Recording Technology (SMART) ATA drives for the HP Personal Computers have built-in drive failure prediction that warns the user or network administrator of an impending failure or crash of the hard drive. The - HP EliteOne 800 | Maintenance & Service Guide HP EliteOne 800 G1 All-in-One - Page 45
height adjustable/recline stand is installed, before laying the computer down for service, position the computer vertically by grasping the sides of the display, and then raise the display to the highest position. Place the computer face down on a soft flat surface. HP recommends that you set down - HP EliteOne 800 | Maintenance & Service Guide HP EliteOne 800 G1 All-in-One - Page 46
Removing the rear I/O cover Description Rear I/O cover Spare part number 733504-001 ▲ Push the two tabs down, then rotate and lift the cover off the computer. 36 Chapter 5 Removal and Replacement Procedures All-in One (AIO) Chassis - HP EliteOne 800 | Maintenance & Service Guide HP EliteOne 800 G1 All-in-One - Page 47
Height-adjustable/recline stand ● Tilt/swivel stand Height-adjustable/recline stand (optional) To remove the stand: 1. Prepare the computer for disassembly (see Preparing to disassemble the computer on page 35). 2. Place the computer face down on a soft flat surface. HP recommends that you set down - HP EliteOne 800 | Maintenance & Service Guide HP EliteOne 800 G1 All-in-One - Page 48
3. Push the base of the stand down (1), and loosen the captive screws securing the stand to the unit (2). 4. Lift the stand up and off the computer. 38 Chapter 5 Removal and Replacement Procedures All-in One (AIO) Chassis - HP EliteOne 800 | Maintenance & Service Guide HP EliteOne 800 G1 All-in-One - Page 49
optional) To remove the stand: 1. Prepare the computer for disassembly (see Preparing to disassemble the computer on page 35). 2. Push the release button (1) on the bottom of the stand and pull the back of the stand off (2) the computer. 3. Push the base of the stand down (1), and loosen the captive - HP EliteOne 800 | Maintenance & Service Guide HP EliteOne 800 G1 All-in-One - Page 50
4. Lift the stand up and off the computer. Installing an access panel security screw You may prevent access to internal components and ports by securing the access panel cover and the access panel to prevent removal of either. 40 Chapter 5 Removal and Replacement Procedures All-in One (AIO) Chassis - HP EliteOne 800 | Maintenance & Service Guide HP EliteOne 800 G1 All-in-One - Page 51
is located on the rear of the computer. Spare part number 733502-001 The computer has one main rear access panel that allows access to internal components. To remove the access panel: 1. Prepare the computer for disassembly (see Preparing to disassemble the computer on page 35). Access panel 41 - HP EliteOne 800 | Maintenance & Service Guide HP EliteOne 800 G1 All-in-One - Page 52
2. Slide the access panel latches toward the edges of the unit, then slide the access panel toward the top of the computer until it slides off the unit. To replace the access panel, reverse the removal procedures. 42 Chapter 5 Removal and Replacement Procedures All-in One (AIO) Chassis - HP EliteOne 800 | Maintenance & Service Guide HP EliteOne 800 G1 All-in-One - Page 53
BD-RW SuperMulti XL Drive Hard drives 1 TB hard drive, hybrid SSD 500 GB, 7200 rpm, 2.5-inch hard drive, self-encrypting (SED) 500 GB, 7200 rpm hard drive 500 GB hard drive, hybrid on the lower left side of the computer (when viewed from behind). The drive is housed in a removable cage. Drives 43 - HP EliteOne 800 | Maintenance & Service Guide HP EliteOne 800 G1 All-in-One - Page 54
Installing a 2.5-inch hard disc drive Removing a 2.5-inch hard disc drive 1. Prepare the computer for disassembly (see Preparing to disassemble the computer on page 35). 2. Remove the access panel (see Access panel on page 41). 44 Chapter 5 Removal and Replacement Procedures All-in One (AIO) Chassis - HP EliteOne 800 | Maintenance & Service Guide HP EliteOne 800 G1 All-in-One - Page 55
The primary drive is the lower position in the drive cage. If only one drive is to be installed, it must occupy this position. 6. Remove the 2.5-inch hard disc drive(s) from the cage. For instructions on installing a hard disc drive, see Installing a 2.5-inch hard disc drive on page 46. Drives 45 - HP EliteOne 800 | Maintenance & Service Guide HP EliteOne 800 G1 All-in-One - Page 56
drive cage. If only one drive is to be installed, it must occupy this position. ● To install a secondary hard disc drive, set the drive into the inch hard disc drive securely into the drive cage with four mounting screws with grommets. 46 Chapter 5 Removal and Replacement Procedures All-in One (AIO - HP EliteOne 800 | Maintenance & Service Guide HP EliteOne 800 G1 All-in-One - Page 57
toward the center of the chassis. If the drive cage contains a secondary (upper) drive, locate the power and data cables next to the drive cage and connect them to the secondary drive. 5. Place the 2.5-inch hard disc drive cage into the chassis and slide it toward the center until it snaps into - HP EliteOne 800 | Maintenance & Service Guide HP EliteOne 800 G1 All-in-One - Page 58
to disassemble the computer on page 35). 2. Remove the access panel (see Access panel on page 41). 3. Push and hold the tab (1) at the back of the optical disc drive enclosure while sliding the drive (2) out of the chassis. 48 Chapter 5 Removal and Replacement Procedures All-in One (AIO) Chassis - HP EliteOne 800 | Maintenance & Service Guide HP EliteOne 800 G1 All-in-One - Page 59
4. Pull the latch off the optical disc drive. 5. Remove the cover from the adhesive strip on the new latch. Align the two pins on the latch with the holes in the new optical disc drive and press the latch onto the drive firmly. NOTE: You may reuse the latch removed from the old optical disc drive. - HP EliteOne 800 | Maintenance & Service Guide HP EliteOne 800 G1 All-in-One - Page 60
6. Align the new optical disc drive with the opening in the side of the computer. Push the drive in firmly until it snaps into place. NOTE: The optical disc drive can be installed in only one way. 50 Chapter 5 Removal and Replacement Procedures All-in One (AIO) Chassis - HP EliteOne 800 | Maintenance & Service Guide HP EliteOne 800 G1 All-in-One - Page 61
page 35). 2. Remove the access panel (see Access panel on page 41). 3. Remove the two Phillips screws (1) that secure the SSD to the computer. 4. Lift the SSD to a 45-degree angle, and then pull it away to remove it from the socket (2). To install the mSATA SSD, reverse the - HP EliteOne 800 | Maintenance & Service Guide HP EliteOne 800 G1 All-in-One - Page 62
on the right side of the computer (viewed from behind). The computer has two memory slots that can be populated with up to two industry-standard SODIMMs. These memory sockets are populated with at least one preinstalled SODIMM. To achieve the maximum memory support, you can populate the system board - HP EliteOne 800 | Maintenance & Service Guide HP EliteOne 800 G1 All-in-One - Page 63
: To remove a memory module: 1. Prepare the computer for disassembly (see Preparing to disassemble the computer on page 35). 2. Place the computer face down on a soft flat surface. HP recommends that you set down a blanket, towel, or other soft cloth to protect the screen surface from scratches or - HP EliteOne 800 | Maintenance & Service Guide HP EliteOne 800 G1 All-in-One - Page 64
it in place. NOTE: A memory module can be installed in only one way. Match the notch on the module with the tab on the memory socket. The computer automatically recognizes the additional memory when you turn on the computer. 54 Chapter 5 Removal and Replacement Procedures All-in One (AIO) Chassis - HP EliteOne 800 | Maintenance & Service Guide HP EliteOne 800 G1 All-in-One - Page 65
of static electricity by briefly touching a grounded metal object. NOTE: The lifetime of the lithium battery can be extended by plugging the computer into a live AC wall socket. The lithium battery is only used when the computer is NOT connected to AC power. HP encourages customers to recycle used - HP EliteOne 800 | Maintenance & Service Guide HP EliteOne 800 G1 All-in-One - Page 66
of the battery. When the battery pops up, lift it out (1). 4. To insert the new battery, slide one edge of the replacement battery under the holder's lip with the positive side up. Push the other edge down until the clamp snaps over the - HP EliteOne 800 | Maintenance & Service Guide HP EliteOne 800 G1 All-in-One - Page 67
one Phillips screw and has two connected antennas. NOTE: The procedure to replace the WLAN module must be performed by an HP technician . NOTE: WLAN module appearance may vary. To remove the WLAN module: 1. Prepare the computer for disassembly (see Preparing to disassemble the computer - HP EliteOne 800 | Maintenance & Service Guide HP EliteOne 800 G1 All-in-One - Page 68
the AUX connector on the module. NOTE: WLAN modules are designed with a notch to prevent incorrect insertion. 58 Chapter 5 Removal and Replacement Procedures All-in One (AIO) Chassis - HP EliteOne 800 | Maintenance & Service Guide HP EliteOne 800 G1 All-in-One - Page 69
must remove the system board before you can remove the card reader board. The card reader board is secured with two screws. To remove the card reader board: 1. Prepare the computer for disassembly (see Preparing to disassemble the computer on page 35). 2. Remove the access panel (see Access panel - HP EliteOne 800 | Maintenance & Service Guide HP EliteOne 800 G1 All-in-One - Page 70
to the system board. 4. Lift the board to a 45-degree angle (1), and then pull it away to remove it from the socket (2). To install the card reader board, reverse the removal procedures. 60 Chapter 5 Removal and Replacement Procedures All-in One (AIO) Chassis - HP EliteOne 800 | Maintenance & Service Guide HP EliteOne 800 G1 All-in-One - Page 71
latch is green and located next to the optical drive bay. Spare part number 733509-001 To remove the optical drive latch: 1. Prepare the computer for disassembly (see Preparing to disassemble the computer on page 35). 2. Remove the access panel (see Access panel on page 41). Optical drive latch 61 - HP EliteOne 800 | Maintenance & Service Guide HP EliteOne 800 G1 All-in-One - Page 72
3. Pull the latch off the side of the optical drive. Two pins secure the latch to the drive. To install the optical drive latch, reverse the removal procedures. 62 Chapter 5 Removal and Replacement Procedures All-in One (AIO) Chassis - HP EliteOne 800 | Maintenance & Service Guide HP EliteOne 800 G1 All-in-One - Page 73
screw. The processor heat sink is secured with five Torx screws - four captured, one shared, not captured. Graphics heat sink To remove the heat sink: 1. Prepare the computer for disassembly (see Preparing to disassemble the computer on page 35). 2. Remove the access panel (see Access panel on page - HP EliteOne 800 | Maintenance & Service Guide HP EliteOne 800 G1 All-in-One - Page 74
Prepare the computer for disassembly (see Preparing to disassemble the computer on page 35). 2. Remove the access panel (see Access panel on page 41). 3. If installed, remove the graphics heat sink (see Graphics heat sink (5). 64 Chapter 5 Removal and Replacement Procedures All-in One (AIO) Chassis - HP EliteOne 800 | Maintenance & Service Guide HP EliteOne 800 G1 All-in-One - Page 75
6. Lift the heat sink out of the computer. CAUTION: To reduce a degradation in thermal performance, be sure not to touch the thermal grease on the surface of the processor or the heat sink. To replace the heat sink, reverse the removal procedures. Heat sink - Graphics board and processor 65 - HP EliteOne 800 | Maintenance & Service Guide HP EliteOne 800 G1 All-in-One - Page 76
installing a new processor onto the system board, always update the system ROM to ensure that the latest version of the BIOS is being used on the computer. The latest system BIOS can be found on the Web at: http://h18000.www.hp.com/support. 66 Chapter 5 Removal and Replacement Procedures All-in - HP EliteOne 800 | Maintenance & Service Guide HP EliteOne 800 G1 All-in-One - Page 77
Torx screws. Removing it allows access to the webcam and allows you to remove the main rear cover. To remove the graphics board: 1. Prepare the computer for disassembly (see Preparing to disassemble the computer on page 35). 2. Remove the access panel (see Access panel on page 41). 3. Remove the - HP EliteOne 800 | Maintenance & Service Guide HP EliteOne 800 G1 All-in-One - Page 78
board. 5. Rotate the board upward (1), and then pull it up and away from the connector to remove it from the system board (2). To replace the graphics board, reverse the removal procedures. 68 Chapter 5 Removal and Replacement Procedures All-in - HP EliteOne 800 | Maintenance & Service Guide HP EliteOne 800 G1 All-in-One - Page 79
trim The top rear trim is located along the top of the back of the computer. Spare part number 733506-001 To remove the top rear trim: 1. Prepare the computer for disassembly (see Preparing to disassemble the computer on page 35). 2. Remove the access panel (see Access panel on page 41). 3. Rotate - HP EliteOne 800 | Maintenance & Service Guide HP EliteOne 800 G1 All-in-One - Page 80
module: 1. Prepare the computer for disassembly (see Preparing to disassemble the computer on page 35). 2. Remove the access panel (see Access panel on page 41). 3. Remove the top rear trim (see Top rear trim on page 69). 70 Chapter 5 Removal and Replacement Procedures All-in One (AIO) Chassis - HP EliteOne 800 | Maintenance & Service Guide HP EliteOne 800 G1 All-in-One - Page 81
4. Remove the two Torx screws that secure the webcam module bracket to the computer. 5. Rotate the assembly to gain access to the connector on the module, and then disconnect the cable from the module. 6. To remove the module from - HP EliteOne 800 | Maintenance & Service Guide HP EliteOne 800 G1 All-in-One - Page 82
the computer on page 35). 2. Remove the access panel (see Access panel on page 41). 3. Remove the heat sink (see Heat sink - Graphics board and processor on page 63). 4. Remove the top rear trim (see Top rear trim on page 69). 72 Chapter 5 Removal and Replacement Procedures All-in One (AIO) Chassis - HP EliteOne 800 | Maintenance & Service Guide HP EliteOne 800 G1 All-in-One - Page 83
5. Remove the Torx screws that secures each antenna transceiver to the frame, and then lift the transceivers off the frame. 6. Note the routing path for each antenna for replacement. To install the antenna, reverse the removal procedures. NOTE: When connecting the antennas cables, connect the cable - HP EliteOne 800 | Maintenance & Service Guide HP EliteOne 800 G1 All-in-One - Page 84
remove the lower rear panel: 1. Prepare the computer for disassembly (see Preparing to disassemble the computer on page 35). 2. Remove the access panel (see Access panel on page 41). 3. Remove the stand (see Stand on page 37). 74 Chapter 5 Removal and Replacement Procedures All-in One (AIO) Chassis - HP EliteOne 800 | Maintenance & Service Guide HP EliteOne 800 G1 All-in-One - Page 85
4. Remove the screw (1) in the middle of the lower rear panel, and slide the panel downward to detach it from the chassis (2). To replace the lower rear panel, reverse the removal procedures. Lower rear panel 75 - HP EliteOne 800 | Maintenance & Service Guide HP EliteOne 800 G1 All-in-One - Page 86
remove the fan assembly: 1. Prepare the computer for disassembly (see Preparing to disassemble the computer on page 35). 2. Remove the stand (see Stand on page 37). 3. Remove the access the fan assembly to the computer (1). 76 Chapter 5 Removal and Replacement Procedures All-in One (AIO) Chassis - HP EliteOne 800 | Maintenance & Service Guide HP EliteOne 800 G1 All-in-One - Page 87
7. Remove the fan assembly from the computer (2). To install the fan assembly, reverse the removal procedures. Fan assembly 77 - HP EliteOne 800 | Maintenance & Service Guide HP EliteOne 800 G1 All-in-One - Page 88
). 2. Remove the access panel (see Access panel on page 41). 3. Remove the stand (see Stand on page 37). 4. Remove the lower panel (see Lower rear panel on page 74). 5. Lift up the Mylar piece that covers the left speaker (1). 78 Chapter 5 Removal and Replacement Procedures All-in One (AIO) Chassis - HP EliteOne 800 | Maintenance & Service Guide HP EliteOne 800 G1 All-in-One - Page 89
that secure the left speaker to the computer. 7. Remove two Torx screws (3) that secure the right speaker to the computer, and then disconnect the speaker cable from the system board connector labeled SPKR (4). 8. Remove the speakers from the computer. To install the speakers, reverse the removal - HP EliteOne 800 | Maintenance & Service Guide HP EliteOne 800 G1 All-in-One - Page 90
jumper settings on the board based on the display panel. To remove the converter board: 1. Prepare the computer for disassembly (see Preparing to disassemble the computer on page 35). 2. Remove the stand (see Stand the wires. 80 Chapter 5 Removal and Replacement Procedures All-in One (AIO) Chassis - HP EliteOne 800 | Maintenance & Service Guide HP EliteOne 800 G1 All-in-One - Page 91
the jumpers on the converter board for the installed display panel. Refer to the label in the chassis for jumper settings. 7. Lift the converter board from the computer. To install the converter board, reverse the removal procedures. Be sure to correctly position the jumpers on the converter board - HP EliteOne 800 | Maintenance & Service Guide HP EliteOne 800 G1 All-in-One - Page 92
(see Preparing to disassemble the computer on page 35). 2. Remove the stand (see Stand on page 37). 3. Remove the access panel (see Access panel on page 41). 4. Remove the lower rear panel (see Lower rear panel on page 74). 82 Chapter 5 Removal and Replacement Procedures All-in One (AIO) Chassis - HP EliteOne 800 | Maintenance & Service Guide HP EliteOne 800 G1 All-in-One - Page 93
5. While the board/holder assembly is installed, remove the plastic holder from the board. 6. Lift the board enough to gain access to the connectors. 7. Disconnect the cables from the board. NOTE: The cables and connectors on this board are small and fragile. Use care when disconnecting/connecting - HP EliteOne 800 | Maintenance & Service Guide HP EliteOne 800 G1 All-in-One - Page 94
the stand (see Stand on page 37). 3. Remove the access panel (see Access panel on page 41). 4. Remove the lower rear panel (see Lower rear panel on page 74). 5. Remove the four Torx screws (1) securing the plate to the chassis. 84 Chapter 5 Removal and Replacement Procedures All-in One (AIO) Chassis - HP EliteOne 800 | Maintenance & Service Guide HP EliteOne 800 G1 All-in-One - Page 95
6. Lift the plate left straight up and off the computer (2). To replace the VESA mounting plate, reverse the removal procedures. VESA mounting plate 85 - HP EliteOne 800 | Maintenance & Service Guide HP EliteOne 800 G1 All-in-One - Page 96
one connector routed to the system board. To remove the power supply: 1. Prepare the computer for disassembly (see Preparing to disassemble the computer on page 35). 2. Remove the stand (see Stand power supply to the computer. 86 Chapter 5 Removal and Replacement Procedures All-in One (AIO) Chassis - HP EliteOne 800 | Maintenance & Service Guide HP EliteOne 800 G1 All-in-One - Page 97
7. Lift the power supply from the computer (3). To install the power supply, reverse the removal procedures. Power supply 87 - HP EliteOne 800 | Maintenance & Service Guide HP EliteOne 800 G1 All-in-One - Page 98
modules (see Memory on page 52). 7. Remove the graphics heat sink (see Graphics heat sink on page 63). 8. Remove the processor heat sink (see Processor heat sink on page 64). 9. Remove the processor (see Processor on page 66). 88 Chapter 5 Removal and Replacement Procedures All-in One (AIO) Chassis - HP EliteOne 800 | Maintenance & Service Guide HP EliteOne 800 G1 All-in-One - Page 99
10. Remove the graphics board (see Graphics board on page 67). 11. Remove the WLAN module (see WLAN module to remove it (2). 14. Remove the eight remaining Torx screws that secure the system board to the computer. 15. Position the cables on the side of the board out of the way so you can freely slide - HP EliteOne 800 | Maintenance & Service Guide HP EliteOne 800 G1 All-in-One - Page 100
go into BIOS and make sure the LVDS Panel Select setting is correct. To update BIOS with display panel model information: 1. Boot the computer. 2. Repeatedly press F10 when the monitor light turns green to access the F10 Setup utility. 90 Chapter 5 Removal and Replacement Procedures All-in One (AIO - HP EliteOne 800 | Maintenance & Service Guide HP EliteOne 800 G1 All-in-One - Page 101
message is displayed at the bottom of the screen. NOTE: If you do not press Esc at the appropriate time, you must restart the computer and again press Esc when the monitor light turns green to access the utility. 3. Press F10 to enter Computer Setup. 4. Go to Security > System ID's. 5. If necessary - HP EliteOne 800 | Maintenance & Service Guide HP EliteOne 800 G1 All-in-One - Page 102
one each side of the computer. They are secured with tabs, and the removal procedures are similar for both panels. To remove the side panels: 1. Prepare the computer for disassembly (see Preparing to disassemble the computer on page 35). 2. Remove the stand (see Stand All-in One (AIO) Chassis - HP EliteOne 800 | Maintenance & Service Guide HP EliteOne 800 G1 All-in-One - Page 103
7. Two tabs secure both the left and right side panels to the computer. Press both tabs to disengage the panel, and rotate the panel off the computer. NOTE: The removal and replacement procedures are similar for both panels. Right panel (when viewed from behind) shown in the following images. To - HP EliteOne 800 | Maintenance & Service Guide HP EliteOne 800 G1 All-in-One - Page 104
rear panel. It is under a Mylar cover and has two connectors and one screw. To remove the power button board: 1. Prepare the computer for disassembly (see Preparing to disassemble the computer on page 35). 2. Remove the stand (see Stand on page 37). 3. Remove the access panel (see Access panel on - HP EliteOne 800 | Maintenance & Service Guide HP EliteOne 800 G1 All-in-One - Page 105
6. Remove the Torx screw (1) that secures the Mylar that covers the power button board, and then lift the Mylar from the computer (2). Power button board 95 - HP EliteOne 800 | Maintenance & Service Guide HP EliteOne 800 G1 All-in-One - Page 106
two cables (1) from the board, and then remove the Torx screw that secures the board to the computer (2). 8. Remove the power button board from the computer. To install the power button board, reverse the removal procedures. 96 Chapter 5 Removal and Replacement Procedures All-in One (AIO) Chassis - HP EliteOne 800 | Maintenance & Service Guide HP EliteOne 800 G1 All-in-One - Page 107
cover for bezel) Touch panel kit, with integrated touch glass Display panel stand (see Stand on page 37). 2. Prepare the computer for disassembly (see Preparing to disassemble the computer see Speakers on page 78). 9. Remove the power button board (see Power button board on page 94). 10. Remove the - HP EliteOne 800 | Maintenance & Service Guide HP EliteOne 800 G1 All-in-One - Page 108
NOTE: The two top, middle screws also secure the webcam. 98 Chapter 5 Removal and Replacement Procedures All-in One (AIO) Chassis - HP EliteOne 800 | Maintenance & Service Guide HP EliteOne 800 G1 All-in-One - Page 109
after you have removed the screws, the frame may stick to the bezel/display. The following image illustrates a touch model with the frame removed from the display/bezel. The following image illustrates a non-touch model with the frame removed from the display/bezel. Front bezel and display panel 99 - HP EliteOne 800 | Maintenance & Service Guide HP EliteOne 800 G1 All-in-One - Page 110
panel before sending the panel back to the supplier. 13. Separate the display panel from the bezel. 100 Chapter 5 Removal and Replacement Procedures All-in One (AIO) Chassis - HP EliteOne 800 | Maintenance & Service Guide HP EliteOne 800 G1 All-in-One - Page 111
14. If disassembling a non-touch model, the display panel cable is connected to the bottom of to correctly position the jumpers on the converter board for the installed display panel. The jumper settings are shown on a label near the converter board. CAUTION: Incorrect jumper placement can result in - HP EliteOne 800 | Maintenance & Service Guide HP EliteOne 800 G1 All-in-One - Page 112
information. Failure to do so may cause the new panel to function incorrectly. To update BIOS with the new panel model information: 1. Boot the computer. 2. Repeatedly press F10 when the monitor light turns green to access the F10 Setup utility. 3. Select Advanced, select Device Options, select LVDS - HP EliteOne 800 | Maintenance & Service Guide HP EliteOne 800 G1 All-in-One - Page 113
: 1. Prepare the computer for disassembly (see Preparing to disassemble the computer on page 35). 2. Remove the stand (see Stand on page 37). mounting plate (see VESA mounting plate on page 84). 7. Remove the power supply (see Power supply on page 86). 8. Remove the system board (see System - HP EliteOne 800 | Maintenance & Service Guide HP EliteOne 800 G1 All-in-One - Page 114
13. Remove the connector from the computer. To install the hard drive or optical drive connector, reverse the removal procedures. 104 Chapter 5 Removal and Replacement Procedures All-in One (AIO) Chassis - HP EliteOne 800 | Maintenance & Service Guide HP EliteOne 800 G1 All-in-One - Page 115
Use Computer Setup (F10) Utility to do the following: ● Change factory default settings. ● Set the system date and time. ● Set, view, change, or verify the system configuration, including settings for processor, graphics, memory, audio, storage, communications, and input devices. ● Modify the boot - HP EliteOne 800 | Maintenance & Service Guide HP EliteOne 800 G1 All-in-One - Page 116
Apply Defaults and Exit. This option will restore the original factory system defaults. NOTE: Not all settings shown in the following sections are available for all models CAUTION: Do NOT turn the computer power OFF while the BIOS is saving the Computer Setup (F10) changes because the CMOS could - HP EliteOne 800 | Maintenance & Service Guide HP EliteOne 800 G1 All-in-One - Page 117
from Removable Media Restores system configuration from a USB flash media device. Default Setup Save Current Settings as Default Saves the current system configuration settings as the default. Restore Factory Settings as Default Restores the factory system configuration settings as the default - HP EliteOne 800 | Maintenance & Service Guide HP EliteOne 800 G1 All-in-One - Page 118
Computer Setup-Storage Option Device Configuration Description Lists all installed BIOS-controlled set to User, allows you to specify the parameters (logical cylinders, heads, and sectors per track) used by the BIOS number, connector color (not included for USB CDROM). ● SSD Life Used NOTE: - HP EliteOne 800 | Maintenance & Service Guide HP EliteOne 800 G1 All-in-One - Page 119
drive data and degrade or corrupt established volumes. IDE - This is the most backwards-compatible setting of the three options. Operating systems usually do not require additional driver support in IDE mode. RAID - Allows DOS and boot access to RAID volumes. Use this mode with the RAID device - HP EliteOne 800 | Maintenance & Service Guide HP EliteOne 800 G1 All-in-One - Page 120
Shortcut to Temporarily Override Boot Order To boot one time from a device other than the default device specified in Boot Order, restart the computer and press Esc (to access the boot menu) and then F9 (Boot Order), or only F9 (skipping the boot menu) when the monitor light turns green. After POST - HP EliteOne 800 | Maintenance & Service Guide HP EliteOne 800 G1 All-in-One - Page 121
NOTE: If the setup password is set, it is required to change Computer Setup options, flash the ROM, and make changes to certain plug and play settings under Windows. Allows you to set and enable a power-on password. The power-on password prompt appears after a power cycle or reboot. If the user - HP EliteOne 800 | Maintenance & Service Guide HP EliteOne 800 G1 All-in-One - Page 122
or PCI Express slot. Default is enabled. Network Boot Enables/disables the computer's ability to boot from an operating system installed on a network server. (Feature available on NIC models only; the network controller must be either a PCI expansion card or embedded on the system board.) Default - HP EliteOne 800 | Maintenance & Service Guide HP EliteOne 800 G1 All-in-One - Page 123
in MS-DOS or Windows Safe Mode. NOTE: Most operating systems control access to the MBR of the current bootable disk; the BIOS cannot prevent changes that may occur while the operating system is running. Restores the backup Master Boot Record to the current bootable disk. Default is disabled. Only - HP EliteOne 800 | Maintenance & Service Guide HP EliteOne 800 G1 All-in-One - Page 124
) - Controls the underlying processor and chipset features needed to support a virtual appliance. Changing this setting requires turning the computer off and Factory Settings may result in significant data loss. ● Measure boot variables/devices to PCR1 - Typically, the computer measures the boot - HP EliteOne 800 | Maintenance & Service Guide HP EliteOne 800 G1 All-in-One - Page 125
request a Reset to Factory Settings of the Embedded Security Device. Support-Enable/Disable. Allows you to turn off all legacy support on the computer, including booting to DOS, running legacy graphics cards, booting to legacy devices, and so on. If set to disable, legacy boot options in Storage > Boot - HP EliteOne 800 | Maintenance & Service Guide HP EliteOne 800 G1 All-in-One - Page 126
select Restart to access the screen that lets you boot to a device or troubleshoot your computer. Computer Setup-Power NOTE: Support for specific Computer Setup options may vary depending on the hardware configuration. Table 6-4 Computer Setup-Power Option OS Power Management Description ● Idle - HP EliteOne 800 | Maintenance & Service Guide HP EliteOne 800 G1 All-in-One - Page 127
is ASPM Disabled. Network Controller - Sets ASPM of the bus. ASPM lets you set lower power modes that activate when the bus is not being used. Options are Disabled, LOs, L1, LOs and L1. Default is ASPM Disabled. USB 3.0 Controller - Sets ASPM of the bus. ASPM lets you set lower power modes that - HP EliteOne 800 | Maintenance & Service Guide HP EliteOne 800 G1 All-in-One - Page 128
POST error messages, which are error messages displayed on the monitor during the Power On Self Test if the BIOS encounters some kind of problem while starting the PC. A POST error message will only display on screen if the computer is capable of booting this far. If the POST detects an error before - HP EliteOne 800 | Maintenance & Service Guide HP EliteOne 800 G1 All-in-One - Page 129
(for advanced users) (continued) BIOS Power-On Allows you to set the computer to turn on automatically at a time you specify. Onboard Devices Allows you to set resources for or disable Legacy devices. Select the Legacy device's IRQ, DMA, and I/O Range. The settings may not take effect for all - HP EliteOne 800 | Maintenance & Service Guide HP EliteOne 800 G1 All-in-One - Page 130
Table 6-5 Computer Setup-Advanced (for advanced users) (continued) VGA Configuration Displayed only if there is an add-in video card in the system. Allows you to specify which VGA controller will be the "boot" or primary VGA controller. AMT Configuration Allows you to set: ● AMT (enable/disable - HP EliteOne 800 | Maintenance & Service Guide HP EliteOne 800 G1 All-in-One - Page 131
to the call agent, who will either schedule support or provide replacement parts. How to access and run HP PC Hardware Diagnostics - UEFI To access the UEFI diagnostics: 1. Restart or turn on the computer and press Esc repeatedly until the BIOS boot menu appears. 2. Press F2 or select Diagnostics - HP EliteOne 800 | Maintenance & Service Guide HP EliteOne 800 G1 All-in-One - Page 132
. c. Third - in the BIOS, a core set of diagnostics (for memory and hard disk drive) that are accessible only if the USB or hard disk drive versions are not detected. Downloading HP PC Hardware Diagnostics to a USB device 1. Go to http://www.hp.com. 2. Click the Support & Drivers link. 3. Select the - HP EliteOne 800 | Maintenance & Service Guide HP EliteOne 800 G1 All-in-One - Page 133
177 for more information. ● If the screen is blank, plug the monitor into a different video port on the computer if one is available. Or, replace the monitor with a monitor that you know is functioning properly. ● If you are working on a network, plug another computer with a different cable into the - HP EliteOne 800 | Maintenance & Service Guide HP EliteOne 800 G1 All-in-One - Page 134
ID number, and monitor serial number before calling. ● Spend time troubleshooting the problem with the service technician. ● Remove any hardware that was recently added to your system. ● Remove any software that was recently installed. ● Restore the system from the Recovery Disc Set that you created - HP EliteOne 800 | Maintenance & Service Guide HP EliteOne 800 G1 All-in-One - Page 135
Check the Power LED on the front of the computer to see if it is flashing red. The flashing lights are error codes that will help you diagnose the problem. Refer to Appendix A, POST error messages on page 177 for more information. ● Turn up the brightness and contrast controls of the monitor if the - HP EliteOne 800 | Maintenance & Service Guide HP EliteOne 800 G1 All-in-One - Page 136
before touching. Computer appears locked up and will not turn off when the power button is pressed. Cause Solution Software control of the power switch is not functional. 1. Press and hold the power button for at least four seconds until the computer turns off. 2. Disconnect the power cord - HP EliteOne 800 | Maintenance & Service Guide HP EliteOne 800 G1 All-in-One - Page 137
Hard drive is full. Low on memory. Solution 1. Make sure airflow to the computer is not blocked. Leave a 10.2-cm (4-inch) clearance on all vented sides of the computer and above the monitor to permit the required airflow. 2. Make sure fans are connected and working properly (some fans only operate - HP EliteOne 800 | Maintenance & Service Guide HP EliteOne 800 G1 All-in-One - Page 138
the graphics subsystem. consult the documentation that came with the application for suggestions on how to improve performance by adjusting parameters in the application. 2. Add more memory. 3. Upgrade the graphics solution. Cause unknown. Restart the computer. 128 Chapter 8 Troubleshooting - HP EliteOne 800 | Maintenance & Service Guide HP EliteOne 800 G1 All-in-One - Page 139
the rear of the power supply) is set to the appropriate voltage. Proper voltage setting depends on your region. 2. Remove the expansion cards one at a time until the 5V_aux light on the system board turns on. 3. Replace the system board. OR Press and hold the power button for less than 4 seconds - HP EliteOne 800 | Maintenance & Service Guide HP EliteOne 800 G1 All-in-One - Page 140
activated: A fan may be blocked or not turning. OR The heat sink is not properly attached to the processor. 1. Ensure that the computer air vents are not blocked and the processor cooling fan is running. 2. Open the access panel, press the power button, and see if the processor fan (or other - HP EliteOne 800 | Maintenance & Service Guide HP EliteOne 800 G1 All-in-One - Page 141
problem by removing ALL attached devices (such as hard drives or optical drives and expansion cards). Power on the system. If the system enters POST, then power off and replace one Start screen type e, and then select File Explorer from the list of applications. In the left column, expand Computer, - HP EliteOne 800 | Maintenance & Service Guide HP EliteOne 800 G1 All-in-One - Page 142
a restore kit is available, then select the File Backup Program option, and then restore the system. 3. Install system files for the appropriate operating system. Run the Computer Setup utility and enable the hard drive entry in the Storage > Boot Order list. 132 Chapter 8 Troubleshooting without - HP EliteOne 800 | Maintenance & Service Guide HP EliteOne 800 G1 All-in-One - Page 143
Solution 1. Use the task manager to close programs that do not respond. 2. Attempt the normal Windows "Shut Down" procedure. If this fails, press the power button for four or more seconds to turn off the power. To restart the computer, press the power button again. Solving hard drive problems 133 - HP EliteOne 800 | Maintenance & Service Guide HP EliteOne 800 G1 All-in-One - Page 144
card in a computer with Windows. A write-protected or locked error occurs when attempting to write to the media card. Cause Solution Media card is locked. Locking the media card is a safety feature that prevents writing to and deleting from an SD/ Memory Stick/PRO card. If using an SD card - HP EliteOne 800 | Maintenance & Service Guide HP EliteOne 800 G1 All-in-One - Page 145
After installing the media card reader and booting to Windows, the reader and the inserted cards are not recognized by the computer. Cause Solution The operating system needs time to recognize the device if the reader was just installed into the computer and you are turning the PC on for the - HP EliteOne 800 | Maintenance & Service Guide HP EliteOne 800 G1 All-in-One - Page 146
power button for more than four seconds. Otherwise, the computer will shut down and you will lose any unsaved data. Systems may have a monitor connection on both the motherboard or an add-in card. Try moving the monitor connection to a different connector on the back of the computer 1. In Control - HP EliteOne 800 | Maintenance & Service Guide HP EliteOne 800 G1 All-in-One - Page 147
feature. Dim characters. Cause The brightness and contrast controls are not set properly. Cables are not properly connected. Solution Adjust the monitor brightness and contrast controls. Check that the graphics cable is securely connected to the graphics card (if applicable) or video connector - HP EliteOne 800 | Maintenance & Service Guide HP EliteOne 800 G1 All-in-One - Page 148
Connection, Check Signal Cable" displays on screen. Cause Solution Monitor video cable is disconnected. Connect the video cable between the monitor and computer. CAUTION: Ensure that the computer power is off while connecting the video cable. 138 Chapter 8 Troubleshooting without diagnostics - HP EliteOne 800 | Maintenance & Service Guide HP EliteOne 800 G1 All-in-One - Page 149
corners of your monitor. To exit safe mode, restart your computer and let Windows start normally. High pitched noise coming from inside a flat panel monitor. Cause Solution Brightness and/or contrast settings are too high. Lower brightness and/or contrast settings. Solving display problems 139 - HP EliteOne 800 | Maintenance & Service Guide HP EliteOne 800 G1 All-in-One - Page 150
graphics card. 2. Manually synchronize the Clock and Clock Phase on- screen display functions. To download a SoftPaq that will assist you with the synchronization, go to the following Web site, select the appropriate monitor, and download either SP32347 or SP32202: http://www.hp.com/ support - HP EliteOne 800 | Maintenance & Service Guide HP EliteOne 800 G1 All-in-One - Page 151
volume control is turned down or muted. Double-click the Speaker icon on the taskbar, then make sure that Mute is not selected and use the volume slider to adjust the volume. NOTE: In Windows 8, the taskbar is available at the bottom of the Desktop screen. Audio is hidden in Computer Setup - HP EliteOne 800 | Maintenance & Service Guide HP EliteOne 800 G1 All-in-One - Page 152
Solution The application is set to use a different audio device than speakers. Some graphics cards support audio over the DisplayPort connection (if applicable), access Device Manager in Windows 8, from the Start screen, type c, select Control Panel from the list of applications, and then select - HP EliteOne 800 | Maintenance & Service Guide HP EliteOne 800 G1 All-in-One - Page 153
select which audio output device is used. The operating system controls may be set to use a different audio device as the default output device than what is expected. Solution Some graphics cards support audio over the DisplayPort connection (if applicable), so multiple audio devices may be listed - HP EliteOne 800 | Maintenance & Service Guide HP EliteOne 800 G1 All-in-One - Page 154
is not installed. The cables may not be connected properly. Printer memory may be overloaded. Solution Install the correct printer driver for the application. Reconnect all cables. Reset the printer by turning it off for one minute, then turn it back on. Printer will not print. Cause The printer - HP EliteOne 800 | Maintenance & Service Guide HP EliteOne 800 G1 All-in-One - Page 155
from Sleep date, do not hold down the power button for more than four seconds. Otherwise, the computer will shut down and you will lose any the computer (or the keyboard) and restart. Windows 8: 1. Press the Windows logo + l to open the Settings charm. 2. Use the arrow keys to select Power, and - HP EliteOne 800 | Maintenance & Service Guide HP EliteOne 800 G1 All-in-One - Page 156
repair. See the Worldwide Limited Warranty for terms and conditions. Computer is in Sleep state. Press the power button to resume from Sleep state. CAUTION: When attempting to resume from mouse cleaning kit available from most computer stores. 146 Chapter 8 Troubleshooting without diagnostics - HP EliteOne 800 | Maintenance & Service Guide HP EliteOne 800 G1 All-in-One - Page 157
hardware. In Windows, use the Add Hardware Wizard and follow the instructions that appear on the screen. To open the Add Hardware Wizard, open a Command Prompt and open hdwwiz.exe. WARNING! When the computer is plugged into an AC power source, voltage is always applied to the system board. To reduce - HP EliteOne 800 | Maintenance & Service Guide HP EliteOne 800 G1 All-in-One - Page 158
Replace third-party memory with HP memory. 4. Replace the system board. Power LED flashes Red six times, once every second, followed by a two second pause, and the computer beeps six times. (Beeps stop after fifth iteration but LEDs continue flashing.) Cause Solution Graphics card (some models - HP EliteOne 800 | Maintenance & Service Guide HP EliteOne 800 G1 All-in-One - Page 159
by removing the cards one at time (if multiple cards), then power on the system to see if fault goes away. 2. Once bad card is identified, remove and replace bad option card. 3. Replace the system board. Solving Network Problems Some common causes and solutions for network problems are listed in - HP EliteOne 800 | Maintenance & Service Guide HP EliteOne 800 G1 All-in-One - Page 160
. 5. Click the Configure button. 6. Click the Power Management tab, then select Allow this device to wake the computer. To enable Wake-on-LAN in Windows 8: 1. From the Start screen, type c, and then select Control Panel from the list of applications. 2. Select Network and Sharing Center, and - HP EliteOne 800 | Maintenance & Service Guide HP EliteOne 800 G1 All-in-One - Page 161
Manager in Windows 8, from the Start screen, type c, select Control Panel from the list of applications, and then select Device Manager. Network controller is disabled. 1. Run Computer Setup and enable network controller. 2. Enable the network controller in the operating system using Device - HP EliteOne 800 | Maintenance & Service Guide HP EliteOne 800 G1 All-in-One - Page 162
Under the Computer Setup Advanced menu, change the resource settings for the board. The network controller requires drivers. Verify that the drivers were not accidentally deleted when the drivers for a new expansion board were installed. The expansion board installed is a network card (NIC) and - HP EliteOne 800 | Maintenance & Service Guide HP EliteOne 800 G1 All-in-One - Page 163
an authorized service provider. Solving memory problems If you encounter memory problems, some common causes and solutions are listed in the following table. CAUTION: Power may still be supplied to the DIMMs when the computer is turned off (depending on the Management Engine (ME) settings). To - HP EliteOne 800 | Maintenance & Service Guide HP EliteOne 800 G1 All-in-One - Page 164
Too many Terminate and Stay Resident programs (TSRs) are installed. You have run out of memory for the application. Solution Delete any TSRs that you do not need. Check the memory requirements for the application or add more memory to the computer. 154 Chapter 8 Troubleshooting without diagnostics - HP EliteOne 800 | Maintenance & Service Guide HP EliteOne 800 G1 All-in-One - Page 165
or is bad. 1. Reseat DIMMs. Power on the system. 2. Replace DIMMs one at a time to isolate the faulty module. 3. Replace third-party memory with HP memory. 4. Replace the system board. Solving processor problems If you encounter processor problems, common causes and solutions are listed in - HP EliteOne 800 | Maintenance & Service Guide HP EliteOne 800 G1 All-in-One - Page 166
in Storage > Boot Order. Network Boot is enabled in Computer Setup. Run the Computer Setup utility and disable Network Boot in Security > Network Boot. Non-bootable CD in drive. Try a bootable CD in the drive. Boot order not correct. Run the Computer Setup utility and change boot sequence in - HP EliteOne 800 | Maintenance & Service Guide HP EliteOne 800 G1 All-in-One - Page 167
not properly seated in the drive. Solution Turn off the computer and insert a thin metal rod into screen, type c, select Control Panel from the list of applications, and then select Device Manager. 2. Restart the computer and let Windows detect the CD or DVD driver. Solving CD-ROM and DVD problems - HP EliteOne 800 | Maintenance & Service Guide HP EliteOne 800 G1 All-in-One - Page 168
USB is enabled in Storage > Boot Order. The computer boots to DOS after making a bootable flash drive. Cause Solution Flash drive is bootable. Install the flash drive only after the operating system boots. Flash drive is defective. Try a different flash drive. 158 Chapter 8 Troubleshooting - HP EliteOne 800 | Maintenance & Service Guide HP EliteOne 800 G1 All-in-One - Page 169
. 1. Turn off the computer. 2. Reconnect the device to the front of the computer and restart the computer. The device does not have power. If the USB device requires AC power, be sure one end is connected to the device and one end is connected to a live outlet. The correct device driver is not - HP EliteOne 800 | Maintenance & Service Guide HP EliteOne 800 G1 All-in-One - Page 170
UTP cable between the cable modem and the computers's RJ-45 connector. (If the connection is good, the "PC" LED light on the front of the cable Delete button. 4. Select the Cookies check box and click the Delete button. Windows 8: 1. From the Start screen, type c, and then select Control Panel - HP EliteOne 800 | Maintenance & Service Guide HP EliteOne 800 G1 All-in-One - Page 171
. ● Be sure that all the needed device drivers have been installed. ● If you have installed an operating system other than the factory-installed operating system, check to be sure it is supported on the system. If you encounter software problems, see the applicable solutions listed in the following - HP EliteOne 800 | Maintenance & Service Guide HP EliteOne 800 G1 All-in-One - Page 172
Computer will not continue after HP logo screen displays. Cause Solution System files may be damaged. In Windows 7, use recovery media to scan hard drive for errors, or use Windows Startup Repair to fix problems that might prevent Windows from starting correctly. Windows Startup Repair is one of - HP EliteOne 800 | Maintenance & Service Guide HP EliteOne 800 G1 All-in-One - Page 173
up, restoring, and recovering in Windows 8 Your computer includes tools provided by HP and Windows to help you safeguard your information and retrieve it if you ever need to. These tools will help you return your computer to a proper working state or even back to the original factory state, all - HP EliteOne 800 | Maintenance & Service Guide HP EliteOne 800 G1 All-in-One - Page 174
at the factory. NOTE: Any information on the USB flash drive will be erased before the recovery media is created. To create the recovery media, from the Start screen, type recovery drive, and then click on Settings, then click on Create a recovery drive. Follow the on-screen instructions to continue - HP EliteOne 800 | Maintenance & Service Guide HP EliteOne 800 G1 All-in-One - Page 175
personal data, apps, and settings, and reinstall Windows. The Reset recovery tool reinstalls the operating system and HP programs and drivers that were installed at the factory. Software not installed at the factory must be reinstalled. Any personal files must be restored from backups you made. See - HP EliteOne 800 | Maintenance & Service Guide HP EliteOne 800 G1 All-in-One - Page 176
PC settings screen. 4. Under Refresh your PC without affecting your files, select Get started, and follow the on-screen instructions. If Windows is not responding, use these steps to start Refresh: 1. If possible, back up all personal files. 2. If possible, check for the presence of the HP Recovery - HP EliteOne 800 | Maintenance & Service Guide HP EliteOne 800 G1 All-in-One - Page 177
. Use the arrow keys to select your USB flash drive from the UEFI Boot Sources list. Press Enter to boot from that device. 4. Choose your keyboard layout. 5. Select Troubleshoot. 6. Select Refresh your PC. 7. Follow the on-screen instructions. Backing up, restoring, and recovering in Windows 8 167 - HP EliteOne 800 | Maintenance & Service Guide HP EliteOne 800 G1 All-in-One - Page 178
keyboard key. 4. Follow the on-screen instructions. After the repair is completed and the Windows 8 desktop appears: 1. Remove the Windows 8 operating system media, and then insert the Driver Recovery media. 2. Install the Hardware Enabling Drivers first, and then install Recommended Applications - HP EliteOne 800 | Maintenance & Service Guide HP EliteOne 800 G1 All-in-One - Page 179
Backing up, restoring, and recovering in Windows 7 Your computer includes tools provided by HP and Windows to help you safeguard your information and retrieve it if you ever need to. These tools will help you return your computer to a proper working state or even back to the original factory state, - HP EliteOne 800 | Maintenance & Service Guide HP EliteOne 800 G1 All-in-One - Page 180
Start button, click All Programs, click Security and Protection, click Recovery Manager, and then click HP Recovery Media Creation. If prompted, click Yes to allow the program to continue. 3. Click Create recovery media using blank DVD(s), and then click Next. 4. Follow the on-screen instructions - HP EliteOne 800 | Maintenance & Service Guide HP EliteOne 800 G1 All-in-One - Page 181
screen instructions. When the process is complete, label the USB flash drive and store it in a secure place. Creating recovery discs with HP Recovery Disc Creator (select models only) HP models. After you successfully set up the computer, you can create recovery discs using HP Recovery Disc Creator. - HP EliteOne 800 | Maintenance & Service Guide HP EliteOne 800 G1 All-in-One - Page 182
may take over an hour, depending on file size and the speed of the computer. 1. Select Start > All Programs > Maintenance > Backup and Restore. 2. Follow the on-screen instructions to set up your backup. System Restore If you have a problem that might be due to software that you installed on your - HP EliteOne 800 | Maintenance & Service Guide HP EliteOne 800 G1 All-in-One - Page 183
instructions in Creating recovery media on page 169. If the computer is working and Windows 7 is responding, use these steps to perform a System Recovery: 1. Turn off the computer. 2. Disconnect all peripheral devices from the computer except the monitor, keyboard, and mouse. Backing up, restoring - HP EliteOne 800 | Maintenance & Service Guide HP EliteOne 800 G1 All-in-One - Page 184
3. Press the power button to turn on the computer. 4. As soon as you see the HP logo screen, repeatedly press the F11 key on your keyboard until the Windows is Loading Files... message appears on the screen. 5. At the HP Recovery Manager screen, follow the on-screen instructions to continue. 6. When - HP EliteOne 800 | Maintenance & Service Guide HP EliteOne 800 G1 All-in-One - Page 185
press and hold the power button for approximately 5 seconds or until the computer turns off. 3. Disconnect all peripheral devices from the computer except the monitor, keyboard, and mouse. 4. Press the power button to turn on the computer, and press Esc as the computer is powering on to display the - HP EliteOne 800 | Maintenance & Service Guide HP EliteOne 800 G1 All-in-One - Page 186
Enter to boot from that device. 3. When prompted, press any keyboard key. 4. Follow the on-screen instructions. 5. Click Next. 6. Select Install now. 7. Follow the on-screen instructions. After the repair is completed: 1. Eject the Windows 7 operating system DVD and then insert the Driver Recovery - HP EliteOne 800 | Maintenance & Service Guide HP EliteOne 800 G1 All-in-One - Page 187
-Test (POST) or computer restart, the probable source of the problem, and steps you can take to resolve the error condition. POST Message Disabled suppresses most system messages during POST, such as memory count and non-error text messages. If a POST error occurs, the screen will display the error - HP EliteOne 800 | Maintenance & Service Guide HP EliteOne 800 G1 All-in-One - Page 188
time or date in configuration memory. RTC (real-time clock) battery may need to be replaced. Reset the date and time under Control Panel (Computer Setup can also be used). If the problem persists, replace the RTC battery. See the Removal and Replacement section for instructions on installing a new - HP EliteOne 800 | Maintenance & Service Guide HP EliteOne 800 G1 All-in-One - Page 189
has the same amount of memory. 1. If additional memory was recently added, remove it to see if the problem remains. 2. Check product documentation for memory support information. 1. Reconnect keyboard with computer turned off. 2. Check connector for bent or missing pins. 3. Ensure that none of - HP EliteOne 800 | Maintenance & Service Guide HP EliteOne 800 G1 All-in-One - Page 190
Graphics display controller. 1. Reseat the graphics card (if applicable). 2. Clear CMOS. (See Appendix B, Password security and resetting CMOS on page 189.) 3. Verify monitor is attached and turned on. 4. Replace the graphics card (if possible). 510-Flash Screen Image Corrupted Flash Screen - HP EliteOne 800 | Maintenance & Service Guide HP EliteOne 800 G1 All-in-One - Page 191
Storage > DPS Self-test. 2. Apply hard drive firmware patch if applicable. (Available at http://www.hp.com/support.) 3. Back up contents and replace hard drive. 1796-SATA Cabling Error One or more SATA devices are improperly attached. For optimal performance, the SATA 0 and SATA 1 connectors - HP EliteOne 800 | Maintenance & Service Guide HP EliteOne 800 G1 All-in-One - Page 192
action 1. Upgrade BIOS to proper version. 2. Change the processor. 1. Reboot the computer. 2. Unplug the power cord, re-seat the memory modules, and reboot the computer. 3. If the memory configuration was recently changed, unplug the computer, restore the original memory configuration, and reboot - HP EliteOne 800 | Maintenance & Service Guide HP EliteOne 800 G1 All-in-One - Page 193
the computer. 2. If the error persists, update to the latest BIOS version. 3. If the error still persists, replace the system board. Make sure there is a memory If the error persists and system BIOS has been recently updated, restore previous system BIOS version. Otherwise, update the ME firmware - HP EliteOne 800 | Maintenance & Service Guide HP EliteOne 800 G1 All-in-One - Page 194
file has mismatch version Provisioning file contained on the USB key is 1. Reboot the computer. not a valid version for the current ME firmware. 2. If the error persists and system BIOS has been recently updated, restore previous system BIOS version. Otherwise, update the ME firmware version - HP EliteOne 800 | Maintenance & Service Guide HP EliteOne 800 G1 All-in-One - Page 195
Control panel message Network Server Mode Active and No Keyboard Attached Parity Check 2 Description Keyboard failure while Network Server Mode enabled. Parity RAM failure. Recommended action 1. Reconnect keyboard with computer turned off. 2. Check connector for bent or missing pins. 3. Ensure - HP EliteOne 800 | Maintenance & Service Guide HP EliteOne 800 G1 All-in-One - Page 196
activated: A fan may be blocked or not turning. OR The heat sink/fan assembly is not properly attached to the processor. 1. Ensure that the computer air vents are not blocked and the processor cooling fan is running. 2. Open hood, press power button, and see if the processor fan spins. If - HP EliteOne 800 | Maintenance & Service Guide HP EliteOne 800 G1 All-in-One - Page 197
computer power cord before attempting to reseat, install, or remove a DIMM module. 1. Reseat DIMMs. 2. Replace DIMMs one at a time to isolate the faulty module. 3. Replace third-party memory with HP memory. 4. Replace the system board. For systems with a graphics card: 1. Reseat the graphics card - HP EliteOne 800 | Maintenance & Service Guide HP EliteOne 800 G1 All-in-One - Page 198
. 1. Clean the MXM graphics card heat sink. 2. Replace the MXM graphics card heat sink. 3. Replace the MXM graphic card. System unable to power on. Press and hold the power button for less than 4 seconds. If the hard drive LED turns white, the power button is working correctly. Try the following - HP EliteOne 800 | Maintenance & Service Guide HP EliteOne 800 G1 All-in-One - Page 199
computer by resetting the password jumper. CAUTION: Pushing the CMOS button will reset CMOS values to factory defaults. It is important to back up the computer CMOS settings security feature in Computer Setup and you forget the setup password or the power-on password, the computer is inaccessible and - HP EliteOne 800 | Maintenance & Service Guide HP EliteOne 800 G1 All-in-One - Page 200
computer turns on, press the Esc key while "Press the ESC key for Startup Menu" message is displayed at the bottom of the screen. 3. Press the F10 key to enter Computer Setup. 4. To establish Setup password, select Security > Setup Password and follow the instructions. - or - To establish a Power - HP EliteOne 800 | Maintenance & Service Guide HP EliteOne 800 G1 All-in-One - Page 201
by briefly touching a grounded metal object. See the Safety & Regulatory Information guide for more information. 3. Remove the computer cover or access panel. CAUTION: Pushing the CMOS button will reset CMOS values to factory defaults. It is important to back up the computer CMOS settings before - HP EliteOne 800 | Maintenance & Service Guide HP EliteOne 800 G1 All-in-One - Page 202
connected. NOTE: For assistance locating the CMOS button and other system board components, see the Illustrated Parts & Service Map (IPSM). 5. Replace the computer cover or access panel. 6. Reconnect the external devices. 7. Plug in the computer and turn on power. NOTE: You will receive POST error - HP EliteOne 800 | Maintenance & Service Guide HP EliteOne 800 G1 All-in-One - Page 203
that sense the incoming voltage and automatically switch to the proper voltage. The power cord set received with the computer meets the requirements for use in the country where you purchased the equipment. Power cord sets for use in other countries must meet the requirements of the country where - HP EliteOne 800 | Maintenance & Service Guide HP EliteOne 800 G1 All-in-One - Page 204
BSI France (1) UTE United States (2) UL Germany (1) VDE 1. The flexible cord must be Type HO5VV-F, 3-conductor, 0.75mm2 conductor size. Power cord set fittings (appliance coupler and wall plug) must bear the certification mark of the agency responsible for evaluation in the country where it - HP EliteOne 800 | Maintenance & Service Guide HP EliteOne 800 G1 All-in-One - Page 205
Depth 16.8 in 20.5 in 7.7 in Approximate Weight (with stand) 19.5 lb - 22.2 lbs Temperature Range Operating ) Operating 0 - 10,000 ft Non-operating 0 - 30,000 ft Power Supply Rated Voltage Range Rated Line Frequency Max Operating Power 42.6 cm 52.2 cm 19.6 cm 8.83 kg - 10.08 kg - HP EliteOne 800 | Maintenance & Service Guide HP EliteOne 800 G1 All-in-One - Page 206
80 spare part numbers 23 converter board cable spare part number 17 country power cord set requirements 194 Customer Support 123 D deleted files restoring for Windows 8 computer models 165 display panel removing 97 spare part number 13, 97 drive 2.5-inch, installing 46 2.5-inch, removing 44 optical - HP EliteOne 800 | Maintenance & Service Guide HP EliteOne 800 G1 All-in-One - Page 207
card reader problems 134 memory problems 153 memory module removing 52 spare part numbers 17, 18 monitor problems 135 O opening the computer 35 power-on 189 setup 189 POST error messages 177 power button board spare part number 17, 23, 94 power button board cable spare part number 17 power cord set - HP EliteOne 800 | Maintenance & Service Guide HP EliteOne 800 G1 All-in-One - Page 208
131 hardware installation 147 Internet access 159 keyboard 144 Media Card Reader 134 memory 153 monitor 135 mouse 144 network 149 power 130 printer 143 processor 155 software 161 processor spare part numbers 17 processor problems 155 R rear components 5 rear I/O cover removing 36 spare part number - HP EliteOne 800 | Maintenance & Service Guide HP EliteOne 800 G1 All-in-One - Page 209
Windows 8 computer models 165 system restore points, creating Windows 7 169 System Restore, Windows 7 172 T tamper-proof screws tool 32 temperature control 29 thermal module removing 63 thermal module, spare part number 14, 24 tilt adjustment 8 tilt/swivel stand removing 39 tools, servicing 32 top
-
 1
1 -
 2
2 -
 3
3 -
 4
4 -
 5
5 -
 6
6 -
 7
7 -
8
-
9
-
10
-
11
-
12
-
13
-
14
-
15
-
16
-
17
-
18
-
19
-
20
-
21
-
22
-
23
-
24
-
25
-
26
-
27
-
28
-
29
-
30
-
31
-
32
-
33
-
34
-
35
-
36
-
37
-
38
-
39
-
40
-
41
-
42
-
43
-
44
-
45
-
46
-
47
-
48
-
49
-
50
-
51
-
52
-
53
-
54
-
55
-
56
-
57
-
58
-
59
-
60
-
61
-
62
-
63
-
64
-
65
-
66
-
67
-
68
-
69
-
70
-
71
-
72
-
73
-
74
-
75
-
76
-
77
-
78
-
79
-
80
-
81
-
82
-
83
-
84
-
85
-
86
-
87
-
88
-
89
-
90
-
91
-
92
-
93
-
94
-
95
-
96
-
97
-
98
-
99
-
100
-
101
-
102
-
103
-
104
-
105
-
106
-
107
-
108
-
109
-
110
-
111
-
112
-
113
-
114
-
115
-
116
-
117
-
118
-
119
-
120
-
121
-
122
-
123
-
124
-
125
-
126
-
127
-
128
-
129
-
130
-
131
-
132
-
133
-
134
-
135
-
136
-
137
-
138
-
139
-
140
-
141
-
142
-
143
-
144
-
145
-
146
-
147
-
148
-
149
-
150
-
151
-
152
-
153
-
154
-
155
-
156
-
157
-
158
-
159
-
160
-
161
-
162
-
163
-
164
-
165
-
166
-
167
-
168
-
169
-
170
-
171
-
172
-
173
-
174
-
175
-
176
-
177
-
178
-
179
-
180
-
181
-
182
-
183
-
184
-
185
-
186
-
187
-
188
-
189
-
190
-
191
-
192
-
193
-
194
-
195
-
196
-
197
-
198
-
199
-
200
-
201
-
202
-
203
-
204
-
205
-
206
-
207
-
208
-
209
 |
 |

Maintenance & Service Guide
HP EliteOne 800 G1 All-in-One