HP Indigo 10000 HD Writing Head Service Document - Page 31
Make sure that the WH is flat on the mounting springs cover as shown below
 |
View all HP Indigo 10000 manuals
Add to My Manuals
Save this manual to your list of manuals |
Page 31 highlights
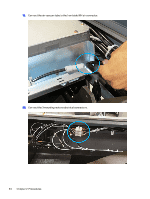
8. Lower the writing head slowly over the mounting pins until the WH sits on the mounts. 9. When the WH is in place, visually inspect the 3 mounting motors. Verify that the WH is fully seated on the mounting brackets and that the WH is not seated on any electrical cables or air tubes. 10. Make sure that the WH is flat on the mounting springs cover as shown below: Installing the HD writing head 29
-
 1
1 -
2
-
3
-
4
-
5
-
6
-
7
-
8
-
9
-
10
-
11
-
12
-
13
-
14
-
15
-
16
-
17
-
18
-
19
-
20
-
21
-
22
-
23
-
24
-
25
-
 26
26 -
 27
27 -
 28
28 -
 29
29 -
 30
30 -
 31
31 -
 32
32 -
 33
33 -
 34
34 -
 35
35 -
 36
36 -
37
-
38
-
39
-
40
-
41
-
42
-
43
-
44
-
45
-
46
-
47
-
48
-
49
-
50
-
51
-
52
-
53
-
54
-
55
-
56
-
57
-
58
-
59
-
60
-
61
-
62
-
63
-
64
-
65
-
66
-
67
-
68
-
69
-
70
-
71
-
72
-
73
-
74
-
75
-
76
-
77
-
78
-
79
-
80
-
81
-
82
-
83
-
84
-
85
-
86
-
87
-
88
-
89
-
90
-
91
-
92
-
93
-
94
-
95
-
96
-
97
-
98
-
99
-
100
-
101
-
102
-
103
-
104
-
105
 |
 |

8.
Lower the writing head slowly over the mounting pins until the WH sits on the mounts.
9.
When the WH is in place, visually inspect the 3 mounting motors. Verify that the WH is fully seated
on the mounting brackets and that the WH is not seated on any electrical cables or air tubes.
10.
Make sure that the WH is flat on the mounting springs cover as shown below:
Installing the HD writing head
29